Representational state transfer (REST) or RESTful web services provide a way to exchange data between applications or systems on the Internet. RESTful web service also refers as RESTful API, uses HTTP request to GET, PUT, POST and DELETE data across platforms. In present days, RESTful API is an essential component of the web application.
When the CodeIgniter application requires communicating with another application, RESTful API is needed to integrate into CodeIgniter. Using RESTful API in CodeIgniter, you can exchange data between different applications or platform. This tutorial shows RESTful server implementation for CodeIgniter and you will learn how to create RESTful web services in CodeIgniter.
To demonstrate CodeIgniter REST API, we will implement CRUD operations in CodeIgniter web service. The following tasks will be performed to create a simple REST API in CodeIgniter.
- Setup RESTful library for CodeIgniter.
- Create API method to fetch the user information via GET request.
- Create API methods to add, edit, and delete user information via POST, PUT, and DELETE request.
- Interact with the CodeIgniter Rest API using PHP cURL.
- Test HTTP calls with Google Chrome Postman extension.
Before you get started, take a look the files structure of CodeIgniter REST API.

Create Database Tables
To store user’s information, a table needs to be created in the database. The following SQL creates a users table with some basic fields in MySQL database.
CREATE TABLE `users` (
 `id` int(11) NOT NULL AUTO_INCREMENT,
 `first_name` varchar(100) COLLATE utf8_unicode_ci NOT NULL,
 `last_name` varchar(100) COLLATE utf8_unicode_ci NOT NULL,
 `email` varchar(255) COLLATE utf8_unicode_ci NOT NULL,
 `phone` varchar(20) COLLATE utf8_unicode_ci NOT NULL,
 `created` datetime NOT NULL,
 `modified` datetime NOT NULL,
 `status` enum('1','0') COLLATE utf8_unicode_ci NOT NULL,
 PRIMARY KEY (`id`)
) ENGINE=InnoDB DEFAULT CHARSET=utf8 COLLATE=utf8_unicode_ci;

The following SQL creates a keys table to store REST API key for authentication.
CREATE TABLE `keys` (
 `id` int(11) NOT NULL AUTO_INCREMENT,
 `user_id` int(11) NOT NULL,
 `key` varchar(40) NOT NULL,
 `level` int(2) NOT NULL,
 `ignore_limits` tinyint(1) NOT NULL DEFAULT '0',
 `is_private_key` tinyint(1) NOT NULL DEFAULT '0',
 `ip_addresses` text,
 `date_created` datetime NOT NULL,
 PRIMARY KEY (`id`)
) ENGINE=InnoDB DEFAULT CHARSET=utf8;

Now insert an API key in keys table, which will be used on API call.
INSERT INTO `keys` (`id`, `user_id`, `key`, `level`, `ignore_limits`, `is_private_key`, `ip_addresses`, `date_created`) VALUES
(1, 0, 'CODEX@123', 0, 0, 0, NULL, '2017-10-12 13:34:33');
CodeIgniter REST Controller Setup
We will use CodeIgniter REST_Controller to build RESTful web services in CodeIgniter. Follow the below steps to setup REST Controller Library in your CodeIgniter application.
- Download REST config file and place in the
application/config/directory.
Open theapplication/config/rest.phpfile and setup the following configuration.- Set REST login username and password.
$config['rest_valid_logins'] = ['admin' => '1234'];
- Enable REST API key.
$config['rest_enable_keys'] = TRUE;
- Set REST login username and password.
- Download REST_Controller file and place in the
application/libraries/directory. - Download Format class file and place in the
application/libraries/directory. - Download Language file and place in the
application/language/english/directory.
Note that: All the required library files are included in our example CodeIgniter application, so, you don’t need to download these files separately. Download our source code to get sample CodeIgniter RESTful Web service application.
Create Model
Open the application/models/ directory and create User.php file and add the following code to handle the database related works.
The User model has the following methods to fetch, insert, update, and delete user data in the database.
- __construct() – Load the database library.
- getRows() – Fetch the user data from the
userstable and returns single row or multiple rows. - insert() – Insert user data in the
userstable. - user_put() – Update user data in the
userstable based on the given ID. - user_delete() – Delete user from the
userstable based on the given ID.
load->database();
    }

    /*
     * Fetch user data
     */
    function getRows($id = ""){
        if(!empty($id)){
            $query = $this->db->get_where('users', array('id' => $id));
            return $query->row_array();
        }else{
            $query = $this->db->get('users');
            return $query->result_array();
        }
    }

    /*
     * Insert user data
     */
    public function insert($data = array()) {
        if(!array_key_exists('created', $data)){
            $data['created'] = date("Y-m-d H:i:s");
        }
        if(!array_key_exists('modified', $data)){
            $data['modified'] = date("Y-m-d H:i:s");
        }
        $insert = $this->db->insert('users', $data);
        if($insert){
            return $this->db->insert_id();
        }else{
            return false;
        }
    }

    /*
     * Update user data
     */
    public function update($data, $id) {
        if(!empty($data) && !empty($id)){
            if(!array_key_exists('modified', $data)){
                $data['modified'] = date("Y-m-d H:i:s");
            }
            $update = $this->db->update('users', $data, array('id'=>$id));
            return $update?true:false;
        }else{
            return false;
        }
    }

    /*
     * Delete user data
     */
    public function delete($id){
        $delete = $this->db->delete('users',array('id'=>$id));
        return $delete?true:false;
    }

}
?>
Create API Controller
It’s always a good idea to group all API controllers in a separate folder for better usability. So, create an api/ folder in application/controllers/ directory to place the controller which will be used for API call.
Open the application/controllers/api/ directory and create Example.php file. At first, include the REST Controller library and add the following code.
The Example API controller has the following methods to handle the GET, POST, PUT, and DELETE request.
- __construct() – Load the User model.
- user_get() – Return the user data from database. If the ID parameter doesn’t exist, it returns all the rows otherwise single row will be returned.
- user_post() – Add user data to the database.
- user_put() – Update the user data in the database based on the ID.
- user_delete() – Delete the user from the database based on the ID.
load->model('user');
    }

    public function user_get($id = 0) {
        //returns all rows if the id parameter doesn't exist,
        //otherwise single row will be returned
        $users = $this->user->getRows($id);

        //check if the user data exists
        if(!empty($users)){
            //set the response and exit
            $this->response($users, REST_Controller::HTTP_OK);
        }else{
            //set the response and exit
            $this->response([
                'status' => FALSE,
                'message' => 'No user were found.'
            ], REST_Controller::HTTP_NOT_FOUND);
        }
    }

    public function user_post() {
        $userData = array();
        $userData['first_name'] = $this->post('first_name');
        $userData['last_name'] = $this->post('last_name');
        $userData['email'] = $this->post('email');
        $userData['phone'] = $this->post('phone');
        if(!empty($userData['first_name']) && !empty($userData['last_name']) && !empty($userData['email']) && !empty($userData['phone'])){
            //insert user data
            $insert = $this->user->insert($userData);

            //check if the user data inserted
            if($insert){
                //set the response and exit
                $this->response([
                    'status' => TRUE,
                    'message' => 'User has been added successfully.'
                ], REST_Controller::HTTP_OK);
            }else{
                //set the response and exit
                $this->response("Some problems occurred, please try again.", REST_Controller::HTTP_BAD_REQUEST);
            }
        }else{
            //set the response and exit
            $this->response("Provide complete user information to create.", REST_Controller::HTTP_BAD_REQUEST);
        }
    }

    public function user_put() {
        $userData = array();
        $id = $this->put('id');
        $userData['first_name'] = $this->put('first_name');
        $userData['last_name'] = $this->put('last_name');
        $userData['email'] = $this->put('email');
        $userData['phone'] = $this->put('phone');
        if(!empty($id) && !empty($userData['first_name']) && !empty($userData['last_name']) && !empty($userData['email']) && !empty($userData['phone'])){
            //update user data
            $update = $this->user->update($userData, $id);

            //check if the user data updated
            if($update){
                //set the response and exit
                $this->response([
                    'status' => TRUE,
                    'message' => 'User has been updated successfully.'
                ], REST_Controller::HTTP_OK);
            }else{
                //set the response and exit
                $this->response("Some problems occurred, please try again.", REST_Controller::HTTP_BAD_REQUEST);
            }
        }else{
            //set the response and exit
            $this->response("Provide complete user information to update.", REST_Controller::HTTP_BAD_REQUEST);
        }
    }

    public function user_delete($id){
        //check whether post id is not empty
        if($id){
            //delete post
            $delete = $this->user->delete($id);

            if($delete){
                //set the response and exit
                $this->response([
                    'status' => TRUE,
                    'message' => 'User has been removed successfully.'
                ], REST_Controller::HTTP_OK);
            }else{
                //set the response and exit
                $this->response("Some problems occurred, please try again.", REST_Controller::HTTP_BAD_REQUEST);
            }
        }else{
            //set the response and exit
            $this->response([
                'status' => FALSE,
                'message' => 'No user were found.'
            ], REST_Controller::HTTP_NOT_FOUND);
        }
    }
}

?>
Interacting with CodeIgniter RESTful Web Services
Now it’s time to interact with the CodeIgniter RESTful Web Services. The cURL is the most flexible and easiest way to interact with a REST API. In the following example code, we will show you how to send GET, POST, PUT and DELETE request to CodeIgniter REST API using PHP cURL. Also, HTTP Basic authentication and API key will be used to connect with RESTful API.
Retrieve User Data via REST API
The following code performs a GET request to fetch the user data via RESTful Web Services (Example API).
//API URL
$url = 'http://localhost/codeigniter/api/example/user/';

//API key
$apiKey = 'CODEX@123';

//Auth credentials
$username = "admin";
$password = "1234";

//create a new cURL resource
$ch = curl_init($url);

curl_setopt($ch, CURLOPT_TIMEOUT, 30);
curl_setopt($ch, CURLOPT_RETURNTRANSFER,1);
curl_setopt($ch, CURLOPT_HTTPAUTH, CURLAUTH_ANY);
curl_setopt($ch, CURLOPT_HTTPHEADER, array("X-API-KEY: " . $apiKey));
curl_setopt($ch, CURLOPT_USERPWD, "$username:$password");

$result = curl_exec($ch);

//close cURL resource
curl_close($ch);
Insert User Data via REST API
The following code performs a POST request to insert user data via RESTful Web Services (Example API).
//API URL
$url = 'http://localhost/codeigniter/api/example/user/';

//API key
$apiKey = 'CODEX@123';

//Auth credentials
$username = "admin";
$password = "1234";

//user information
$userData = array(
    'first_name' => 'John',
    'last_name' => 'Doe',
    'email' => 'john@example.com',
    'phone' => '123-456-7890'
);

//create a new cURL resource
$ch = curl_init($url);

curl_setopt($ch, CURLOPT_TIMEOUT, 30);
curl_setopt($ch, CURLOPT_RETURNTRANSFER,1);
curl_setopt($ch, CURLOPT_HTTPAUTH, CURLAUTH_ANY);
curl_setopt($ch, CURLOPT_HTTPHEADER, array("X-API-KEY: " . $apiKey));
curl_setopt($ch, CURLOPT_USERPWD, "$username:$password");
curl_setopt($ch, CURLOPT_POST, 1);
curl_setopt($ch, CURLOPT_POSTFIELDS, $userData);

$result = curl_exec($ch);

//close cURL resource
curl_close($ch);
Update User Data via REST API
The following code performs a PUT request to update user data via RESTful Web Services (Example API).
//API URL
$url = 'http://localhost/codeigniter/api/example/user/';

//API key
$apiKey = 'CODEX@123';

//Auth credentials
$username = "admin";
$password = "1234";

//user information
$userData = array(
    'id' => 2,
    'first_name' => 'John2',
    'last_name' => 'Doe2',
    'email' => 'john2@example.com',
    'phone' => '098-765-4321'
);

//create a new cURL resource
$ch = curl_init($url);

curl_setopt($ch, CURLOPT_TIMEOUT, 30);
curl_setopt($ch, CURLOPT_RETURNTRANSFER,1);
curl_setopt($ch, CURLOPT_HTTPAUTH, CURLAUTH_ANY);
curl_setopt($ch, CURLOPT_HTTPHEADER, array('X-API-KEY: '.$apiKey, 'Content-Type: application/x-www-form-urlencoded'));
curl_setopt($ch, CURLOPT_USERPWD, "$username:$password");
curl_setopt($ch, CURLOPT_CUSTOMREQUEST, "PUT");
curl_setopt($ch, CURLOPT_POSTFIELDS, http_build_query($userData));

$result = curl_exec($ch);

//close cURL resource
curl_close($ch);
Delete User Data via REST API
The following code performs a DELETE request to delete user data via RESTful Web Services (Example API).
//API URL
$url = 'http://localhost/codeigniter/api/example/user/2';

//API key
$apiKey = 'CODEX@123';

//Auth credentials
$username = "admin";
$password = "1234";

//create a new cURL resource
$ch = curl_init($url);

curl_setopt($ch, CURLOPT_TIMEOUT, 30);
curl_setopt($ch, CURLOPT_RETURNTRANSFER,1);
curl_setopt($ch, CURLOPT_HTTPAUTH, CURLAUTH_ANY);
curl_setopt($ch, CURLOPT_HTTPHEADER, array("X-API-KEY: " . $apiKey));
curl_setopt($ch, CURLOPT_USERPWD, "$username:$password");
curl_setopt($ch, CURLOPT_CUSTOMREQUEST, 'DELETE');

$result = curl_exec($ch);

//close cURL resource
curl_close($ch);
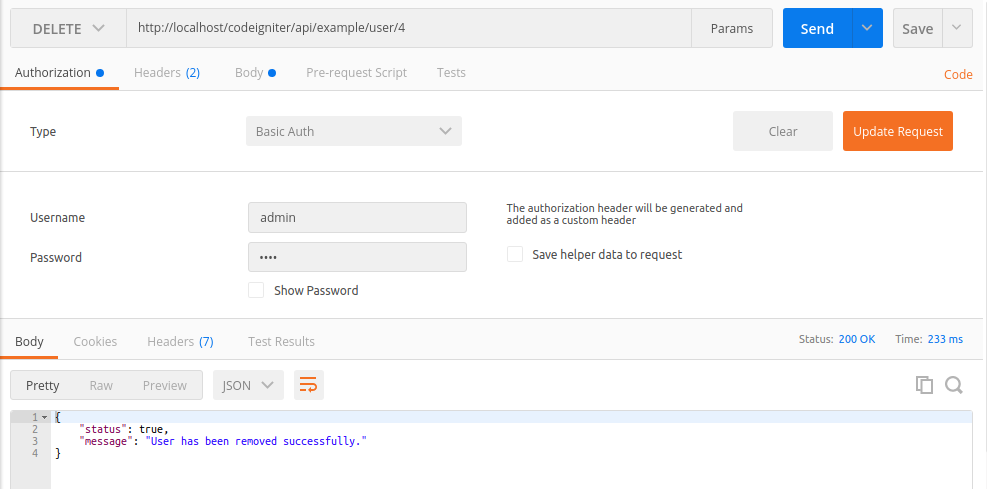
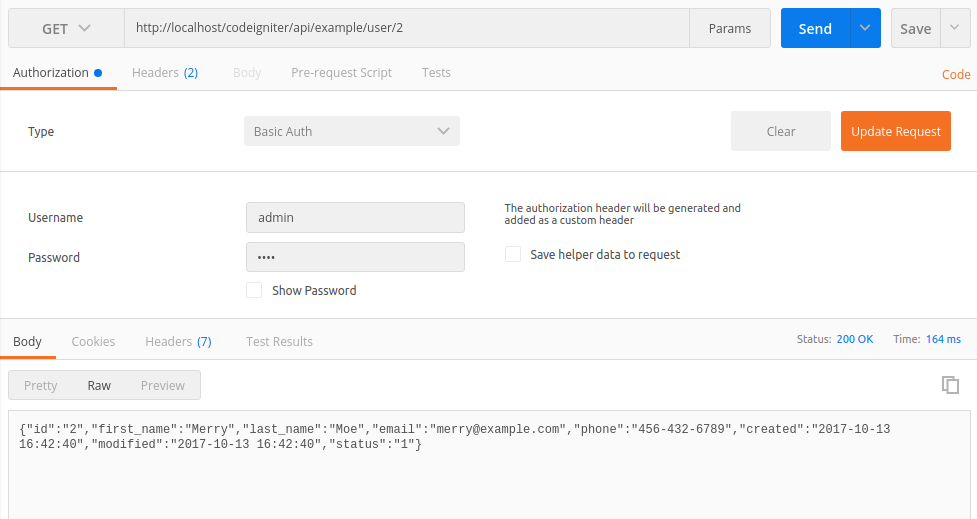
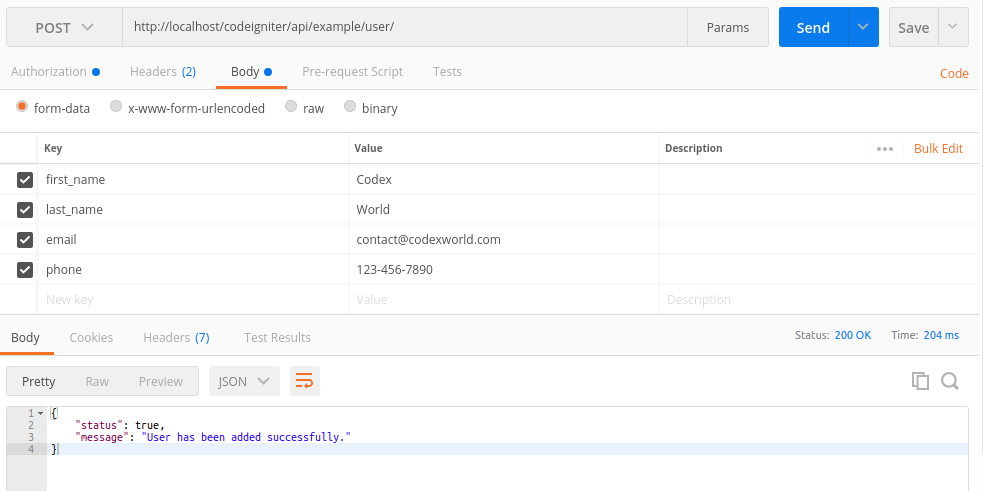
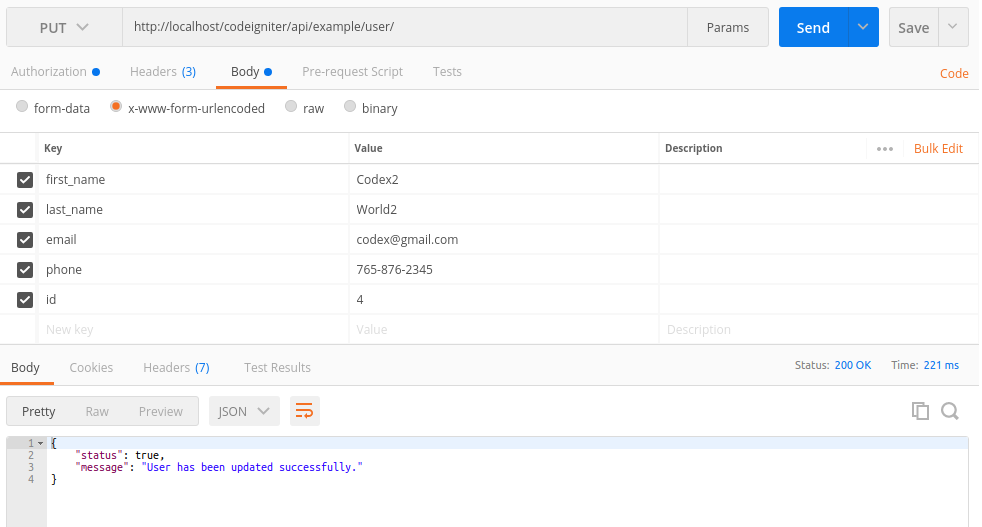
Test HTTP calls with Postman Extension
Postman Extension makes API development faster, easier, and better. Install Postman Extension for testing the API call.
- Get all users data:
GET http://localhost/codeigniter/api/example/user/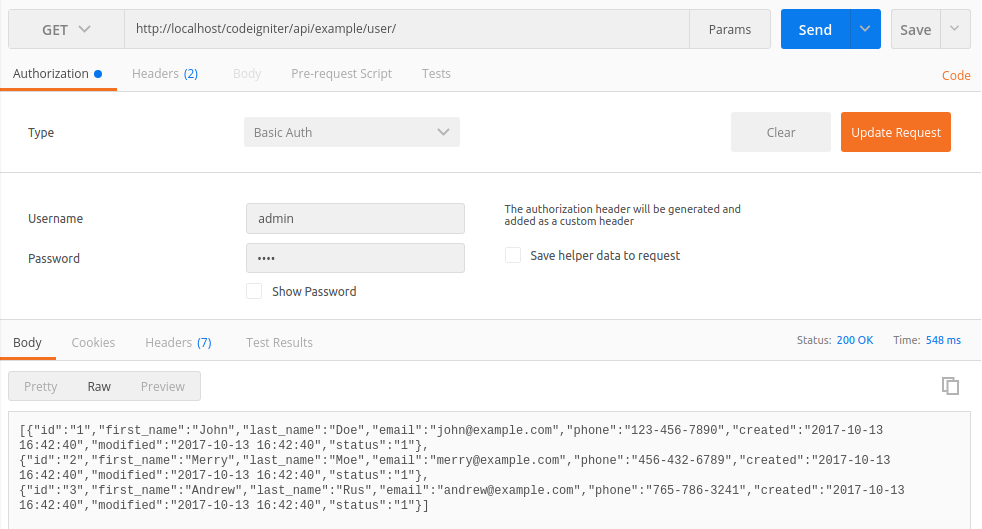
- Get single user data:
GET http://localhost/codeigniter/api/example/user/4 -
- Add user data in the database:
POST http://localhost/codeigniter/api/example/user/
Update user data in the database: PUT http://localhost/codeigniter/api/example/user/
Delete user from the database: DELETE http://localhost/codeigniter/api/example/user/4