With Red Hat officially ending support for CentOS 8, users are forced to migrate to a different operating system. While CentOS 7 remains supported till end of 2024, the life cycle of the newer CentOS 8 was cut short by Red Hat for the end of 2021. Red Hat’s decision to end the CentOS 8 support remains highly controversial in the Linux community and it has stirred a lot of criticism. While the EOL of CentoOS 8 is a fact, we’re going to focus on recommending reasonable alternatives that can swiftly replace no longer supported CentOS 8.
Alternatives to CentOS 8
If your server runs CentOS, then the natural solution seems to migrate to other distribution based on Red Hat Enterprise Linux (RHEL) code. Migrating to one of the recommended RHEL derivatives will ensure a seamless experience and uninterrupted performance regardless of what you run on the server. We describe 4 RHEL derivatives in this article:
• AlmaLinux
• Rocky Linux
• Oracle Linux
• CentOS Stream
All of them aim to be 100% binary compatible with the original CentOS, meaning your current projects running on CentOS should run on each of them in the same way. From a technical perspective and from user’s experience, there is not much of a difference between the original CentOS 8 and the above-mentioned distributions.
The decision on which distribution to migrate is less about the functionality of the operating system and more about how it’s developed and maintained. Some of the alternatives are free community projects, while others are backed by large-scale commercial businesses.
AlmaLinux
First distribution we will cover is AlmaLinux, an increasingly popular semi-commercial project.
AlmaLinux is developed as a direct successor for CentOS. It is the binary equivalent to CentOS 8. But unlike Rocky Linux, the development is run by a private company. CloudLinux is a company that founded and funded the AlmaLinux OS foundation. CloudLinux invested approximately $1 million to develop AlmaLinux, after Red Hat announced discontinued support for CentOS 8. The combination of private funding and a strong community makes this distribution very promising.
When Red Hat announced the end of support for CentOS 8, one of the co-founders of the original CentOS operating system stepped in. Henry Kurtzer founded CentOS together with his colleague Rocky McGaugh in 2004. When Kurtzer decided to start working on a new substitute for CentOS, he named the new operating system after the late Rocky McGaugh. As all other alternatives mentioned in this article, the Rocky Linux distribution is based on the RHEL code, which means there are only marginal differences in code in comparison to CentOS.
Rocky Linux is an independent project with a free community support. The stable release 8.4 was released in June 2021 under the codename “Green Obsidian”. From all mentioned distributions, this is the youngest distribution, and one that is still under construction.
Since mid-2021, Henry Kurtzer has been offering paid support plans via his CIQ company, trying to offer “enterprise-grade” services . Still, the Rocky Linux distribution is at heart a community project preserving the original open-source spirit.
Key features:
Active community
Lead by CentOS founder
Slower release cycle
Young project
Plesk / cPanel support is missing
CentOS Stream
CentOS Stream is an alternative to CentOS 8 that comes directly from Red Hat. The main difference is that it has a different release cycle than other CentOS8 alternatives. It’s a rolling release of the RHEL, meaning that there are almost constant updates with all the newest developments in the code of the core, libraries and applications:
On one hand this means access to the newest software very quickly, on the other hand there is a higher risk of compatibility issues. It is a great idea for a development sandbox, but not necessarily for a production system.
Key features:
Backed by a renowned company
Constantly Updated
Oracle Linux
One of the less mentioned alternatives is using Linux from Oracle. Like all other alternatives, Oracle’s Linux is 100 percent binary compatible with the original Red Hat distribution. And that makes it also very close to the CentOS distribution – Oracle ensures that their Linux is fully compatible with existing CentOS 8 apps.
The biggest advantage of Oracle Linux is obvious – the support of one of the most prominent IT companies. The customer support isn’t free, but everything else is. Some users also consider as an advantage the possibility to perform updates via the yum server.
On the other hand, many users are now discouraged from using Linux distributions developed by corporations. They argue that after Red Hat discontinued support of CentOS, Oracle Linux can end up doing the same. But at least for now, the Oracle Linux remains a perfectly viable alternative, especially if you can afford their support.
Key Features:
Backed by a renowned company
Contabo Recommendation
All distributions mentioned above are very close to the original CentOS 8. Developers of all mentioned distributions also made it easy to migrate using just a few commands.
Your decision which alternative to use should be based on who stands behind each project. Do you trust an open community like Rocky Linux or are you more keen on projects backed by big corporations like Oracle?
If we were to recommend just one distribution, it would undoubtedly be AlmaLinux. It has the stability thanks to the backing of CloudLinux and the energy coming from the community. That’s why we recommend AlmaLinux as a safe bet for CentOS 8 users.
How to Migrate from CentOS 8
Video Guide
Below, you will find a brief description of the migration process for AlmaLinux, Rocky Linux, CentOS Stream and Oracle Linux.
Don’t forget to back up your data before performing the migration. If you don’t care about the data on the instance, you can simply reinstall the virtual machine without performing a migration. Contabo customers can do this in Contabo Customer Panel and choose AlmaLinux, Rocky Linux or CentOS Stream.
First, log in to your instance using SSH. Also, please make sure you have sufficient admin rights first. The easiest way how to avoid admin rights issues is to enter the command sudo -i at the beginning of each session: sudo -i
How to migrate from CentOS 8 to AlmaLinux
Before migrating, update your current distribution by running this command: dnf update
Download the distribution from GitHub using curl -O https://raw.githubusercontent.com/AlmaLinux/almalinux-deploy/master/almalinux-deploy.sh
Assign all necessary permissions to the script: chmod +x almalinux-deploy.sh
Now run the script by typing ./almalinux-deploy.sh
And finally reboot
How to migrate from CentOS 8 to Rocky Linux
Before migrating, update your current distribution by running this command: dnf update
Rocky Linux developers have created a script called migrate2rocky. To obtain the distribution, just download it using this command: curl -O https://raw.githubusercontent.com/rocky-linux/rocky-tools/main/migrate2rocky/migrate2rocky.sh
When the file has been finished downloading, give the script all necessary permissions by chmod u+x migrate2rocky.sh
Now execute the script itself: ./migrate2rocky.sh -r
And finally reboot
How to migrate from CentOS 8 to CentOS Stream
Before migrating, update your current distribution by running this command: dnf update
Start the installation by typing: dnf install centos-release-stream
After the installation is done, you have to change the repository for CentOS Stream: dnf swap centos-linux-repos centos-stream-repos
And at last, let’s sync all your existing packages with the new distribution: dnf distro-sync
and finally reboot
How to Migrate From CentOS 8 to Oracle Linux
Before migrating, update your current distribution by running this command: dnf update
Download the distribution from GitHub: curl -O https://raw.githubusercontent.com/oracle/centos2ol/main/centos2ol.sh
Now run this command to replace your CentOS 8 with the Oracle: ./centos2ol.sh
For an introduction to Git and how to install, please refer to the introduction tutorial.
This article will teach you how to use Git when you want to deploy your application. While there are many ways to use Git to deploy our application, this tutorial will focus on the one that is most straightforward. I assume you already know how to create and use a repository on your local machine. If not, please refer to this tutorial.
When you use Git, the workflow generally is toward version control only. You have a local repository where you work and a remote repository where you keep everything in sync and can work with a team and different machines. But you can also use Git to move your application to production.
Server Setup
Our fictitious workspace:
Your server live directory: /var/www/html
Your server repository: /var/www/site.git
What should we do if we want to push to site.git and at the same time make all the content available at /var/www/html?
To create our repository:
On /var/www/site.git we execute sudo git config –global init.defaultBranch main and right after sudo git init –bare
You will see a few files and folders, including the ‘hooks’ folder. So let’s go to ‘hooks’ folder:
If you have a huge site, chances are you also do a lot of data processing – imports, exports, calculations etc.
These kind of batch processing jobs that max out the CPU and disk are the mortal enemy of real-time transactions. Your web visitors demand real-time interaction and fast response from your site, so if you are running imports and maxing out your CPU and disk on the same server hosting your web traffic then your users are regularly going to encounter slowness. This leads to loss of interest from your visitors, loss of sales and loss of SEO rank.
Ultimately, to solve this, once you have exhausted scaling up, you need to architect a better solution.
Scaling Up WordPress – check before building your cluster!
If you are considering building a cluster, it means you think you can’t get more speed from a single server. If you have not yet used our Super Speedy Pack yet then you should definitely try that before building a cluster. We built our Super Speedy Pack to solve search, filtering and underlying scalability issues exhibited in WordPress and WooCommerce.
It is not uncommon for customers with large sites to get 10x or more speed boost from our Super Speedy Plugin pack so prior to building your cluster, check out our Super Speedy Plugin pack.
Scaling Out with a WordPress Cluster
You need to separate the batch processing from the realtime stuff. That means you need a minimum of 2 servers. 1 server processes all the data imports, exports, calculations, category counts, etc – the data is replicated to the 2nd server and that server serves your web traffic.
If you’re going to the bother of getting 2 servers, you’re better off going further and getting 3 servers. It’s very little extra hassle and then gives you the ability to have 3 servers online at once with no batch processing, or 1 or 2 of the servers handling batch processing and the remaining ones serving web traffic.
Using this model, you can also easily switch servers offline to upgrade them without interrupting visitors to your website. That means you can be online 100% of the time!
Note that this setup technically uses 4 servers – the 4th server being a load balancer. Instead of this server, you could use the Digital Ocean load balancer feature/server instead but I provide details below for installing this easily.
If you’re looking at building a cluster for more speed, you may find our plugin pack will help give you the speed boost you need.
Step by step guide to building your cluster
This is the guide I use to install these clusters, so hopefully it helps some of you out there who wish to go huge with your WordPress sites.
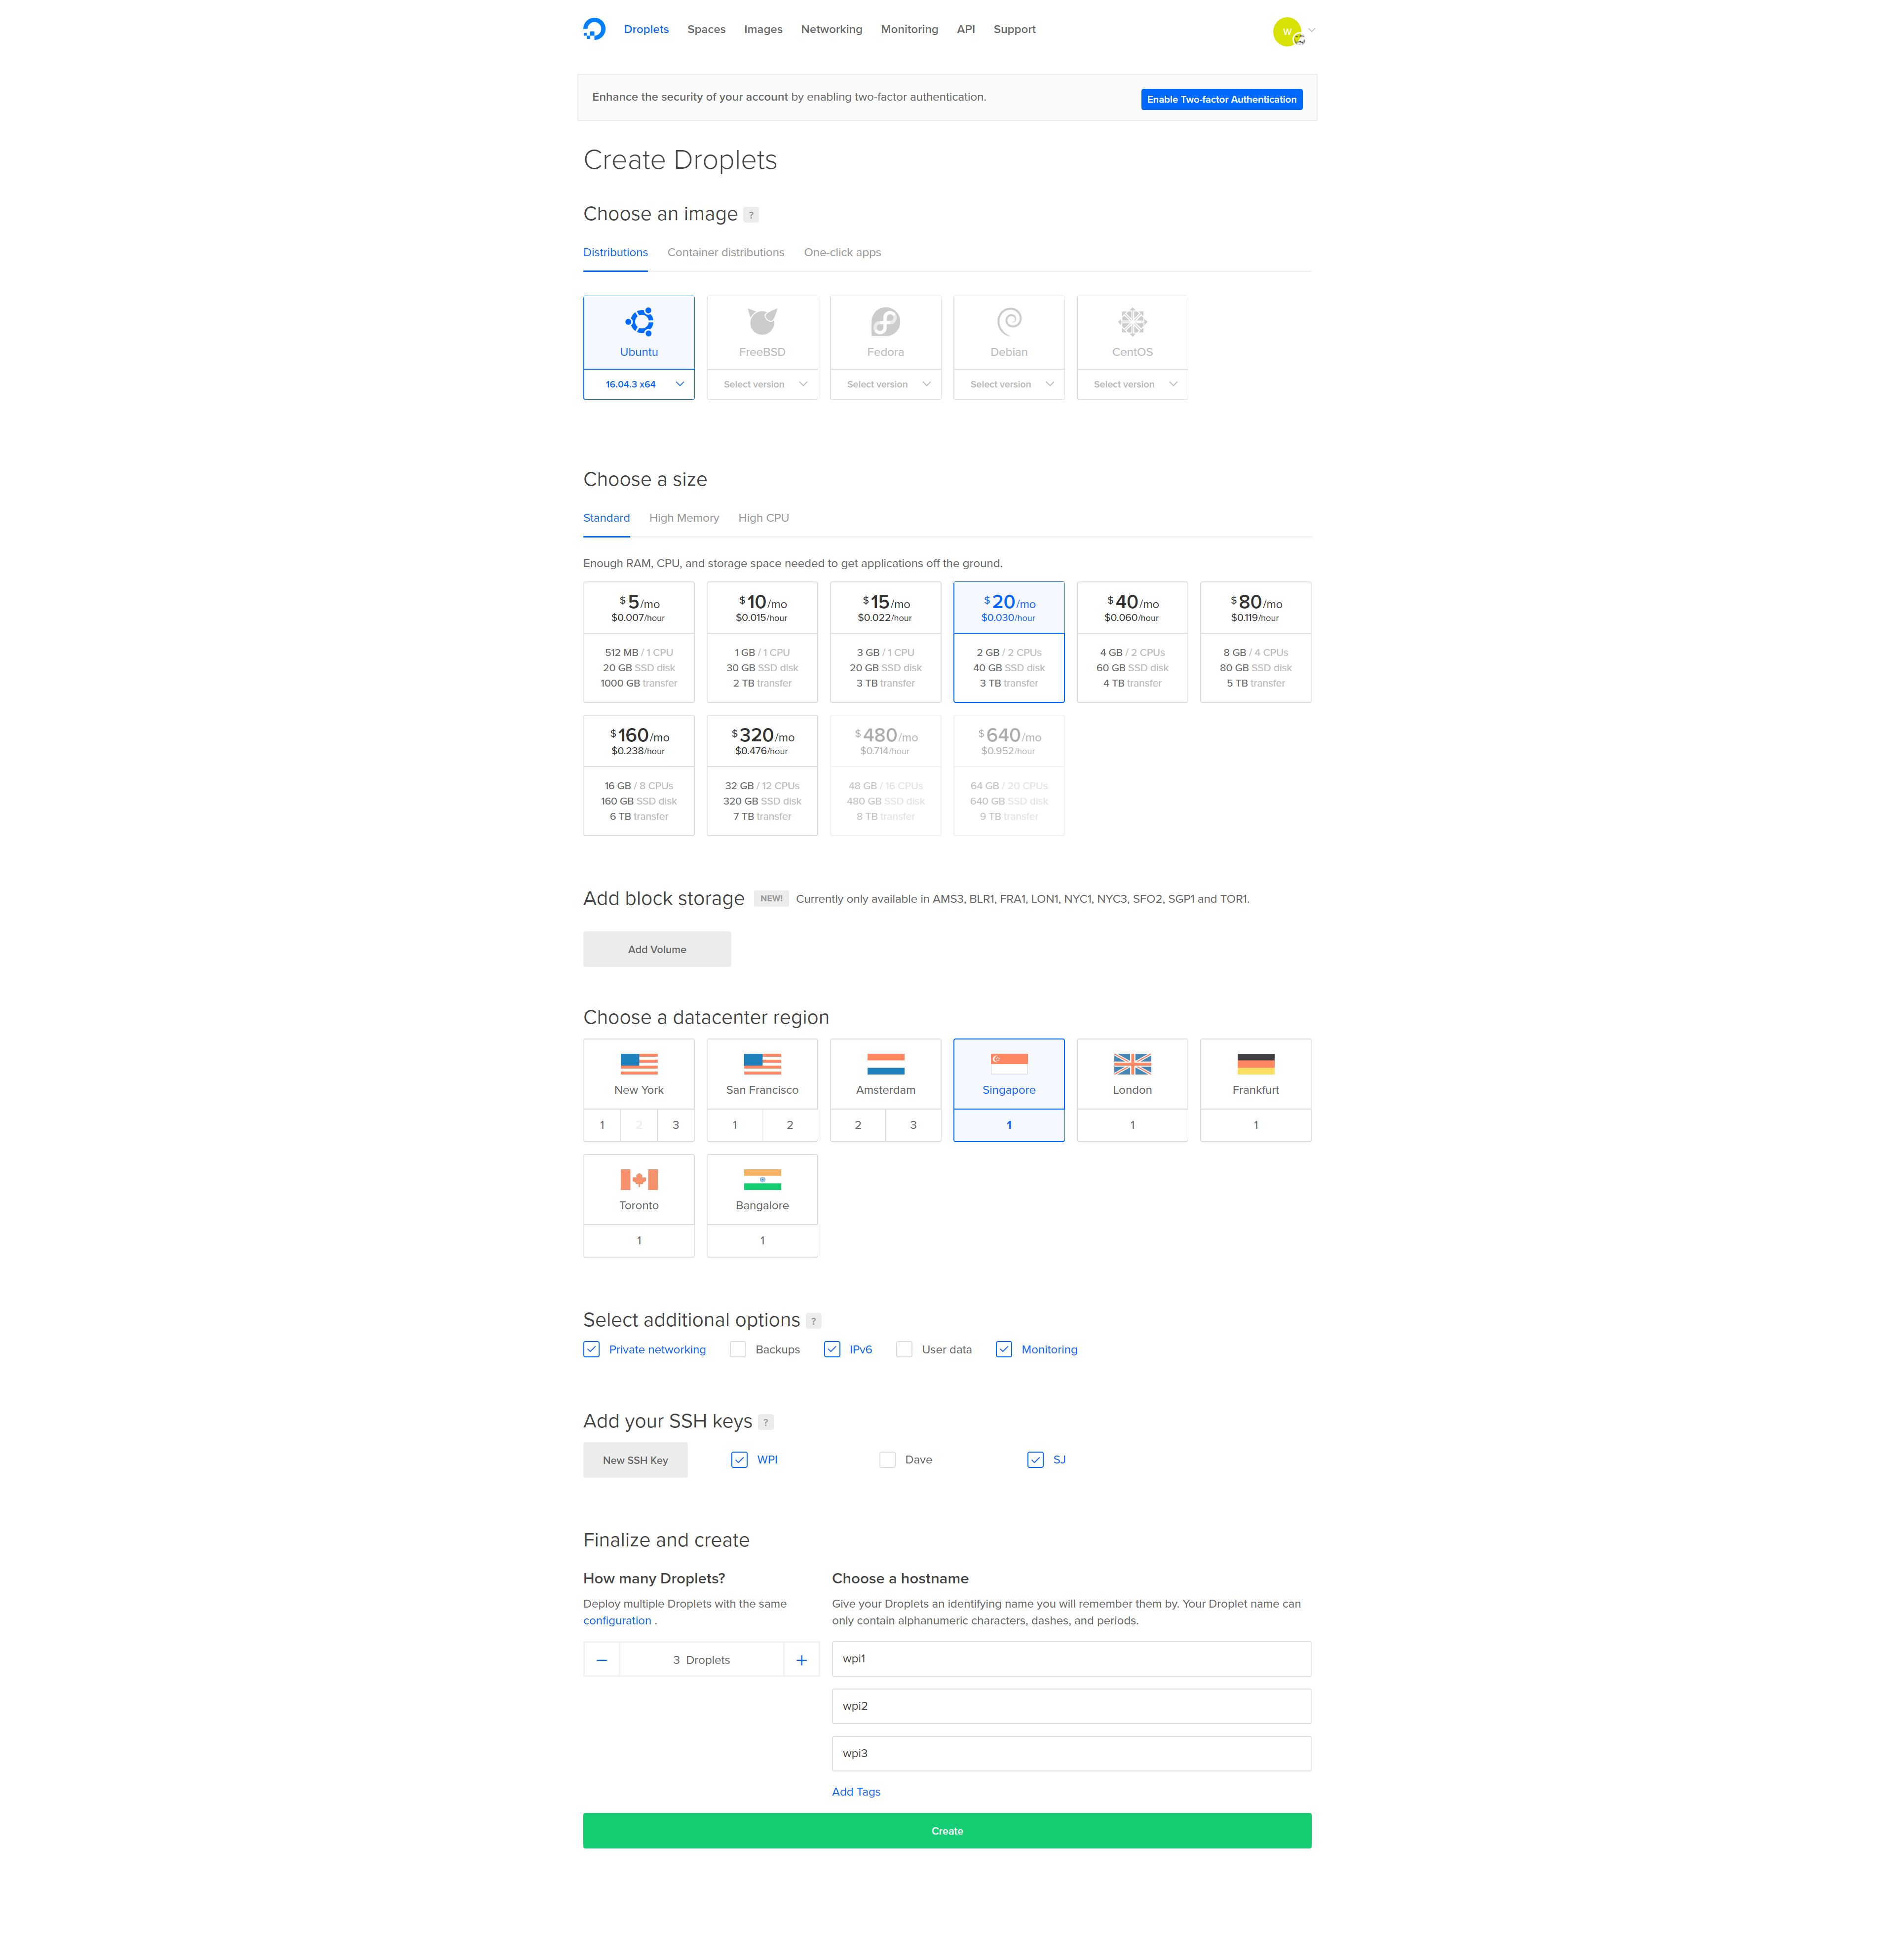
Create 3 Ubuntu 16.04 servers
I like Digital Ocean, so this guide is using their hosting, but you can use any host provided they offer private networking and Ubuntu 16.04.
Create 3 Ubuntu 16.04 (or 3 servers on any platform) – they make it easy to make multiple at once – make sure to enable private networking and add your ssh key.
Install PerconaDB XtraDB Cluster on your cluster-nodes
Log into your 3 droplets and run the following commands on each node:
Note: You will be asked to enter a new root password for the cluster. To make life easier, use the same password for each PerconaDB node, or leave the root password blank and it will infer security if you log in as root and connect.
Configure private networking
We want the nodes to share data over the private network, rather than out and in from your hosting company. This prevents crazy bandwidth costs, speeds things up and improves security.
Even though private networking is already enabled, we need to be able to reliably use eth1 (rather than eth0) as the private network device.
On each node edit the grub networking file. I prefer vi to edit files, but you can use nano or even edit the files with Filezilla.
vi /etc/default/grub.d/50-cloudimg-settings.cfg
Find the line that begins GRUB_CMDLINE_LINUX_DEFAULT and alter it as follows (add net.ifnames=0):
Save the file then run the update grub command and reboot (only time I know of where you need to reboot a linux box!).
update-grub
shutdown -r now
Repeat the above for all your nodes. Then you can check config with this:
ifconfig -a
You should see the public IP address against eth0 and the private address against eth1.
You can also view each ethernet devices configuration here:
cat /etc/network/interfaces.d/50-cloud-init.cfg
The file above will already be configured if you selected private networking when you created the droplet.
Take a note of the private IP address for each of your 3 nodes. This information is also available from your Digital Ocean interface when you click through to each droplet.
You can test private networking is working by pinging the private IP address of another node from one of the nodes:
ping 10.130.45.161
Configure replication
Firstly, we need a replication user. Create this user on all 3 nodes.
Log into mysql:
mysql
or if you chose a password for your mysql server earlier, use this:
mysql -u root -p
Enter the root DB password you chose earlier then create a new user for replication purposes (choose a strong password and note it down so we can add it to the configuration files):
CREATE USER 'sstuser'@'localhost' IDENTIFIED BY 'password';
GRANT RELOAD, LOCK TABLES, PROCESS, REPLICATION CLIENT ON *.* TO 'sstuser'@'localhost';
FLUSH PRIVILEGES;
Next exit MySQL by typing ‘exit’ then hitting enter, then stop MySQL on all 3 nodes using:
service mysql stop
On node1, customise the configuration file below according to your private IP addresses and replication user password enter it into this file:
vi /etc/mysql/percona-xtradb-cluster.conf.d/wsrep.cnf
Enter the 3 private IP addresses for wsrep_cluster_address, separated by commas.
Enter node 1 private IP address for wsrep_node_address.
Enter the sst password for wsrep_sst_auth.
Change the name of the node on the line wsrep_node_name
Your file will end up looking something like this (lines in bold are the lines you need to alter from the default config):
[mysqld]
# Path to Galera library
wsrep_provider=/usr/lib/galera3/libgalera_smm.so

# Cluster connection URL contains IPs of nodes
#If no IP is found, this implies that a new cluster needs to be created,
#in order to do that you need to bootstrap this node
wsrep_cluster_address=gcomm://10.130.45.161,10.130.47.4,10.130.47.11

# In order for Galera to work correctly binlog format should be ROW
binlog_format=ROW

# MyISAM storage engine has only experimental support
default_storage_engine=InnoDB

# Slave thread to use
wsrep_slave_threads= 8

wsrep_log_conflicts
# This changes how InnoDB autoincrement locks are managed and is a requirement for Galera
innodb_autoinc_lock_mode=2

# Node IP address
wsrep_node_address=10.130.45.161
# Cluster name
wsrep_cluster_name=pxc-cluster

#If wsrep_node_name is not specified, then system hostname will be used
wsrep_node_name=pxc-cluster-node-1

#pxc_strict_mode allowed values: DISABLED,PERMISSIVE,ENFORCING,MASTER
pxc_strict_mode=ENFORCING

# SST method
wsrep_sst_method=xtrabackup-v2

#Authentication for SST method
wsrep_sst_auth="sstuser:password"
Note: You will also need to remove the # comment from the beginning of the lines with the wsrep_node_address and the wsrep_sst_auth.
Copy the contents of the file and then save it. Configure node 2 and node 3 by editing the same file on those nodes and altering 2 rows from the file above:
Change wsrep_node_address to be the private IP address of node 2 (or node 3 for that node)
Change wsrep_node_name to pxc-cluster-node-2 or pxc-cluster-node-3
Once you’ve done this, you’re ready to bootstrap your cluster.
Bootstrap your cluster
On node 1, run the following command:
/etc/init.d/mysql bootstrap-pxc
Check it’s running by logging into mysql and running this command:
showstatuslike'wsrep%';
Note: The above command can be useful in future to check for replication status – you can see things like how many items are queued to be replicated amongst other details.
On node 2 and 3, run the following:
/etc/init.d/mysql start
You now have a Percona cluster with 3 nodes replicating data to each other.
Install Nginx and PHP 7 on all 3 nodes
On each node, install Nginx and PHP 7 using the following sequence of commands:
After much testing, GlusterFS is not well-suited to WordPress file-replication. GlusterFS slows down a LOT when there are a lot of files in each directory. The guide has been updated to use Unison instead. This Unison setup uses a star schema for file replication, with node 1 at the centre of the star.
That means a file edit on node 3 will replicate to node 1 and then to node 2. A file edit on node 1 will replicate out directly to node 2 and 3. Because of this, it makes sense to make node 1 our wp-admin server where we upload plugin files. Because of this star schema for file replication, node 1 is your most important node. If it goes down, or you switch it off, file replication will be paused until you bring it back online.
On each node, install unison:
apt-get -y install unison openssh-server
This will allow us to run the replication commands later once we have installed the WordPress files.
Configure SSH so nodes can connect to each other
SSH access is required for Unison to be able to replicate files. Run the following on all 3 nodes:
ssh-keygen
Hit enter 3 times to accept 3 defaults inc 2 blank passwords for the keyfile so it works non-interactively
Now, grab a copy of the id_rsa.pub files for each node and paste them into the other 2 nodes authorized_keys file. Find the public keys of each node by running this command:
cat /root/.ssh/id_rsa.pub
Then paste those public keys into the authorized_keys file of the other 2 nodes:
vi /root/.ssh/authorized_keys
Authenticate each node
On node 1, run:
ssh ipofnode2
ssh ipofnode3
You will be asked if you wish to trust the other node. Answer yes.
Repeat this on node 2 and node 3, connecting to the other 2 nodes.
Replicate the web folder files using Unison
Now that we have ssh authentication, we can set up Unison to replicate the website files to node 2 and 3. Run the following commands on node 1 of your cluster:
Change IP addresses and folder locations. Use internal IP addresses so traffic goes over the faster internal network card.
Install WordPress files onto Node 1 only
Because we are using file replication and we already have database replication in our cluster, we only need to install WordPress onto node 1. On node 1, run the following:
Note: Instead of /var/www/wpicluster you could use /var/www/yourdomain.com but if you do, ensure you alter the nginx config files in the next section.
Configure Nginx to load your WordPress site on each node
I’ve created some configuration files to make this part quicker and easier. The configuration files set Nginx up to work over port 80 – later, we will add SSL to our load balancer. This reduces load on our servers since they won’t have to decrypt SSL traffic.
The configuration files here also configure the Nginx fastcgi-cache, so you don’t need to install Varnish. They’re also domain-name independent, so no configuration required.
Digital Ocean provide a load balancer, but with that approach you have to manually renew your SSL certificates. Plus you get less control – we want control so we can send wp-admin traffic to node 1. So follow the instructions below to set up your own load balancer.
First, create a droplet with Ubuntu 16.04 again, private networking and your SSH keys.
Then log onto your load balancer droplet and run the following commands:
Then create a new file at /etc/nginx/conf.d/loadbalancer.conf.
vi /etc/nginx/conf.d/loadbalancer.conf
This will automatically be loaded when you restart nginx. Enter the following in the file, adjusted for your private IP addresses.
upstream clusterwpadmin {
     server 10.130.45.161;
}
upstream clusternodes {
     ip_hash;
 server 10.130.47.4 max_fails=3;
 server 10.130.47.11 max_fails=3;
}
server {
     listen 80;
# this block is for letsencrypt
 root /var/www/html;
 location ~ /.well-known {
      allow all;
  try_files $uri $uri/ =404;
 }
 server_name _;
 #return 301 https://$host$request_uri;
 location ~ /wp-(admin/|login\.php\b|cron\.php) {
     proxy_pass http://clusterwpadmin;
 proxy_set_header X-Forwarded-Host $host;
 proxy_set_header X-Forwarded-Server $host;
 proxy_set_header X-Forwarded-For $proxy_add_x_forwarded_for;
 proxy_set_header X-Forwarded-Proto $scheme;
 proxy_set_header X-Real-IP $remote_addr;
 proxy_set_header Host $host;
 }
location / {
     proxy_pass http://clusternodes;
 proxy_set_header X-Forwarded-Host $host;
 proxy_set_header X-Forwarded-Server $host;
 proxy_set_header X-Forwarded-For $proxy_add_x_forwarded_for;
 proxy_set_header X-Forwarded-Proto $scheme;
 proxy_set_header X-Real-IP $remote_addr;
 proxy_set_header Host $host;
 }
}
server {
     listen 443 ssl;
 #ssl_certificate /etc/letsencrypt/live/yourdomain.com/cert.pem;
 #ssl_certificate_key /etc/letsencrypt/live/yourdomain.com/privkey.pem;
location ~ /wp-(admin/|login\.php\b|cron\.php) {
     proxy_pass http://clusterwpadmin;
 proxy_set_header X-Forwarded-Host $host;
 proxy_set_header X-Forwarded-Server $host;
 proxy_set_header X-Forwarded-For $proxy_add_x_forwarded_for;
 proxy_set_header X-Forwarded-Proto $scheme;
 proxy_set_header X-Real-IP $remote_addr;
 proxy_set_header Host $host;
 }
location / {
     proxy_pass http://clusternodes;
 proxy_set_header X-Forwarded-Host $host;
 proxy_set_header X-Forwarded-Server $host;
 proxy_set_header X-Forwarded-For $proxy_add_x_forwarded_for;
 proxy_set_header X-Forwarded-Proto $scheme;
 proxy_set_header X-Real-IP $remote_addr;
 proxy_set_header Host $host;
 }
}
#if a user connects to yourdomain.com:9443 they will be directed to node 1. This is where admins should connect to add plugins etc.
server {
     listen 9443 ssl;
 server_name _;
 #ssl_certificate /etc/letsencrypt/live/yourdomain.com/cert.pem;
 #ssl_certificate_key /etc/letsencrypt/live/yourdomain.com/privkey.pem;
location / {
     proxy_pass http://clusterwpadmin;
 proxy_set_header X-Forwarded-Host $host;
 proxy_set_header X-Forwarded-Server $host;
 proxy_set_header X-Forwarded-For $proxy_add_x_forwarded_for;
 proxy_set_header X-Forwarded-Proto $scheme;
 proxy_set_header X-Real-IP $remote_addr;
 proxy_set_header Host $host;
 }
}

Save that file then you can restart nginx using:
service nginx restart
SaveNow, log into your DNS provider and point your new domain name at the public IP address of your loadbalancer node.
Configure WordPress
Now that we have database and file replication set up, and a load balancer, we can go about starting the 5-minute install of WordPress.
On node 1, connect to mysql using:
mysql -p (or just mysql if no root password)
Note: you’ll be asked for your password, so paste it in – right-click in putty is paste, and it’ll look like nothing happened because it’s a password field, but it does paste.
create database wpicluster;
grant all privileges on wpicluster.* to wpi@localhost identified by 'CHOOSEASTRONGPASSWORD';
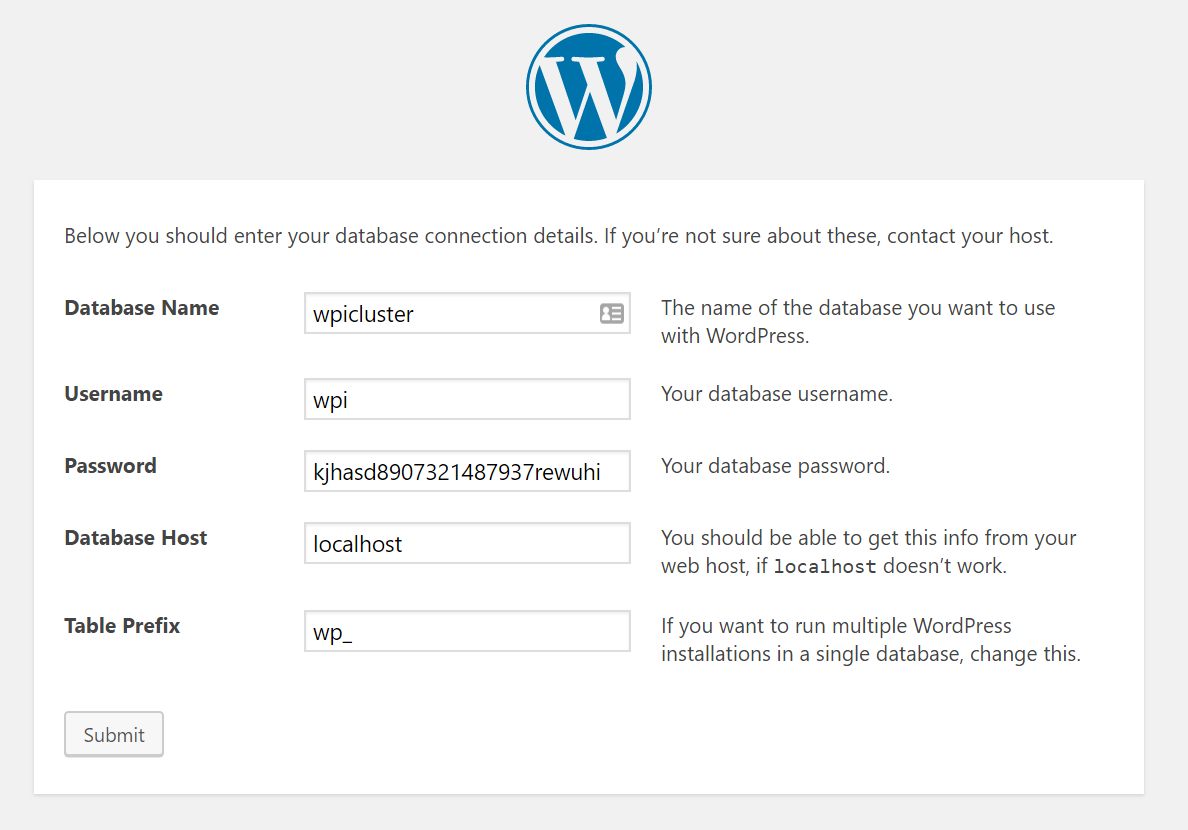
Visit the URL you chose earlier for your loadbalancer, e.g. http://www.yourdomain.com.
Choose your language, then enter the database name: wpicluster, the username: wpi and the password you chose in the GRANT command above.
Set up WordPress Cron on only node 1
WP Cron is awful. It relies on users visiting your site in order to run scheduled tasks. In this case, we don’t even want scheduled jobs running on node 2 or 3, so we’ll disable wp cron across all nodes and then implement a real cron job on node 1.
On node 1, edit /var/www/wpicluster/wp-config.php. This file edit will replicate to your other nodes.
vi /var/www/wpicluster/wp-config.php
and insert the following lines somewhere:
define('WP_DISABLE_CRON', true);
if (strpos($_SERVER['HTTP_X_FORWARDED_PROTO'], 'https') !== false) {
 $_SERVER['HTTPS']='on';
}
Note: Only the first line is to disable WP_CRON. The rest is for later when we forward traffic from our load balancer and we want to ensure WordPress knows to server up static files over HTTPS if that was what the user requested.
If you’re struggling to figure out where to put this code, you can stick it after the define(‘DB_NAME’, ….); line.
This wp-config.php update will replicate out to the other nodes using GlusterFS, so you don’t need to modify this on the other nodes.
You should get a note telling you CONGRATULATIONS. It will also tell you the location the key files were saved to. Now edit the loadbalancer.conf file from earlier to set up SSL. (WordPress installation does not work well over SSL which is why we add SSL after installation)
vi /etc/nginx/conf.d/loadbalancer.conf
Uncomment the ssl_certificate (x2) and ssl_certificate_key (x2) lines and replace the path with the paths provided by the output from LetsEncrypt.
Also uncomment the line “return 301 https://$host$request_uri;”
service nginx restart
Once you have edited the loadbalancer.conf file and restarted nginx, you will have a working SSL certificate on your load balancer.
Note: At this point, if you access your website with https, some CSS will appear broken. There is one final stage we have to complete in order to fix this, which is almost the final step in the entire process.
Update your Site URL in WordPress
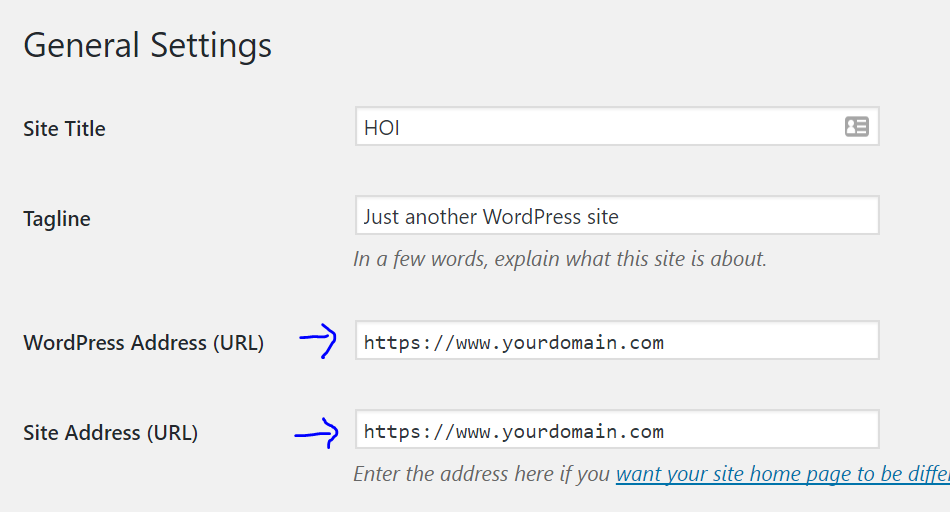
Log into node1.yourdomain.com. Visit the WordPress dashboard, then Settings->General.
You will see 2 domain entries, both of which are probably currently tied to your node 1 subdomain, and both of which will be http instead of https.
Replace both of these entries with https://www.yourdomain.com.
Note: Here you enter the domain name you chose for your load balancer, normally www.yourdomain.com or similar.
If you didn’t already, edit your wp-config.php file on Node 1 and just below where you disabled WP_CRON, add the following lines:
if (strpos($_SERVER['HTTP_X_FORWARDED_PROTO'], 'https') !== false) {
  $_SERVER['HTTPS']='on';
}
The traffic is being served over https to your users, but because it’s plain http on each node (between your load balancer and your nodes), you need to make sure WordPress knows it’s HTTPS so any static files are correctly loaded over HTTPS.
Go forth and conquer!
That’s it, a mammoth task complete.
You can visit wp-admin from any server, but you can also force traffic to node 1 for your own admin purposes by visiting https://www.yourdomain.com:9443/wp-admin/. With the configuration above, node 1 is never serving traffic to front-end users, so you can run all kinds of admin jobs on there without impacting slowing down user traffic.
In CentOS 8, there is an error using yum. There is no URL in the image list, similar to the following:
Error:Failed to download metadata for repo 'appstream':Cannot prepare internal mirrorlist:NoURLsin mirrorlist
reason:
On January 31, 2022, the CentOS team finally removed all packages of CentOS 8 from the official image.
CentOS 8 has expired on December 31, 2021, but the software package has been retained on the official image for some time. Now they are transferred to https://vault.centos.org
Solution:
If you still need to run CentOS 8, you can run it in/etc/yum repos. Update the source in D. Use vault.centos.Org instead of mirror.centos.org.
sudo sed -i -e "s|mirrorlist=|#mirrorlist=|g"/etc/yum.repos.d/CentOS-*
sudo sed -i -e "s|#baseurl=http://mirror.centos.org|baseurl=http://vault.centos.org|g"/etc/yum.repos.d/CentOS-*
Essentially, it replaces the previous URL with the URL that is still running. This problem should be solved within this period of time.
How do I install MySQL server 8.0 on CentOS 8 Linux server running on Linode and AWS cloud? How do I add and set up a new MySQL user and database account on the newly created CentOS server?
Oracle MySQL server version 8.0 is a free and open-source free database server. It is one of the most popular database system used in web apps and websites on the Internet.
Typically MySQL is part of the LAMP (Linux, Apache/Nginx, MySQL, Perl/Python/PHP) stack. Popular open-source software such as WordPress, MediaWiki, and others profoundly used by MySQL as a database storage engine. Let us see how to install MySQL server version 8.x on CentOS 8 Linux server.
First, open the terminal app and then log in to your CentOS server using the ssh command: $ ssh vivek@centos-8-ec2-box-ip
Now, update CentOS system to apply security updates and fixes on Linux system using the dnf command/yum command: $ sudo yum update ## or ##
$ sudo dnf update Sample outputs:
Luckily our CentOS 8 box comes with MySQL 8 server package. Let us search for it: $ sudo yum search mysql-server
$ sudo yum module list mysql
And we see:
Last metadata expiration check: 0:02:47 ago on Mon Nov 23 16:26:31 2020.
===================== Name Exactly Matched: mysql-server ======================
mysql-server.x86_64 : The MySQL server and related files
Next, find out version information, run: $ sudo yum info mysql-server
Here is what we see:
Last metadata expiration check: 0:02:22 ago on Mon Nov 23 16:26:31 2020.
Available Packages
Name         : mysql-server
Version      : 8.0.21
Release      : 1.module_el8.2.0+493+63b41e36
Architecture : x86_64
Size         : 22 M
Source       : mysql-8.0.21-1.module_el8.2.0+493+63b41e36.src.rpm
Repository   : AppStream
Summary      : The MySQL server and related files
URL          : http://www.mysql.com
License      : GPLv2 with exceptions and LGPLv2 and BSD
Description  : MySQL is a multi-user, multi-threaded SQL database server. MySQL
             : is a client/server implementation consisting of a server daemon
             : (mysqld) and many different client programs and libraries. This
             : package contains the MySQL server and some accompanying files
             : and directories.
Install it: $ sudo yum install mysql-server
Click to enlarge
Step 2 – Enabling MySQL 8 mysqld.service,server
The service name is mysqld.service, and we need to enable it using the following systemctl command: $ sudo systemctl enable mysqld.service
Confirmation displayed:
Start the service and then verify it: $ sudo systemctl start mysqld.service
$ sudo systemctl status mysqld.service
● mysqld.service - MySQL 8.0 database server
   Loaded: loaded (/usr/lib/systemd/system/mysqld.service; enabled; vendor preset: disabled)
   Active: active (running) since Mon 2020-11-23 16:50:14 UTC; 4s ago
  Process: 551 ExecStopPost=/usr/libexec/mysql-wait-stop (code=exited, status=0/SUCCESS)
  Process: 681 ExecStartPost=/usr/libexec/mysql-check-upgrade (code=exited, status=0/SUCCESS)
  Process: 601 ExecStartPre=/usr/libexec/mysql-prepare-db-dir mysqld.service (code=exited, status=0/SUCCESS)
  Process: 577 ExecStartPre=/usr/libexec/mysql-check-socket (code=exited, status=0/SUCCESS)
 Main PID: 637 (mysqld)
   Status: "Server is operational"
    Tasks: 39 (limit: 24960)
   Memory: 331.0M
   CGroup: /system.slice/mysqld.service
           └─637 /usr/libexec/mysqld --basedir=/usr

Nov 23 16:50:13 centos-aws-mysql systemd[1]: Stopped MySQL 8.0 database server.
Nov 23 16:50:13 centos-aws-mysql systemd[1]: Starting MySQL 8.0 database server...
Nov 23 16:50:14 centos-aws-mysql systemd[1]: Started MySQL 8.0 database server.
Step 3 – Securing MySQL 8 server
All you need to do is type the following command, and it will secure MySQL 8 server installation on CentOS Linux: $ sudo mysql_secure_installation
Please set the password for root here.

New password:

Re-enter new password:

Estimated strength of the password: 100
Do you wish to continue with the password provided?(Press y|Y for Yes, any other key for No) : y
By default, a MySQL installation has an anonymous user,
allowing anyone to log into MySQL without having to have
a user account created for them. This is intended only for
testing, and to make the installation go a bit smoother.
You should remove them before moving into a production
environment.

Remove anonymous users? (Press y|Y for Yes, any other key for No) : y
Success.


Normally, root should only be allowed to connect from
'localhost'. This ensures that someone cannot guess at
the root password from the network.

Disallow root login remotely? (Press y|Y for Yes, any other key for No) : y
Success.

By default, MySQL comes with a database named 'test' that
anyone can access. This is also intended only for testing,
and should be removed before moving into a production
environment.


Remove test database and access to it? (Press y|Y for Yes, any other key for No) : y
 - Dropping test database...
Success.

 - Removing privileges on test database...
Success.

Reloading the privilege tables will ensure that all changes
made so far will take effect immediately.

Reload privilege tables now? (Press y|Y for Yes, any other key for No) : y
Success.

All done!
Step 4 – Starting/Stopping/Restarting MySQL 8 server
The syntax is: $ sudo systemctl start mysql.service
$ sudo systemctl stop mysql.service
$ sudo systemctl restart mysql.service
To view the MySQL 8 service log as follows using the journalctl command: $ sudo journalctl -u mysqld.service -xe
$ sudo tail -f /var/log/mysql/mysqld.log MySQL 8 log file sample entries:
2020-11-23T16:55:19.101316Z 0 [System] [MY-013172] [Server] Received SHUTDOWN from user . Shutting down mysqld (Version: 8.0.21).
2020-11-23T16:55:21.728819Z 0 [Warning] [MY-010909] [Server] /usr/libexec/mysqld: Forcing close of thread 10  user: 'root'.
2020-11-23T16:55:23.083389Z 0 [System] [MY-010910] [Server] /usr/libexec/mysqld: Shutdown complete (mysqld 8.0.21)  Source distribution.
2020-11-23T16:56:19.225544Z 0 [System] [MY-010116] [Server] /usr/libexec/mysqld (mysqld 8.0.21) starting as process 524
2020-11-23T16:56:19.237500Z 1 [System] [MY-013576] [InnoDB] InnoDB initialization has started.
2020-11-23T16:56:19.562441Z 1 [System] [MY-013577] [InnoDB] InnoDB initialization has ended.
2020-11-23T16:56:19.677202Z 0 [System] [MY-011323] [Server] X Plugin ready for connections. Bind-address: '::' port: 33060, socket: /var/lib/mysql/mysqlx.sock
2020-11-23T16:56:19.754024Z 0 [Warning] [MY-010068] [Server] CA certificate ca.pem is self signed.
2020-11-23T16:56:19.754207Z 0 [System] [MY-013602] [Server] Channel mysql_main configured to support TLS. Encrypted connections are now supported for this channel.
2020-11-23T16:56:19.780843Z 0 [System] [MY-010931] [Server] /usr/libexec/mysqld: ready for connections. Version: '8.0.21'  socket: '/var/lib/mysql/mysql.sock'  port: 3306  Source distribution.
Step 5 – Testing MySQL 8 installation
So far, so good. You learned how to install, set up, secure, and start/stop the MySQL 8 on CentOS 8 Linux cloud server. It is time to log in as a
mysql root user. The syntax is: $ mysql -u root -p
$ mysql -u USER -h host -p
$ mysql -u USER -h host -p mysql
Let us type a few SQL commands at the mysql> prompt: STATUS;
SHOW VARIABLES LIKE "%version%";
quit
Step 6 – Creating a new MySQL 8 database and user account with password
Let create a new database called ‘spacedb‘, type at the mysql> prompt: CREATE DATABASE spacedb;
Next, we are going to create a new user named ‘mars‘ for our database called ‘spacedb’ as follows: CREATE USER 'mars'@'%' IDENTIFIED BY 'User_Password_Here';
Finally, give permissions: GRANT SELECT, INSERT, UPDATE, DELETE ON spacedb.* TO 'mars'@'%';
Of course, we can grant ALL PRIVILEGES too as follows: GRANT ALL PRIVILEGES ON spacedb.* TO 'mars'@'%';
See MySQL 8 users and their grants/permissions as follows: SELECT user,host FROM mysql.user;
SHOW GRANTS for mars;
quit
Test new user settings and DB as follows: mysql -u mars -p spacedb
mysql -u mars -h localhost -p spacedb
Where,
-u mars; : User name for login
-h localhost : Connect to server named localhost
-p : Prompt for password
spacedb : Connect to database named spacedb
Step 7 – Configuring MySQL 8 server on a CentOS 8
Let us see default config file using the cat command: # cat /etc/my.cnf.d/mysql-server.cnf Config:
WARNING: See MySQL documentation for a detailed explanation for tuning options as to each server and set up is unique. Do not set up values blindly. I provide them as a starting point for optimizing MySQL 8 installation and values depending upon available RAM, CPU cores, server load and other circumstances.
Step 8 – Firewall configuration to open MySQL server TCP port 3306
Are you using MySQL 8 server remotely? Do you have Apache/Nginx/PHP/Python/Perl app on another server? Then open port for everyone: $ sudo firewall-cmd --zone=public --add-service=mysql --permanent
Only allow access from 192.168.1.0/24 CIDR: $ sudo firewall-cmd \
--add-rich-rule 'rule family="ipv4" \
source address="192.168.1.0/24" \
service name="mysql" accept' --permanent
The above is fine grained firewalld access rules to restrict access to MySQL 8 server to VLAN users only. See how to set up a firewall using FirewallD on CentOS 8 Linux for more info.
Conclusion
And there you have it, Oracle MySQL server version 8.x set up and running correctly on a CentOS Linux 8 server with Firewalld config. Further, you learned how to add a new database, user, and password for your project including MySQL 8 server tuning options.
Create a new virtual machine and install the CentOS to the virtual machine. During the CentOS installation, select Workstation as Base Environment, select Container Management, Development Tools and Graphical Administration Tools as Additional software for Selected Environment. Use http://mirror.centos.org/centos/8/BaseOS/x86_64/os/ as the installation source.
After installing the CentOS, execute the following commands to get the required libraries to create applications for handling compiled objects.
dnf update
dnf -y install elfutils-libelf-devel
Insert the ISO of VirtualBox Guest Additions to the virtual machine, and then install it.
Use the following command, with oracle user, to edit the crontab file.
crontab -e
Put the following cron job in the first line of crontab file, then press the keys :wq to save and exit.
@reboot /home/oracle/scripts/cron.sh
Healthcheck
Login as oracle user and then execute the following commands one-by-one.
sqlplus /nolog
conn / as sysdba;select* from v$version;
show pdbs;
Create New User and Tablespace
Login as Sysdba with SqlPlus.
sqlplus / as sysdba
Update the seesion setting _ORACLE_SCRIPT to true to allow common user comes without c## as prefix.
ALTER SESSION SET"_ORACLE_SCRIPT"=true;
Create a new tablespace with an automatic extensible size 100MB, maximum 10G in size.
-- DROP TABLESPACE my_tablespace INCLUDING CONTENTS AND DATAFILES;-- Location of the dat file: /u01/app/oracle/product/19.3.0/dbhome_1/dbs/my_tablespace.dat-- SELECT tablespace_name, block_size, max_size, status FROM DBA_TABLESPACES;CREATETABLESPACEmy_tablespace
DATAFILE 'my_tablespace.dat'
SIZE 100M
AUTOEXTEND ON
NEXT 32M MAXSIZE 10G
EXTENT MANAGEMENT LOCAL
SEGMENT SPACE MANAGEMENT AUTO
;
SELECT FILE_ID, FILE_NAME, TABLESPACE_NAME, AUTOEXTENSIBLE, INCREMENT_BY
FROM DBA_DATA_FILES ORDER BY FILE_ID DESC;
[Optional] Update the password life time from 180 days (default) to unlimited.
ALTER PROFILE DEFAULT LIMIT PASSWORD_LIFE_TIME UNLIMITED;
Create a new user.
-- ALTER SESSION SET "_ORACLE_SCRIPT"=true;-- DROP USER newuser CASCADE;CREATEUSERnewuser IDENTIFIED BY "P@ssw0rd" DEFAULT TABLESPACE my_tablespace;
Grant permissions to the new user.
-- REVOKE CREATE SESSION FROM newuser;-- REVOKE CREATE TABLE FROM newuser;-- REVOKE CREATE VIEW FROM newuser;-- REVOKE CREATE ANY TRIGGER FROM newuser;-- REVOKE CREATE ANY PROCEDURE FROM newuser;-- REVOKE CREATE SEQUENCE FROM newuser;-- REVOKE CREATE SYNONYM FROM newuser;GRANT CREATE SESSION TO newuser;
GRANT CREATE TABLE TO newuser;
GRANT CREATE VIEW TO newuser;
GRANT CREATE ANY TRIGGER TO newuser;
GRANT CREATE ANY PROCEDURE TO newuser;
GRANT CREATE SEQUENCE TO newuser;
GRANT CREATE SYNONYM TO newuser;
ALTERUSER newuser QUOTA UNLIMITED ON my_tablespace;
Webmin is a free, open-source and web-based system configuration and management tool for Unix-like operating systems. You can set up Apache web server, Samba, DNS, Mail, FTP, Database, File system and package management with Webmin web-based interface. Webmin is very similar to cPanel and provides an easy way to manage Linux systems through a web browser.
Prerequisites
A server running CentOS 8.
A root password is configured on your server.
Getting Started
By default, SELinux is enabled in CentOS 8 server. So you will need to disable it first.
You can do this by editing /etc/selinux/config file:
nano /etc/selinux/config
Make the following changes:
SELINUX=disabled
Save and close the file. Then, restart your server to apply the changes.
Install Webmin with RPM
First, you will need to install the required dependencies by running the following command:
Once downloaded, run the following command to install Webmin:
rpm -ivh webmin-1.930-1.noarch.rpm
You should see the following output:
warning: webmin-1.930-1.noarch.rpm: Header V4 DSA/SHA1 Signature, key ID 11f63c51: NOKEY
Verifying...                          ################################# [100%]
Preparing...                          ################################# [100%]
Operating system is CentOS Linux
Updating / installing...
   1:webmin-1.930-1                   ################################# [100%]

Webmin install complete. You can now login to https://centos8:10000/
as root with your root password.
By default, Webmin runs on port 10000. You can check whether Webmin is running or not with the following command:
netstat -ant | grep 10000
You should see the following output:
tcp 0 0 0.0.0.0:10000 0.0.0.0:* LISTEN
You can also check the Webmin process with the following command:
Next, install the Webmin by running the following command:
dnf install webmin
Once the installation is completed, you should see the following output:
Installing       : webmin-1.930-1.noarch                                                       2/2
Running scriptlet: webmin-1.930-1.noarch                                                       2/2
Webmin install complete. You can now login to https://centos8:10000/
as root with your root password.
Access Webmin in Browser
By default, Webmin listens on port 10000. So you will need to open the Webmin port in firewalld. You can do it with the following command:Advertisements
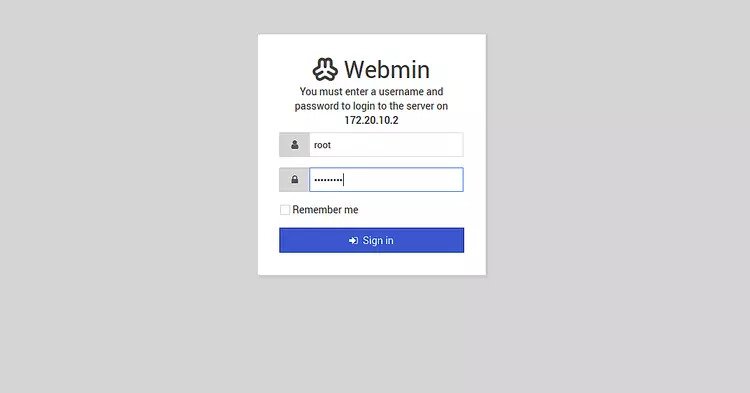
Now, open your web browser and type the URL https://your-server-ip:10000. You will be redirected to the following page:
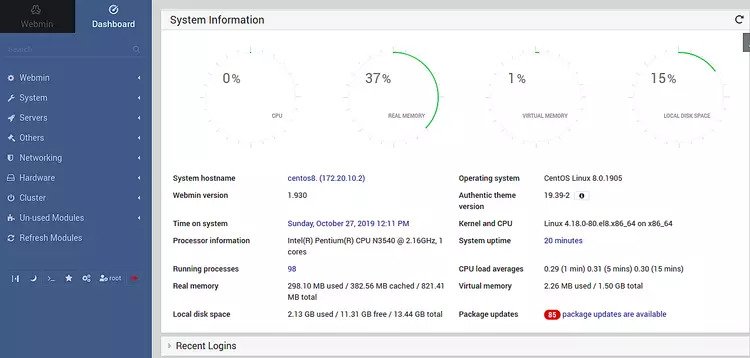
Provide your root user, password and click on the Signin button. You should see the Webmin dashboard in the following page:
From here, you can configure and manage your CentOS 8 server easily.Advertisements
Conclusion
Congratulations! you have successfully installed Webmin on CentOS 8 server. You can now easily install LAMP/LEMP server, FTP server and hosting your website easily through the Webmin web interface.
Step 1. Click Start and type cmd, right-click Command Prompt app and choose Run as administrator.
Step 2. Copy and paste the following command line in Command Prompt window and hit Enter. If you find other keys for Windows 10 Pro, you can replace it with the key in the command line after slmgr /ipk.
slmgr /ipk W269N-WFGWX-YVC9B-4J6C9-T83GX
Step 3. Type the following command lines and remember to hit Enter after you type each line.
slmgr /skms kms.xspace.in
slmgr /ato
How to Check If Your Windows 10 Is Activated or Not
If you want to check whether your Windows 10 computer is activated or not, you can press Windows + R keys on the keyboard to open Run box, type slmgr.vbs -xpr in Run box and hit Enter.
ISD ofron suport IT me staf të kualifikuar të gatshëm 24×7. Suporti ynë është i disponueshëm online, offline, remote, offsite dhe përmes manualeve të përdorimit dhe të administrimit. Suporti i ISD ofrohet në forma të ndryshme: të herëpashershëm, me kontratë të thjeshtë dhe me kontratë profesionale.