Windows

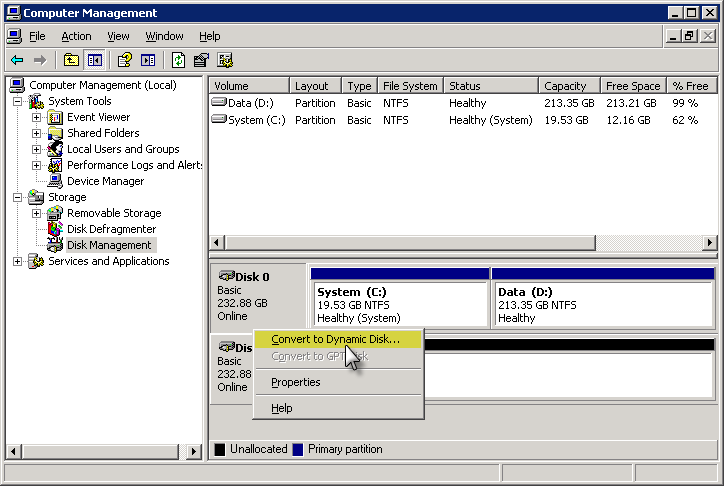
Windows 7 Activation

@echo off
title Activate Windows 7 / 8 / 8.1 / 10 for FREE!&cls&echo =====================================&echo #Copyright: MSGuides.com&echo =====================================&echo.&echo #Supported products:&echo – Windows 7 Professional&echo – Windows 7 Professional N&echo – Windows 7 Professional E&echo – Windows 7 Enterprise&echo – Windows 7 Enterprise N&echo – Windows 7 Enterprise E&echo – Windows 8 Core&echo – Windows 8 Core Single Language&echo – Windows 8 Professional&echo – Windows 8 Professional N&echo – Windows 8 Professional WMC&echo – Windows 8 Enterprise&echo – Windows 8 Enterprise N&echo – Windows 8.1 Core&echo – Windows 8.1 Core N&echo – Windows 8.1 Core Single Language&echo – Windows 8.1 Professional&echo – Windows 8.1 Professional N&echo – Windows 8.1 Professional WMC&echo – Windows 8.1 Enterprise&echo – Windows 8.1 Enterprise N&echo – Windows 10 Home&echo – Windows 10 Home N&echo – Windows 10 Home Single Language&echo – Windows 10 Home Country Specific&echo – Windows 10 Professional&echo – Windows 10 Professional N&echo – Windows 10 Education N&echo – Windows 10 Education N&echo – Windows 10 Enterprise&echo – Windows 10 Enterprise N&echo – Windows 10 Enterprise LTSB&echo – Windows 10 Enterprise LTSB N&echo.&echo.&echo ====================================&echo Activating your Windows… & cscript //nologo c:\windows\system32\slmgr.vbs /ipk FJ82H-XT6CR-J8D7P-XQJJ2-GPDD4 >nul&cscript //nologo c:\windows\system32\slmgr.vbs /ipk MRPKT-YTG23-K7D7T-X2JMM-QY7MG >nul&cscript //nologo c:\windows\system32\slmgr.vbs /ipk W82YF-2Q76Y-63HXB-FGJG9-GF7QX >nul&cscript //nologo c:\windows\system32\slmgr.vbs /ipk 33PXH-7Y6KF-2VJC9-XBBR8-HVTHH >nul&cscript //nologo c:\windows\system32\slmgr.vbs /ipk YDRBP-3D83W-TY26F-D46B2-XCKRJ >nul&cscript //nologo c:\windows\system32\slmgr.vbs /ipk C29WB-22CC8-VJ326-GHFJW-H9DH4 >nul&cscript //nologo c:\windows\system32\slmgr.vbs /ipk BN3D2-R7TKB-3YPBD-8DRP2-27GG4 >nul&cscript //nologo c:\windows\system32\slmgr.vbs /ipk 2WN2H-YGCQR-KFX6K-CD6TF-84YXQ >nul&cscript //nologo c:\windows\system32\slmgr.vbs /ipk NG4HW-VH26C-733KW-K6F98-J8CK4 >nul&cscript //nologo c:\windows\system32\slmgr.vbs /ipk XCVCF-2NXM9-723PB-MHCB7-2RYQQ >nul&cscript //nologo c:\windows\system32\slmgr.vbs /ipk GNBB8-YVD74-QJHX6-27H4K-8QHDG >nul&cscript //nologo c:\windows\system32\slmgr.vbs /ipk 32JNW-9KQ84-P47T8-D8GGY-CWCK7 >nul&cscript //nologo c:\windows\system32\slmgr.vbs /ipk JMNMF-RHW7P-DMY6X-RF3DR-X2BQT >nul&cscript //nologo c:\windows\system32\slmgr.vbs /ipk M9Q9P-WNJJT-6PXPY-DWX8H-6XWKK >nul&cscript //nologo c:\windows\system32\slmgr.vbs /ipk 7B9N3-D94CG-YTVHR-QBPX3-RJP64 >nul&cscript //nologo c:\windows\system32\slmgr.vbs /ipk BB6NG-PQ82V-VRDPW-8XVD2-V8P66 >nul&cscript //nologo c:\windows\system32\slmgr.vbs /ipk GCRJD-8NW9H-F2CDX-CCM8D-9D6T9 >nul&cscript //nologo c:\windows\system32\slmgr.vbs /ipk HMCNV-VVBFX-7HMBH-CTY9B-B4FXY >nul&cscript //nologo c:\windows\system32\slmgr.vbs /ipk 789NJ-TQK6T-6XTH8-J39CJ-J8D3P >nul&cscript //nologo c:\windows\system32\slmgr.vbs /ipk TX9XD-98N7V-6WMQ6-BX7FG-H8Q99 >nul&cscript //nologo c:\windows\system32\slmgr.vbs /ipk 3KHY7-WNT83-DGQKR-F7HPR-844BM >nul&cscript //nologo c:\windows\system32\slmgr.vbs /ipk 7HNRX-D7KGG-3K4RQ-4WPJ4-YTDFH >nul&cscript //nologo c:\windows\system32\slmgr.vbs /ipk PVMJN-6DFY6-9CCP6-7BKTT-D3WVR >nul&cscript //nologo c:\windows\system32\slmgr.vbs /ipk W269N-WFGWX-YVC9B-4J6C9-T83GX >nul&cscript //nologo c:\windows\system32\slmgr.vbs /ipk MH37W-N47XK-V7XM9-C7227-GCQG9 >nul
echo ————————————&echo.&echo.&set i=1
:server
if %i%==1 set KMS_Sev=kms7.MSGuides.com
if %i%==2 set KMS_Sev=kms8.MSGuides.com
if %i%==3 set KMS_Sev=kms9.MSGuides.com
if %i%==4 goto notsupported
cscript //nologo c:\windows\system32\slmgr.vbs /skms %KMS_Sev% >nul
cscript //nologo c:\windows\system32\slmgr.vbs /ato | find /i “successfully” && (echo.& echo ====================================== & echo. & choice /n /c YN /m “Would you like to visit my blog [Y,N]?” & if errorlevel 2 exit) || (echo The connection to the server failed! Trying to connect to another one… & echo Please wait… & echo. & echo. & set /a i+=1 & goto server)
explorer “http://MSGuides.com”&goto halt
:notsupported
echo ======================================&echo.&echo Sorry! Your version is not supported.
:halt
pause >nul

How to Activate Windows 10 Pro with CMD

Step 1. Click Start and type cmd, right-click Command Prompt app and choose Run as administrator.

Step 2. Copy and paste the following command line in Command Prompt window and hit Enter. If you find other keys for Windows 10 Pro, you can replace it with the key in the command line after slmgr /ipk.

slmgr /ipk W269N-WFGWX-YVC9B-4J6C9-T83GX

Step 3. Type the following command lines and remember to hit Enter after you type each line.

slmgr /skms kms.xspace.in

slmgr /ato

How to Check If Your Windows 10 Is Activated or Not

If you want to check whether your Windows 10 computer is activated or not, you can press Windows + R keys on the keyboard to open Run box, type slmgr.vbs -xpr in Run box and hit Enter.

Schedule Shutdown or Restarts in Windows using the Task Scheduler

While you can always use the Shutdown /s /t 60 command and create a desktop shortcut to delay shutdown of your Windows 10/8/7 computer by (in this case 60 secs) or make it shutdown at a particular time after calculating the time in seconds, you can also use the Task scheduler to shut down, restart or perform any action at one time or periodically.

Schedule Shutdown or Restarts in Windows

Using the Task Scheduler, you can schedule computer to shut down at a certain time in the night or any time! And why might you want to do this? Maybe your computer is processing a task or maybe it is downloading files from the Internet, and you do not want to wait till then. You can then schedule it to shut down after say 2 hours, while you go on to catch up on your beauty sleep!

To make your computer shutdown at a particular time, type taskschd.msc is start search and hit Enter to open the Task Scheduler. In the right panel, click on Create Basic Task.

Give it name and a description if you wish and click Next.

When asked When do you want the task to start, select One time. Click Next.

Select the Start date and time.

Clicking Next will bring you to the Action page. Here select Start a program and click on Next.

Here type shutdown on the Program/script space and /s /f /t 0 in the Add arguments box. If you want the shutdown to commence after say 60 sec, type 60 instead of 0 here.

Click Next to review all and finally click Finish. Your computer will shutdown at the designated day and time.

NOTE: In a CMD window, you may run shutdown /? to see all the available switches. To schedule restarts, you need to use the /r parameter instead of the /s parameter. To log off the current user use /l.

If you are looking out for faster ways to do it, take a look at some of these free tools to Auto Shutdown, Restart Windows computer at fixed times.

Set Up Software RAID using Windows Server 2003

The following article explains how to set up RAID 1 (data mirroring) using Windows Server 2003. This requires a dedicated Windows server without a hardware RAID controller and with two hard drives.

Please be advised that setting up software RAID will likely result in a necessary server reboot so please plan accordingly.

  • Step 1 First you must log in to your Windows server via Remote Desktop. For more help, please reference How do I log in to my Windows server via Remote Desktop?
  • Step 2 From the Start menu on your server, right-click My Computer and select Manage.
  • Step 3 Click the Disk Management menu item from the left-hand side of the window.
  • Step 4 Right-click the grey area that says Disk 0 and then select Convert to Dynamic Disk.
  • Step 5 You must check the box next to both disks so that they are both converted to Dynamic Disks. This is necessary to set up the data mirror.
  • Step 6 A confirmation window is shown. Click the Convert button.
  • Step 7 A message informs you that if you have any other operating systems installed on these disks other than Windows Server 2003 (which you should not), those operating systems will not boot. Click the Yes button to covert both drives to Dynamic Disks.
  • Step 8 A message that file systems will be unmounted. This is fine. Click the Yes button to continue.
  • Step 9 A message informing you the server will need to be restarted in order to complete the conversion. Click the OK button to restart the computer now.
  • Step 10 After the server boots back up, log back in through Remote Desktop. Access Disk Management through the Computer Management window as you did earlier. Now we will actually set up the RAID 1 array which will mirror all the data from the first drive to the second drive. Right-click the C: drive and select Add Mirror.
  • Step 11 Select the second disk (which is Disk 1 since the first disk is Disk 0) and click the Add Mirror button.
  • Step 12 This will start to copy all the data from the first drive to the second drive. In the future, any new data written to the disk will be written to both drives at the same time. This way, even if one drive fails, your server will still be able to boot from the good drive and your data will still be intact. You can also mirror another partition (such as the D: drive) by following the same process. Right-click the partition and select Add Mirror.
  • Step 13 Once again, select the second drive (Disk 1) and click the Add Mirror button.
You can continue working while the data is synchronized across both disks. Once the synchronization is finished, your system will now be utilizing RAID 1 (data mirroring)!
Free Web Hosting