extension=php_pgsql.dll
You also can enable Postgresql extension for PDO as well.
extension=php_pdo_pgsql.dll
Nginx is open-source software for web serving, reverse proxying, caching, load balancing, media streaming, and more. In this post, I will mention few Nginx configurations which we use frequently.
server {
  # Standard HTTP Protocol
  listen 80;

  # Standard HTTPS Protocol
  listen 443 ssl;

  # Listen on 80 using IPv6
  listen [::]:80;

  # Listen only on using IPv6
  listen [::]:80 ipv6only=on;
}
server {
  # Relative or full path to log file
  access_log /path/to/file.log;

  # Turn 'on' or 'off'
  access_log on;
}
server {
  # Listen to yourdomain.com
  server_name yourdomain.com;

  # Listen to multiple domains
  server_name yourdomain.com www.yourdomain.com;

  # Listen to all domains
  server_name *.yourdomain.com;

  # Listen to all top-level domains
  server_name yourdomain.*;

  # Listen to unspecified Hostnames (Listens to IP address itself)
  server_name "";

}
server {
  listen 80;
  server_name yourdomain.com;

  location / {
          root /path/to/website;
  }
}
server {
  listen 80;
  server_name www.yourdomain.com;
  return 301 http://yourdomain.com$request_uri;
}
server {
  listen 80;
  server_name www.yourdomain.com;

  location /redirect-url {
     return 301 http://otherdomain.com;
  }
}
server {
  listen 80;
  server_name yourdomain.com;

  location / {
     proxy_pass http://0.0.0.0:3000;
     # where 0.0.0.0:3000 is your application server (Ex: node.js) bound on 0.0.0.0 listening on port 3000
  }

}
upstream node_js {
  server 0.0.0.0:3000;
  server 0.0.0.0:4000;
  server 123.131.121.122;
}

server {
  listen 80;
  server_name yourdomain.com;

  location / {
     proxy_pass http://node_js;
  }
}
server {
  listen 443 ssl;
  server_name yourdomain.com;

  ssl on;

  ssl_certificate /path/to/cert.pem;
  ssl_certificate_key /path/to/privatekey.pem;

  ssl_stapling on;
  ssl_stapling_verify on;
  ssl_trusted_certificate /path/to/fullchain.pem;

  ssl_protocols TLSv1 TLSv1.1 TLSv1.2;
  ssl_connection_timeout 1d;
  ssl_session_cache shared:SSL:50m;
  add_header Strict-Transport-Security max-age=15768000;
}

# Permanent Redirect for HTTP to HTTPS
server {
  listen 80;
  server_name yourdomain.com;
  return 301 https://$host$request_uri;
}
Work In Progress, more explanations will be added soon
Table of content
upstream php {
    least_conn;
    server unix:/var/run/php-fpm.sock;
    server unix:/var/run/php-two-fpm.sock;
    keepalive 5;
}
upstream php {
    least_conn;
    server 127.0.0.1:9090;
    server 127.0.0.1:9091;
    keepalive 5;
}
# Upstreams
upstream backend {
    least_conn;

    server 10.10.10.1:80;
    server 10.10.10.2:80;
}

server {

    server_name site.ltd;

    location / {
        proxy_pass http://backend;
        proxy_redirect      off;
        proxy_set_header    Host            $host;
        proxy_set_header    X-Real-IP       $remote_addr;
        proxy_set_header    X-Forwarded-For $proxy_add_x_forwarded_for;
    }
}
To put inside a configuration file in /etc/nginx/conf.d/
# do not cache xmlhttp requests
map $http_x_requested_with $http_request_no_cache {
    default 0;
    XMLHttpRequest 1;
}
# do not cache requests for the following cookies
map $http_cookie $cookie_no_cache {
    default 0;
    "~*wordpress_[a-f0-9]+" 1;
    "~*wp-postpass" 1;
    "~*wordpress_logged_in" 1;
    "~*wordpress_no_cache" 1;
    "~*comment_author" 1;
    "~*woocommerce_items_in_cart" 1;
    "~*woocommerce_cart_hash" 1;
    "~*wptouch_switch_toogle" 1;
    "~*comment_author_email_" 1;
}
# do not cache requests for the following uri
map $request_uri $uri_no_cache {
    default 0;
    "~*/wp-admin/" 1;
    "~*/wp-[a-zA-Z0-9-]+.php" 1;
    "~*/feed/" 1;
    "~*/index.php" 1;
    "~*/[a-z0-9_-]+-sitemap([0-9]+)?.xml" 1;
    "~*/sitemap(_index)?.xml" 1;
    "~*/wp-comments-popup.php" 1;
    "~*/wp-links-opml.php" 1;
    "~*/wp-.*.php" 1;
    "~*/xmlrpc.php" 1;
}
# do not cache request with args (like site.tld/index.php?id=1)
map $query_string $query_no_cache {
    default 1;
    "" 0;
}
# map previous conditions with the variable $skip_cache
map $http_request_no_cache$cookie_no_cache$uri_no_cache$query_no_cache $skip_cache {
    default 1;
    0000 0;
}
To put inside another configuration file in /etc/nginx/conf.d
# FastCGI cache settings
fastcgi_cache_path /var/run/nginx-cache levels=1:2 keys_zone=WORDPRESS:360m inactive=24h max_size=256M;
fastcgi_cache_key "$scheme$request_method$host$request_uri$cookie_pll_language";
fastcgi_cache_use_stale error timeout invalid_header updating http_500 http_503;
fastcgi_cache_methods GET HEAD;
fastcgi_buffers 256 32k;
fastcgi_buffer_size 256k;
fastcgi_connect_timeout 4s;
fastcgi_send_timeout 120s;
fastcgi_busy_buffers_size 512k;
fastcgi_temp_file_write_size 512K;
fastcgi_param SERVER_NAME $http_host;
fastcgi_ignore_headers Cache-Control Expires Set-Cookie;
fastcgi_keep_conn on;
fastcgi_cache_lock on;
fastcgi_cache_lock_age 1s;
fastcgi_cache_lock_timeout 3s;
server {

    server_name domain.tld;

    access_log /var/log/nginx/domain.tld.access.log;
    error_log /var/log/nginx/domain.tld.error.log;

    root /var/www/domain.tld/htdocs;
    index index.php index.html index.htm;

    # add X-fastcgi-cache header to see if requests are cached
    add_header X-fastcgi-cache $upstream_cache_status;

    # default try_files directive for WP 5.0+ with pretty URLs
    location / {
        try_files $uri $uri/ /index.php$is_args$args;
    }
    # pass requests to fastcgi with fastcgi_cache enabled
    location ~ \.php$ {
        try_files $uri =404;
        include fastcgi_params;
        fastcgi_pass php;
        fastcgi_cache_bypass $skip_cache;
        fastcgi_no_cache $skip_cache;
        fastcgi_cache WORDPRESS;
        fastcgi_cache_valid 200 30m;
    }
    # block to purge nginx cache with nginx was built with ngx_cache_purge module
    location ~ /purge(/.*) {
        fastcgi_cache_purge WORDPRESS "$scheme$request_method$host$1";
        access_log off;
    }

}
location / {
        proxy_pass http://127.0.0.1:3000;
        proxy_redirect      off;
        proxy_set_header    Host            $host;
        proxy_set_header    X-Real-IP       $remote_addr;
        proxy_set_header    X-Forwarded-For $proxy_add_x_forwarded_for;
    }
location /folder/ { # The / is important!
        proxy_pass http://127.0.0.1:3000/;# The / is important!
        proxy_redirect      off;
        proxy_set_header    Host            $host;
        proxy_set_header    X-Real-IP       $remote_addr;
        proxy_set_header    X-Forwarded-For $proxy_add_x_forwarded_for;
    }
# Upstreams
upstream backend {
    server 127.0.0.1:3000;
    keepalive 5;
}
# HTTP Server
server {
    server_name your_hostname.com;
    error_log /var/log/nginx/rocketchat.access.log;
    location / {
        proxy_pass http://backend;
        proxy_http_version 1.1;
        proxy_set_header Upgrade $http_upgrade;
        proxy_set_header Connection "upgrade";
        proxy_set_header Host $http_host;
        proxy_set_header X-Real-IP $remote_addr;
        proxy_set_header X-Forward-For $proxy_add_x_forwarded_for;
        proxy_set_header X-Forward-Proto http;
        proxy_set_header X-Nginx-Proxy true;
        proxy_redirect off;
    }
}
server {

    server_name domain.tld;

    access_log /var/log/nginx/domain.tld.access.log;
    error_log /var/log/nginx/domain.tld.error.log;

    root /var/www/domain.tld/htdocs;

    # pass requests to Apache backend
    location / {
        proxy_pass http://backend;
    }
    # handle static files with a fallback
    location ~* \.(ogg|ogv|svg|svgz|eot|otf|woff|woff2|ttf|m4a|mp4|ttf|rss|atom|jpe?g|gif|cur|heic|png|tiff|ico|zip|webm|mp3|aac|tgz|gz|rar|bz2|doc|xls|exe|ppt|tar|mid|midi|wav|bmp|rtf|swf|webp)$ {
        add_header "Access-Control-Allow-Origin" "*";
        access_log off;
        log_not_found off;
        expires max;
        try_files $uri @fallback;
    }
    # fallback to pass requests to Apache if files are not found
    location @fallback {
        proxy_pass http://backend;
    }
}
location ~* "\.(old|orig|original|php#|php~|php_bak|save|swo|aspx?|tpl|sh|bash|bak?|cfg|cgi|dll|exe|git|hg|ini|jsp|log|mdb|out|sql|svn|swp|tar|rdf)$" {
    deny all;
}
location ~ /\.(?!well-known\/) {
    deny all;
}
location ~* "(base64_encode)(.*)(\()" {
    deny all;
}
location ~* "(eval\()" {
    deny all;
}
location = /robots.txt {
# Some WordPress plugin gererate robots.txt file
# Refer #340 issue
    try_files $uri $uri/ /index.php?$args @robots;
    access_log off;
    log_not_found off;
}
location @robots {
    return 200 "User-agent: *\nDisallow: /wp-admin/\nAllow: /wp-admin/admin-ajax.php\n";
}
add_header X-Robots-Tag "noindex";

location = /robots.txt {
  return 200 "User-agent: *\nDisallow: /\n";
}
location /videos {
    location ~ \.(mp4)$ {
        mp4;
        mp4_buffer_size       1m;
        mp4_max_buffer_size   5m;
        add_header Vary "Accept-Encoding";
        add_header "Access-Control-Allow-Origin" "*";
        add_header Cache-Control "public, no-transform";
        access_log off;
        log_not_found off;
        expires max;
    }
}
Mapping conditions to display WebP images
# serve WebP images if web browser support WebP
map $http_accept $webp_suffix {
   default "";
   "~*webp" ".webp";
}
Set conditional try_files to server WebP image :
# webp rewrite rules for jpg and png images
# try to load alternative image.png.webp before image.png
location /wp-content/uploads {
    location ~ \.(png|jpe?g)$ {
        add_header Vary "Accept-Encoding";
        add_header "Access-Control-Allow-Origin" "*";
        add_header Cache-Control "public, no-transform";
        access_log off;
        log_not_found off;
        expires max;
        try_files $uri$webp_suffix $uri =404;
    }
}
$db['default'] = array(
        'dsn'   => '',
        'hostname' => 'localhost',
        'username' => 'root',
        'password' => '',
        'database' => 'database_name',
        'dbdriver' => 'mysqli',
        'dbprefix' => '',
        'pconnect' => TRUE,
        'db_debug' => TRUE,
        'cache_on' => FALSE,
        'cachedir' => '',
        'char_set' => 'utf8',
        'dbcollat' => 'utf8_general_ci',
        'swap_pre' => '',
        'encrypt' => FALSE,
        'compress' => FALSE,
        'stricton' => FALSE,
        'failover' => array(
            array(
                    'hostname' => 'localhost1',
                    'username' => '',
                    'password' => '',
                    'database' => '',
                    'dbdriver' => 'mysqli',
                    'dbprefix' => '',
                    'pconnect' => TRUE,
                    'db_debug' => TRUE,
                    'cache_on' => FALSE,
                    'cachedir' => '',
                    'char_set' => 'utf8',
                    'dbcollat' => 'utf8_general_ci',
                    'swap_pre' => '',
                    'encrypt' => FALSE,
                    'compress' => FALSE,
                    'stricton' => FALSE
            ),
            array(
                    'hostname' => 'localhost2',
                    'username' => '',
                    'password' => '',
                    'database' => '',
                    'dbdriver' => 'mysqli',
                    'dbprefix' => '',
                    'pconnect' => TRUE,
                    'db_debug' => TRUE,
                    'cache_on' => FALSE,
                    'cachedir' => '',
                    'char_set' => 'utf8',
                    'dbcollat' => 'utf8_general_ci',
                    'swap_pre' => '',
                    'encrypt' => FALSE,
                    'compress' => FALSE,
                    'stricton' => FALSE
            )
        )
);Representational state transfer (REST) or RESTful web services provide a way to exchange data between applications or systems on the Internet. RESTful web service also refers as RESTful API, uses HTTP request to GET, PUT, POST and DELETE data across platforms. In present days, RESTful API is an essential component of the web application.
When the CodeIgniter application requires communicating with another application, RESTful API is needed to integrate into CodeIgniter. Using RESTful API in CodeIgniter, you can exchange data between different applications or platform. This tutorial shows RESTful server implementation for CodeIgniter and you will learn how to create RESTful web services in CodeIgniter.
To demonstrate CodeIgniter REST API, we will implement CRUD operations in CodeIgniter web service. The following tasks will be performed to create a simple REST API in CodeIgniter.
Before you get started, take a look the files structure of CodeIgniter REST API.

To store user’s information, a table needs to be created in the database. The following SQL creates a users table with some basic fields in MySQL database.
CREATE TABLE `users` (
 `id` int(11) NOT NULL AUTO_INCREMENT,
 `first_name` varchar(100) COLLATE utf8_unicode_ci NOT NULL,
 `last_name` varchar(100) COLLATE utf8_unicode_ci NOT NULL,
 `email` varchar(255) COLLATE utf8_unicode_ci NOT NULL,
 `phone` varchar(20) COLLATE utf8_unicode_ci NOT NULL,
 `created` datetime NOT NULL,
 `modified` datetime NOT NULL,
 `status` enum('1','0') COLLATE utf8_unicode_ci NOT NULL,
 PRIMARY KEY (`id`)
) ENGINE=InnoDB DEFAULT CHARSET=utf8 COLLATE=utf8_unicode_ci;

The following SQL creates a keys table to store REST API key for authentication.
CREATE TABLE `keys` (
 `id` int(11) NOT NULL AUTO_INCREMENT,
 `user_id` int(11) NOT NULL,
 `key` varchar(40) NOT NULL,
 `level` int(2) NOT NULL,
 `ignore_limits` tinyint(1) NOT NULL DEFAULT '0',
 `is_private_key` tinyint(1) NOT NULL DEFAULT '0',
 `ip_addresses` text,
 `date_created` datetime NOT NULL,
 PRIMARY KEY (`id`)
) ENGINE=InnoDB DEFAULT CHARSET=utf8;

Now insert an API key in keys table, which will be used on API call.
INSERT INTO `keys` (`id`, `user_id`, `key`, `level`, `ignore_limits`, `is_private_key`, `ip_addresses`, `date_created`) VALUES
(1, 0, 'CODEX@123', 0, 0, 0, NULL, '2017-10-12 13:34:33');
We will use CodeIgniter REST_Controller to build RESTful web services in CodeIgniter. Follow the below steps to setup REST Controller Library in your CodeIgniter application.
application/config/ directory.application/config/rest.php file and setup the following configuration.
$config['rest_valid_logins'] = ['admin' => '1234'];
$config['rest_enable_keys'] = TRUE;
application/libraries/ directory.application/libraries/ directory.application/language/english/ directory.Note that: All the required library files are included in our example CodeIgniter application, so, you don’t need to download these files separately. Download our source code to get sample CodeIgniter RESTful Web service application.
Open the application/models/ directory and create User.php file and add the following code to handle the database related works.
The User model has the following methods to fetch, insert, update, and delete user data in the database.
users table and returns single row or multiple rows.users table.users table based on the given ID.users table based on the given ID.load->database();
}
/*
* Fetch user data
*/
function getRows($id = ""){
if(!empty($id)){
$query = $this->db->get_where('users', array('id' => $id));
return $query->row_array();
}else{
$query = $this->db->get('users');
return $query->result_array();
}
}
/*
* Insert user data
*/
public function insert($data = array()) {
if(!array_key_exists('created', $data)){
$data['created'] = date("Y-m-d H:i:s");
}
if(!array_key_exists('modified', $data)){
$data['modified'] = date("Y-m-d H:i:s");
}
$insert = $this->db->insert('users', $data);
if($insert){
return $this->db->insert_id();
}else{
return false;
}
}
/*
* Update user data
*/
public function update($data, $id) {
if(!empty($data) && !empty($id)){
if(!array_key_exists('modified', $data)){
$data['modified'] = date("Y-m-d H:i:s");
}
$update = $this->db->update('users', $data, array('id'=>$id));
return $update?true:false;
}else{
return false;
}
}
/*
* Delete user data
*/
public function delete($id){
$delete = $this->db->delete('users',array('id'=>$id));
return $delete?true:false;
}
}
?>
It’s always a good idea to group all API controllers in a separate folder for better usability. So, create an api/ folder in application/controllers/ directory to place the controller which will be used for API call.
Open the application/controllers/api/ directory and create Example.php file. At first, include the REST Controller library and add the following code.
The Example API controller has the following methods to handle the GET, POST, PUT, and DELETE request.
load->model('user');
    }

    public function user_get($id = 0) {
        //returns all rows if the id parameter doesn't exist,
        //otherwise single row will be returned
        $users = $this->user->getRows($id);

        //check if the user data exists
        if(!empty($users)){
            //set the response and exit
            $this->response($users, REST_Controller::HTTP_OK);
        }else{
            //set the response and exit
            $this->response([
                'status' => FALSE,
                'message' => 'No user were found.'
            ], REST_Controller::HTTP_NOT_FOUND);
        }
    }

    public function user_post() {
        $userData = array();
        $userData['first_name'] = $this->post('first_name');
        $userData['last_name'] = $this->post('last_name');
        $userData['email'] = $this->post('email');
        $userData['phone'] = $this->post('phone');
        if(!empty($userData['first_name']) && !empty($userData['last_name']) && !empty($userData['email']) && !empty($userData['phone'])){
            //insert user data
            $insert = $this->user->insert($userData);

            //check if the user data inserted
            if($insert){
                //set the response and exit
                $this->response([
                    'status' => TRUE,
                    'message' => 'User has been added successfully.'
                ], REST_Controller::HTTP_OK);
            }else{
                //set the response and exit
                $this->response("Some problems occurred, please try again.", REST_Controller::HTTP_BAD_REQUEST);
            }
        }else{
            //set the response and exit
            $this->response("Provide complete user information to create.", REST_Controller::HTTP_BAD_REQUEST);
        }
    }

    public function user_put() {
        $userData = array();
        $id = $this->put('id');
        $userData['first_name'] = $this->put('first_name');
        $userData['last_name'] = $this->put('last_name');
        $userData['email'] = $this->put('email');
        $userData['phone'] = $this->put('phone');
        if(!empty($id) && !empty($userData['first_name']) && !empty($userData['last_name']) && !empty($userData['email']) && !empty($userData['phone'])){
            //update user data
            $update = $this->user->update($userData, $id);

            //check if the user data updated
            if($update){
                //set the response and exit
                $this->response([
                    'status' => TRUE,
                    'message' => 'User has been updated successfully.'
                ], REST_Controller::HTTP_OK);
            }else{
                //set the response and exit
                $this->response("Some problems occurred, please try again.", REST_Controller::HTTP_BAD_REQUEST);
            }
        }else{
            //set the response and exit
            $this->response("Provide complete user information to update.", REST_Controller::HTTP_BAD_REQUEST);
        }
    }

    public function user_delete($id){
        //check whether post id is not empty
        if($id){
            //delete post
            $delete = $this->user->delete($id);

            if($delete){
                //set the response and exit
                $this->response([
                    'status' => TRUE,
                    'message' => 'User has been removed successfully.'
                ], REST_Controller::HTTP_OK);
            }else{
                //set the response and exit
                $this->response("Some problems occurred, please try again.", REST_Controller::HTTP_BAD_REQUEST);
            }
        }else{
            //set the response and exit
            $this->response([
                'status' => FALSE,
                'message' => 'No user were found.'
            ], REST_Controller::HTTP_NOT_FOUND);
        }
    }
}

?>
Now it’s time to interact with the CodeIgniter RESTful Web Services. The cURL is the most flexible and easiest way to interact with a REST API. In the following example code, we will show you how to send GET, POST, PUT and DELETE request to CodeIgniter REST API using PHP cURL. Also, HTTP Basic authentication and API key will be used to connect with RESTful API.
Retrieve User Data via REST API
The following code performs a GET request to fetch the user data via RESTful Web Services (Example API).
//API URL
$url = 'http://localhost/codeigniter/api/example/user/';

//API key
$apiKey = 'CODEX@123';

//Auth credentials
$username = "admin";
$password = "1234";

//create a new cURL resource
$ch = curl_init($url);

curl_setopt($ch, CURLOPT_TIMEOUT, 30);
curl_setopt($ch, CURLOPT_RETURNTRANSFER,1);
curl_setopt($ch, CURLOPT_HTTPAUTH, CURLAUTH_ANY);
curl_setopt($ch, CURLOPT_HTTPHEADER, array("X-API-KEY: " . $apiKey));
curl_setopt($ch, CURLOPT_USERPWD, "$username:$password");

$result = curl_exec($ch);

//close cURL resource
curl_close($ch);
Insert User Data via REST API
The following code performs a POST request to insert user data via RESTful Web Services (Example API).
//API URL
$url = 'http://localhost/codeigniter/api/example/user/';

//API key
$apiKey = 'CODEX@123';

//Auth credentials
$username = "admin";
$password = "1234";

//user information
$userData = array(
    'first_name' => 'John',
    'last_name' => 'Doe',
    'email' => 'john@example.com',
    'phone' => '123-456-7890'
);

//create a new cURL resource
$ch = curl_init($url);

curl_setopt($ch, CURLOPT_TIMEOUT, 30);
curl_setopt($ch, CURLOPT_RETURNTRANSFER,1);
curl_setopt($ch, CURLOPT_HTTPAUTH, CURLAUTH_ANY);
curl_setopt($ch, CURLOPT_HTTPHEADER, array("X-API-KEY: " . $apiKey));
curl_setopt($ch, CURLOPT_USERPWD, "$username:$password");
curl_setopt($ch, CURLOPT_POST, 1);
curl_setopt($ch, CURLOPT_POSTFIELDS, $userData);

$result = curl_exec($ch);

//close cURL resource
curl_close($ch);
Update User Data via REST API
The following code performs a PUT request to update user data via RESTful Web Services (Example API).
//API URL
$url = 'http://localhost/codeigniter/api/example/user/';

//API key
$apiKey = 'CODEX@123';

//Auth credentials
$username = "admin";
$password = "1234";

//user information
$userData = array(
    'id' => 2,
    'first_name' => 'John2',
    'last_name' => 'Doe2',
    'email' => 'john2@example.com',
    'phone' => '098-765-4321'
);

//create a new cURL resource
$ch = curl_init($url);

curl_setopt($ch, CURLOPT_TIMEOUT, 30);
curl_setopt($ch, CURLOPT_RETURNTRANSFER,1);
curl_setopt($ch, CURLOPT_HTTPAUTH, CURLAUTH_ANY);
curl_setopt($ch, CURLOPT_HTTPHEADER, array('X-API-KEY: '.$apiKey, 'Content-Type: application/x-www-form-urlencoded'));
curl_setopt($ch, CURLOPT_USERPWD, "$username:$password");
curl_setopt($ch, CURLOPT_CUSTOMREQUEST, "PUT");
curl_setopt($ch, CURLOPT_POSTFIELDS, http_build_query($userData));

$result = curl_exec($ch);

//close cURL resource
curl_close($ch);
Delete User Data via REST API
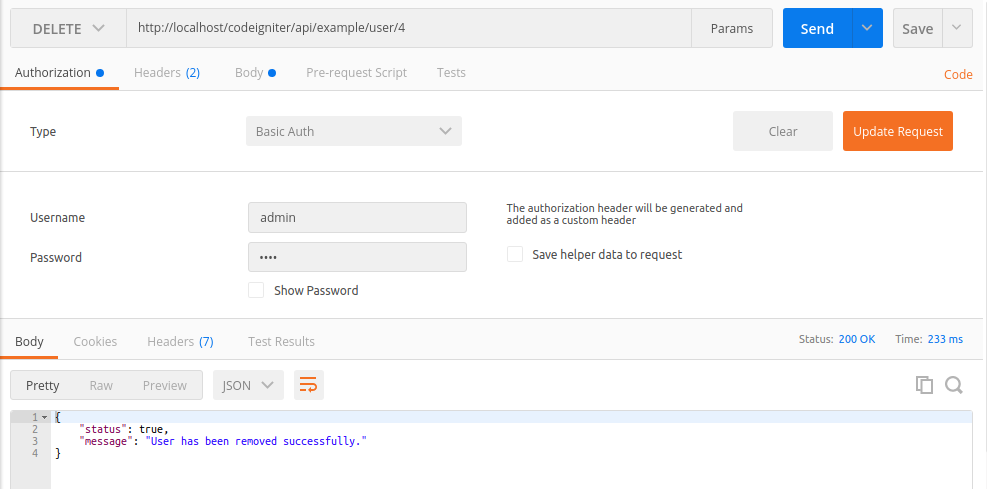
The following code performs a DELETE request to delete user data via RESTful Web Services (Example API).
//API URL
$url = 'http://localhost/codeigniter/api/example/user/2';

//API key
$apiKey = 'CODEX@123';

//Auth credentials
$username = "admin";
$password = "1234";

//create a new cURL resource
$ch = curl_init($url);

curl_setopt($ch, CURLOPT_TIMEOUT, 30);
curl_setopt($ch, CURLOPT_RETURNTRANSFER,1);
curl_setopt($ch, CURLOPT_HTTPAUTH, CURLAUTH_ANY);
curl_setopt($ch, CURLOPT_HTTPHEADER, array("X-API-KEY: " . $apiKey));
curl_setopt($ch, CURLOPT_USERPWD, "$username:$password");
curl_setopt($ch, CURLOPT_CUSTOMREQUEST, 'DELETE');

$result = curl_exec($ch);

//close cURL resource
curl_close($ch);
Postman Extension makes API development faster, easier, and better. Install Postman Extension for testing the API call.
GET http://localhost/codeigniter/api/example/user/
GET http://localhost/codeigniter/api/example/user/4
POST http://localhost/codeigniter/api/example/user/
Update user data in the database: PUT http://localhost/codeigniter/api/example/user/
Delete user from the database: DELETE http://localhost/codeigniter/api/example/user/4
Option 01:
$active_group = 'default';
$query_builder = TRUE;

$db['default'] = array(
    'dsn'   => '',
    'hostname' => '192.168.0.109:1521/orcl', //hostname:db_port/service_name
    //'hostname' => 'localhost:1521/orcl',
    'username' => 'db_username',
    'password' => 'db_password',
    'database' => 'db_name',
    'dbdriver' => 'oci8',
    'dbprefix' => '',
    'pconnect' => FALSE,
    'db_debug' => (ENVIRONMENT !== 'production'),
    'cache_on' => FALSE,
    'cachedir' => '',
    'char_set' => 'utf8',
    'dbcollat' => 'utf8_general_ci',
    'swap_pre' => '',
    'encrypt' => FALSE,
    'compress' => FALSE,
    'stricton' => FALSE,
    'failover' => array(),
    'save_queries' => TRUE
);


Option 02:
$active_group = 'default';
$active_record = TRUE;
$db['default']['hostname'] = '(DESCRIPTION=(ADDRESS=(PROTOCOL=TCP)(HOST=192.168.0.246)(PORT=1521))(CONNECT_DATA=(SID=orcl)))';
$db['default']['username'] = 'db_username';
$db['default']['password'] = 'db_password';
$db['default']['database'] = 'db_name';
$db['default']['dbdriver'] = 'oci8';
$db['default']['dbprefix'] = '';
$db['default']['pconnect'] = TRUE;
$db['default']['db_debug'] = TRUE;
$db['default']['cache_on'] = FALSE;
$db['default']['cachedir'] = '';
$db['default']['char_set'] = 'utf8';
$db['default']['dbcollat'] = 'utf8_general_ci';
$db['default']['swap_pre'] = '';
$db['default']['autoinit'] = TRUE;
$db['default']['stricton'] = FALSE;Postgresql extension in php.iniextension=php_pgsql.dll
You also can enable Postgresql extension for PDO as well.
extension=php_pdo_pgsql.dll
$db['default'] = array(
    'port'   => 5432, # Add
);
OR
$db['default'] = array(
    'dsn'   => 'pgsql:host=localhost;port=5432;dbname=database_name',
    'dbdriver' => 'pdo',
);
$active_group = ‘default’;
$query_builder = TRUE;
$db[‘default’] = array(
‘dsn’ => ”,
‘hostname’ => ‘localhost’,
‘username’ => ‘postgres’,
‘password’ => ”,
‘database’ => ‘fmsdb’,
‘dbdriver’ => ‘postgre’,
‘dbprefix’ => ”,
‘pconnect’ => FALSE,
‘db_debug’ => (ENVIRONMENT !== ‘production’),
‘cache_on’ => FALSE,
‘cachedir’ => ”,
‘char_set’ => ‘utf8’,
‘dbcollat’ => ‘utf8_general_ci’,
‘swap_pre’ => ”,
‘encrypt’ => FALSE,
‘compress’ => FALSE,
‘stricton’ => FALSE,
‘failover’ => array(),
‘save_queries’ => TRUE
);
The WordPress REST API was introduced in the WordPress core at the end of 2016 with the release of WordPress 4.6. Like all the big changes that appear in the platform, the REST API generated controversy in some and indifference in others.
It’s even possible that you have no idea what it is, but if you have an updated version of WordPress (and you should) you are exposing many aspects of your website publicly through the REST API. Just append the fragment /wp-json/ to your domain name and visit this URL to see it with your own eyes.
Moreover, do the exercise of visiting the following web URLs and you may be surprised with what you’ll find:
mydomain.com/wp-json/wp/v2/usersmydomain.com/wp-json/wp/v2/postsAs a result of the first URL you will have a JSON with the data of the users of your web. Notice that user identifiers are included there, and this is something that people traditionally hide due to security issues and to prevent possible attacks.
The second URL shows us a list with the last posts. However, if you have protected content that only certain premium users of your website (in a membership site, for example) should have access to, it’s possible that you’ve been exposing this premium content through the REST API.
Let’s see how we can avoid compromised situations by being more aware of what we publicly expose through the WordPress REST API.
A solution that we can implement to hide the WordPress REST API is to prevent those users who are not registered on our website from accessing it.
To hide the REST API to unregistered users, we must add the following code in our WordPress. Remember that you can put it in the functions.php file of your theme or just develop a plugin for it (a much better option).
  }

if ( ! current_user_can( 'administrator' ) ) {

return new WP_Error( 'rest_not_admin', 'You are not an administrator.', array( 'status' => 401 ) );

}

return $result;

});
  }

return $result;

});
Change password in CodeIgniter with callback validation for check old password.
application/controllers/Users.php
defined('BASEPATH') OR exit('No direct script access allowed');

class Users extends CI_Controller{

    public function __construct()
    {
        parent::__construct();
        $this->load->helper('form');
        $this->load->library('form_validation');
        $this->load->model('users_model');
    }

    private function logged_in()
    {
        if( ! $this->session->userdata('authenticated')){
            redirect('users/login');
        }
    }

    public function changePassword()
    {
        $this->logged_in();

        $data['title'] = 'Change Password';

        $this->load->library('form_validation');

        $this->form_validation->set_rules('oldpass', 'old password', 'callback_password_check');
        $this->form_validation->set_rules('newpass', 'new password', 'required');
        $this->form_validation->set_rules('passconf', 'confirm password', 'required|matches[newpass]');

        $this->form_validation->set_error_delimiters('', '');

        if($this->form_validation->run() == false) {
            $this->load->view('header', $data);
            $this->load->view('users/change_password', $data);
            $this->load->view('footer', $data);
        }
        else {

            $id = $this->session->userdata('id');

            $newpass = $this->input->post('newpass');

            $this->users_model->update_user($id, array('password' => md5($newpass)));

            redirect('users/logout');
        }
    }

    public function password_check($oldpass)
    {
        $id = $this->session->userdata('id');
        $user = $this->users_model->get_user($id);

        if($user->password !== md5($oldpass)) {
            $this->form_validation->set_message('password_check', 'The {field} does not match');
            return false;
        }

        return true;
    }
}
?>
application/models/Users_model.php
CREATE TABLE IF NOT EXISTS `ci_sessions` (
`id` varchar(40) NOT NULL,
`ip_address` varchar(45) NOT NULL,
`timestamp` int(10) unsigned DEFAULT 0 NOT NULL,
`data` blob NOT NULL,
KEY `ci_sessions_timestamp` (`timestamp`)
)
How do I install MySQL server 8.0 on CentOS 8 Linux server running on Linode and AWS cloud? How do I add and set up a new MySQL user and database account on the newly created CentOS server?
Oracle MySQL server version 8.0 is a free and open-source free database server. It is one of the most popular database system used in web apps and websites on the Internet.
Typically MySQL is part of the LAMP (Linux, Apache/Nginx, MySQL, Perl/Python/PHP) stack. Popular open-source software such as WordPress, MediaWiki, and others profoundly used by MySQL as a database storage engine. Let us see how to install MySQL server version 8.x on CentOS 8 Linux server.
| Tutorial requirements | |
|---|---|
| Requirements | CentOS Linux 8 |
| Root privileges | Yes |
| Difficulty | Easy |
| Est. reading time | 15m |
First, open the terminal app and then log in to your CentOS server using the ssh command:
$ ssh vivek@centos-8-ec2-box-ip
Now, update CentOS system to apply security updates and fixes on Linux system using the dnf command/yum command:
$ sudo yum update

## or ##

$ sudo dnf update
Sample outputs:
CentOS-8 - AppStream                            21 MB/s | 5.8 MB     00:00
CentOS-8 - Base                                 14 MB/s | 2.2 MB     00:00
CentOS-8 - Extras                               50 kB/s | 8.6 kB     00:00
Dependencies resolved.
Nothing to do.
Complete!
Luckily our CentOS 8 box comes with MySQL 8 server package. Let us search for it:
$ sudo yum search mysql-server

$ sudo yum module list mysql
And we see:
Last metadata expiration check: 0:02:47 ago on Mon Nov 23 16:26:31 2020.
===================== Name Exactly Matched: mysql-server ======================
mysql-server.x86_64 : The MySQL server and related files
Next, find out version information, run:
$ sudo yum info mysql-server
Here is what we see:
Last metadata expiration check: 0:02:22 ago on Mon Nov 23 16:26:31 2020.
Available Packages
Name         : mysql-server
Version      : 8.0.21
Release      : 1.module_el8.2.0+493+63b41e36
Architecture : x86_64
Size         : 22 M
Source       : mysql-8.0.21-1.module_el8.2.0+493+63b41e36.src.rpm
Repository   : AppStream
Summary      : The MySQL server and related files
URL          : http://www.mysql.com
License      : GPLv2 with exceptions and LGPLv2 and BSD
Description  : MySQL is a multi-user, multi-threaded SQL database server. MySQL
             : is a client/server implementation consisting of a server daemon
             : (mysqld) and many different client programs and libraries. This
             : package contains the MySQL server and some accompanying files
             : and directories.
Install it:
$ sudo yum install mysql-server

Click to enlarge
The service name is mysqld.service, and we need to enable it using the following systemctl command:
$ sudo systemctl enable mysqld.service
Confirmation displayed:
reated symlink /etc/systemd/system/multi-user.target.wants/mysqld.service → /usr/lib/systemd/system/mysqld.service.
Start the service and then verify it:
$ sudo systemctl start mysqld.service

$ sudo systemctl status mysqld.service
● mysqld.service - MySQL 8.0 database server
   Loaded: loaded (/usr/lib/systemd/system/mysqld.service; enabled; vendor preset: disabled)
   Active: active (running) since Mon 2020-11-23 16:50:14 UTC; 4s ago
  Process: 551 ExecStopPost=/usr/libexec/mysql-wait-stop (code=exited, status=0/SUCCESS)
  Process: 681 ExecStartPost=/usr/libexec/mysql-check-upgrade (code=exited, status=0/SUCCESS)
  Process: 601 ExecStartPre=/usr/libexec/mysql-prepare-db-dir mysqld.service (code=exited, status=0/SUCCESS)
  Process: 577 ExecStartPre=/usr/libexec/mysql-check-socket (code=exited, status=0/SUCCESS)
 Main PID: 637 (mysqld)
   Status: "Server is operational"
    Tasks: 39 (limit: 24960)
   Memory: 331.0M
   CGroup: /system.slice/mysqld.service
           └─637 /usr/libexec/mysqld --basedir=/usr

Nov 23 16:50:13 centos-aws-mysql systemd[1]: Stopped MySQL 8.0 database server.
Nov 23 16:50:13 centos-aws-mysql systemd[1]: Starting MySQL 8.0 database server...
Nov 23 16:50:14 centos-aws-mysql systemd[1]: Started MySQL 8.0 database server.
All you need to do is type the following command, and it will secure MySQL 8 server installation on CentOS Linux:
$ sudo mysql_secure_installation
Please set the password for root here.

New password:

Re-enter new password:

Estimated strength of the password: 100
Do you wish to continue with the password provided?(Press y|Y for Yes, any other key for No) : y
By default, a MySQL installation has an anonymous user,
allowing anyone to log into MySQL without having to have
a user account created for them. This is intended only for
testing, and to make the installation go a bit smoother.
You should remove them before moving into a production
environment.

Remove anonymous users? (Press y|Y for Yes, any other key for No) : y
Success.


Normally, root should only be allowed to connect from
'localhost'. This ensures that someone cannot guess at
the root password from the network.

Disallow root login remotely? (Press y|Y for Yes, any other key for No) : y
Success.

By default, MySQL comes with a database named 'test' that
anyone can access. This is also intended only for testing,
and should be removed before moving into a production
environment.


Remove test database and access to it? (Press y|Y for Yes, any other key for No) : y
 - Dropping test database...
Success.

 - Removing privileges on test database...
Success.

Reloading the privilege tables will ensure that all changes
made so far will take effect immediately.

Reload privilege tables now? (Press y|Y for Yes, any other key for No) : y
Success.

All done!
The syntax is:
$ sudo systemctl start mysql.service

$ sudo systemctl stop mysql.service

$ sudo systemctl restart mysql.service
To view the MySQL 8 service log as follows using the journalctl command:
$ sudo journalctl -u mysqld.service -xe

$ sudo tail -f /var/log/mysql/mysqld.log
MySQL 8 log file sample entries:
2020-11-23T16:55:19.101316Z 0 [System] [MY-013172] [Server] Received SHUTDOWN from user . Shutting down mysqld (Version: 8.0.21).
2020-11-23T16:55:21.728819Z 0 [Warning] [MY-010909] [Server] /usr/libexec/mysqld: Forcing close of thread 10  user: 'root'.
2020-11-23T16:55:23.083389Z 0 [System] [MY-010910] [Server] /usr/libexec/mysqld: Shutdown complete (mysqld 8.0.21)  Source distribution.
2020-11-23T16:56:19.225544Z 0 [System] [MY-010116] [Server] /usr/libexec/mysqld (mysqld 8.0.21) starting as process 524
2020-11-23T16:56:19.237500Z 1 [System] [MY-013576] [InnoDB] InnoDB initialization has started.
2020-11-23T16:56:19.562441Z 1 [System] [MY-013577] [InnoDB] InnoDB initialization has ended.
2020-11-23T16:56:19.677202Z 0 [System] [MY-011323] [Server] X Plugin ready for connections. Bind-address: '::' port: 33060, socket: /var/lib/mysql/mysqlx.sock
2020-11-23T16:56:19.754024Z 0 [Warning] [MY-010068] [Server] CA certificate ca.pem is self signed.
2020-11-23T16:56:19.754207Z 0 [System] [MY-013602] [Server] Channel mysql_main configured to support TLS. Encrypted connections are now supported for this channel.
2020-11-23T16:56:19.780843Z 0 [System] [MY-010931] [Server] /usr/libexec/mysqld: ready for connections. Version: '8.0.21'  socket: '/var/lib/mysql/mysql.sock'  port: 3306  Source distribution.
So far, so good. You learned how to install, set up, secure, and start/stop the MySQL 8 on CentOS 8 Linux cloud server. It is time to log in as a
mysql root user. The syntax is:
$ mysql -u root -p

$ mysql -u USER -h host -p

$ mysql -u USER -h host -p mysql
Let us type a few SQL commands at the mysql> prompt:
STATUS;

SHOW VARIABLES LIKE "%version%";

quit

Let create a new database called ‘spacedb‘, type at the mysql> prompt:
CREATE DATABASE spacedb;
Next, we are going to create a new user named ‘mars‘ for our database called ‘spacedb’ as follows:
CREATE USER 'mars'@'%' IDENTIFIED BY 'User_Password_Here';
Finally, give permissions:
GRANT SELECT, INSERT, UPDATE, DELETE ON spacedb.* TO 'mars'@'%';
Of course, we can grant ALL PRIVILEGES too as follows:
GRANT ALL PRIVILEGES ON spacedb.* TO 'mars'@'%';
See MySQL 8 users and their grants/permissions as follows:
SELECT user,host FROM mysql.user;

SHOW GRANTS for mars;

quit
Test new user settings and DB as follows:
mysql -u mars -p spacedb

mysql -u mars -h localhost -p spacedb

Where,
Let us see default config file using the cat command:
# cat /etc/my.cnf.d/mysql-server.cnf
Config:
[mysqld]
datadir=/var/lib/mysql
socket=/var/lib/mysql/mysql.sock
log-error=/var/log/mysql/mysqld.log
pid-file=/run/mysqld/mysqld.pid
Want to allow remote connections to your MySQL server? Edit the /etc/my.cnf.d/mysql-server.cnf and append the following line under [mysqld]:
bind_address = 0.0.0.0
WARNING: See MySQL documentation for a detailed explanation for tuning options as to each server and set up is unique. Do not set up values blindly. I provide them as a starting point for optimizing MySQL 8 installation and values depending upon available RAM, CPU cores, server load and other circumstances.
Set InnoDB settings:
default_storage_engine          = InnoDB
innodb_buffer_pool_instances    = 1
innodb_buffer_pool_size         = 512M
innodb_file_per_table           = 1
innodb_flush_log_at_trx_commit  = 0
innodb_flush_method             = O_DIRECT
innodb_log_buffer_size          = 16M
innodb_log_file_size            = 512M
innodb_stats_on_metadata        = 0
innodb_read_io_threads          = 64
innodb_write_io_threads         = 64
MyISAM settings:
# UPD
key_buffer_size                 = 32M
low_priority_updates            = 1
concurrent_insert               = 2
# UPD
max_connections                 = 100
back_log                        = 512
thread_cache_size               = 100
thread_stack                    = 192K
interactive_timeout             = 180
wait_timeout                    = 180
Buffer settings UPD:
join_buffer_size                = 4M
read_buffer_size                = 3M
read_rnd_buffer_size            = 4M
sort_buffer_size                = 4M
Edit and config logging if needed (by default slow_query disabled):
log_queries_not_using_indexes   = 1
long_query_time                 = 5
#slow_query_log                  = 0
#slow_query_log_file             = /var/log/mysql/mysql_slow.log
This is useful for mysqldump command to make backups:
[mysqldump]
quick
quote_names
max_allowed_packet              = 64M
Are you using MySQL 8 server remotely? Do you have Apache/Nginx/PHP/Python/Perl app on another server? Then open port for everyone:
$ sudo firewall-cmd --zone=public --add-service=mysql --permanent
Only allow access from 192.168.1.0/24 CIDR:
$ sudo firewall-cmd \

--add-rich-rule 'rule family="ipv4" \

source address="192.168.1.0/24" \

service name="mysql" accept' --permanent
The above is fine grained firewalld access rules to restrict access to MySQL 8 server to VLAN users only. See how to set up a firewall using FirewallD on CentOS 8 Linux for more info.
And there you have it, Oracle MySQL server version 8.x set up and running correctly on a CentOS Linux 8 server with Firewalld config. Further, you learned how to add a new database, user, and password for your project including MySQL 8 server tuning options.


