extension=php_pgsql.dll
You also can enable Postgresql extension for PDO as well.
extension=php_pdo_pgsql.dll
| Title | Show All Items |
|---|---|
| URL | /public/items |
| Method | GET |
| Required Authorization | Yes |
| Header Params | Authorization
Example: Authorization = ‘y8AgQDAFFqo=’ |
| URL Params | NONE |
| Data Params | NONE |
| Success Response | Example:
Code: 200 Content: [
{
"id": 22433,
"code": "SHP03095",
"code2": "SHP03095",
"code3": "",
"description": "01 AUREA VERE E BARDHE",
"longDescription": "",
"minimumBalance": 0,
"itemType": 1,
"createDate": "31/12/2013",
"lastUpdateDate": "13/03/2018",
"deleted": false,
"purchasePrice": 130,
"purchaseDiscount": 0,
"salesDiscount": 0,
"active": true,
"unit2Coeficient": 0,
"activeForPurchase": true,
"depreciationMethod": -1,
"depreciationCoeficient": 0,
"netWeight": 0,
"grossWeight": 0,
"customsCountryOfOrigin": "",
"customsCode": "",
"volume": 0,
"excludedFromSalesDiscount": false,
"customsTaxPercentage": 0,
"userID": 70,
"groupID": 343,
"subGroupID": 344,
"defaultSupplierID": 3083,
"itemClassifier1ID": 207,
"itemClassifier2ID": 713,
"itemClassifier3ID": 202,
"itemClassifier4ID": 652,
"itemClassifier5ID": 773,
"VATTypeID": 1,
"unitID": 20,
"unit2ID": -1,
"accountingSchemeID": 1
}
]
|
| Error Response | Example:
Code:401 Content: ‘UNAUTHORIZED’ OR Code:409 Content: ‘Exception message’ |
| Notes |
| Title | Show All Item Groups |
|---|---|
| URL | /public/items/groups |
| Method | GET |
| Required Authorization | Yes |
| Header Params | Authorization
Example: Authorization = ‘y8AgQDAFFqo=’ |
| URL Params | NONE |
| Data Params | NONE |
| Success Response | Example:
Code: 200 Content: [
{
"id": 343,
"code": "MAPO",
"description": "MAPO",
"VAT": 0,
"parentID": -1,
"deleted": false,
"createDate": "07/08/2013",
"lastUpdateDate": "07/08/2013"
}
]
|
| Error Response | Example:
Code:401 Content: ‘UNAUTHORIZED’ OR Code:409 Content: ‘Exception message’ |
| Notes |
| Title | Show All Item SubGroups By ItemGroupID |
|---|---|
| URL | /public/items/groups/subgroups |
| Method | GET |
| Required Authorization | Yes |
| Header Params | Authorization
Example: Authorization = ‘y8AgQDAFFqo=’ |
| URL Params | Required:
parentID=[integer] |
| Data Params | NONE |
| Success Response | Example:
Request: /public/items/groups/subgroups?parentID=394 Code: 200 Content: [
{
"id": 460,
"code": "ALCOHOLIC",
"description": "ALCOHOLIC",
"VAT": 0,
"parentID": 394,
"deleted": false,
"createDate": "31/12/2013",
"lastUpdateDate": "31/12/2013"
},
{
"id": 542,
"code": "BEER",
"description": "BEER",
"VAT": 0,
"parentID": 394,
"deleted": false,
"createDate": "04/09/2015",
"lastUpdateDate": "04/09/2015"
}
]
|
| Error Response | Example:
Code:401 Content: ‘UNAUTHORIZED’ OR Code:409 Content: ‘Exception message’ |
| Notes |
| Title | Show All Item Classifiers |
|---|---|
| URL | /public/items/classifiers |
| Method | GET |
| Required Authorization | Yes |
| Header Params | Authorization
Example: Authorization = ‘y8AgQDAFFqo=’ |
| URL Params | NONE |
| Data Params | NONE |
| Success Response | Example:
Code: 200 Content: [
{
"id": 342,
"code": "BRANCA",
"description": "BRANCA",
"classifierType": 2,
"userID": 70,
"createDate": "31/12/2013",
"lastUpdateDate": "31/12/2013",
"deleted": false
}
]
|
| Error Response | Example:
Code:401 Content: ‘UNAUTHORIZED’ OR Code:409 Content: ‘Exception message’ |
| Notes |
| Title | Show All Item Units |
|---|---|
| URL | /public/items/units |
| Method | GET |
| Required Authorization | Yes |
| Header Params | Authorization
Example: Authorization = ‘y8AgQDAFFqo=’ |
| URL Params | NONE |
| Data Params | NONE |
| Success Response | Example:
Code: 200 Content: [
{
"id": 15,
"code": "KG",
"description": "KG",
"userID": 70,
"createDate": "29/11/2004",
"lastUpdateDate": "29/11/2004",
"deleted": false
}
]
|
| Error Response | Example:
Code:401 Content: ‘UNAUTHORIZED’ OR Code:409 Content: ‘Exception message’ |
| Notes |
| Title | Show All Unpaid Sales Document Headers |
|---|---|
| URL | /public/documents/sales/headers/unpaid/ |
| Method | GET |
| Required Authorization | Yes |
| Header Params | Authorization
Example: Authorization = ‘y8AgQDAFFqo=’ |
| URL Params | NONE |
| Data Params | NONE |
| Success Response | Example:
Code: 200 Content: [
{
"id": 53637,
"documentNumber": "72296",
"description": "FATURE PER RRUMBULLAKOSJE ARKA ",
"total": 8333.3333,
"documentDate": "03/01/2016",
"declarationDate": "03/01/2016",
"dueDate": "08/07/2016",
"generateInventoryDoc": true,
"withVAT": true,
"downPayment": false,
"serialNumber": "",
"amountPaid": 5.688028000000581,
"totalWithVAT": 9999.99996,
"totalDiscount": 0,
"rate": 1,
"paymentStatus": "Faturë e Paguar Pjesërisht",
"generatedSourceID": -1,
"officialClassificationID": -1,
"createDate": "08/07/2016",
"lastUpdateDate": "16/09/2016",
"deleted": false,
"userID": 1028,
"hasChildren": false,
"docTypeID": 4,
"fiscalRegisterMode": 3,
"exportSerialNumber": "",
"transportType": 0,
"transportNotes": "",
"transportTime": "",
"notes": "",
"salesOfferID": -1,
"salesOrderID": -1,
"salesAgentID": -1,
"agentCommission": 0,
"currencyID": 7,
"clientID": 25958,
"serviceUnitID": 129,
"transporterID": -1
}
]
|
| Error Response | Example:
Code:401 Content: ‘UNAUTHORIZED’ OR Code:409 Content: ‘Exception message’ |
| Notes |
| Title | Show All Service Units |
|---|---|
| URL | /public/serviceunits/ |
| Method | GET |
| Required Authorization | Yes |
| Header Params | Authorization
Example: Authorization = ‘y8AgQDAFFqo=’ |
| URL Params | NONE |
| Data Params | NONE |
| Success Response | Example:
Code: 200 Content: [
{
"id": 136,
"code": "MAG TIRANA 2016",
"description": "MAG TIRANA 2016",
"active": true,
"address": "",
"contact": "",
"mobile": "",
"phone": "",
"email": "",
"niptSekondar": "",
"notes": "",
"createDate": "28/03/2016",
"lastUpdateDate": "28/03/2016",
"deleted": false,
"customsDepot": false,
"typeID": 0,
"userID": 921,
"cityID": -1,
"defaultCostCenter1ID": -1,
"defaultCostCenter2ID": -1
}
]
|
| Error Response | Example:
Code:401 Content: ‘UNAUTHORIZED’ OR Code:409 Content: ‘Exception message’ |
| Notes |
| Title | Show All Sales Agents |
|---|---|
| URL | /public/salesagents/ |
| Method | GET |
| Required Authorization | Yes |
| Header Params | Authorization
Example: Authorization = ‘y8AgQDAFFqo=’ |
| URL Params | NONE |
| Data Params | NONE |
| Success Response | Example:
Code: 200 Content: [
{
"id": 1182,
"description": "SARDIAN MEZANI",
"address": "ARTUR BIBO",
"phone": "",
"mobile": "",
"email": "",
"commission": 0,
"active": false,
"hasSpecificItems": false,
"hasSpecificClients": false,
"createDate": "02/02/2017",
"lastUpdateDate": "21/03/2017",
"deleted": false,
"userID": 2084,
"salesAgentUserID": 2109
}
]
|
| Error Response | Example:
Code:401 Content: ‘UNAUTHORIZED’ OR Code:409 Content: ‘Exception message’ |
| Notes |
| Title | Show All Cash Units |
|---|---|
| URL | /public/cashunits/ |
| Method | GET |
| Required Authorization | Yes |
| Header Params | Authorization
Example: Authorization = ‘y8AgQDAFFqo=’ |
| URL Params | NONE |
| Data Params | NONE |
| Success Response | Example:
Code: 200 Content: [
{
"id": 80,
"code": "ARKA 1",
"description": "",
"contact": "",
"active": true,
"createDate": "17/10/2017",
"lastUpdateDate": "17/10/2017",
"deleted": false,
"userID": 2134,
"cityID": -1,
"accountID": 42713,
"currencyID": 7,
"DefaultCostCenter1ID": -1,
"DefaultCostCenter2ID": -1
}
]
|
| Error Response | Example:
Code:401 Content: ‘UNAUTHORIZED’ OR Code:409 Content: ‘Exception message’ |
| Notes |
| Title | Show All Sales Type |
|---|---|
| URL | /public/salestypes/ |
| Method | GET |
| Required Authorization | Yes |
| Header Params | Authorization
Example: Authorization = ‘y8AgQDAFFqo=’ |
| URL Params | NONE |
| Data Params | NONE |
| Success Response | Example:
Code: 200 Content: [
{
"id": 69,
"salesType": "SHUMICE",
"createDate": "24/06/2013",
"lastUpdateDate": "24/06/2013",
"deleted": false,
"userID": 947,
"currencyID": 7
}
]
|
| Error Response | Example:
Code:401 Content: ‘UNAUTHORIZED’ OR Code:409 Content: ‘Exception message’ |
| Notes |
| Title | Show All Items Sales Price By Sales Type ID |
|---|---|
| URL | /public/items/prices |
| Method | GET |
| Required Authorization | Yes |
| Header Params | Authorization
Example: Authorization = ‘y8AgQDAFFqo=’ |
| URL Params | Required:
salesTypeID=[integer] |
| Data Params | NONE |
| Success Response | Example:
Request: /public/items/prices?salesTypeID=70 Code: 200 Content: [
{
"itemID": 32949,
"price": 65.04
},
{
"itemID": 32950,
"price": 335.39
},
{
"itemID": 32951,
"price": 0
}
]
|
| Error Response | Example:
Code:401 Content: ‘UNAUTHORIZED’ OR Code:409 Content: ‘Exception message’ |
| Notes |
| Title | Save Sales Document |
|---|---|
| URL | /public/documents/sales |
| Method | PUT |
| Required Authorization | Yes |
| Header Params | Authorization
Example: Authorization = ‘y8AgQDAFFqo=’ |
| URL Params | NONE |
| Data Params |
                {

                "header":{
                "id":-1,
                "documentNumber":"24",
                "description":"test",
                "documentDate":"16/03/2018",
                "declarationDate":"16/03/2018",
                "dueDate":"16/03/2018",
                "withVAT":true,
                "serialNumber":"",
                "rate":1,
                "currencyID":7,
                "serviceUnitID":140,
                "salesAgentID":140,
                "agentCommission":0,
                "transporterID":140,
                "clientID":30998
                },
                "body":[
                {"id":1113195,
                "price":350.8666666666667,
                "quantity":1,
                "VATCoeficient":0.19999999999999998,
                "discountPercentage":0,
                "itemID":22433,
                "vatTypeClassifierID":1
                }
                ]
                }
|
| Success Response | Example:
Request: /public/documents/sales Code: 200 Content: [
{
"header": {
"id": 216328,
"documentNumber": "24",
"description": "test",
"total": 350.8666666666667,
"documentDate": "16/03/2018",
"declarationDate": "16/03/2018",
"dueDate": "16/03/2018",
"generateInventoryDoc": true,
"withVAT": true,
"downPayment": false,
"serialNumber": "",
"amountPaid": 0,
"totalWithVAT": 421.04,
"totalDiscount": 0,
"rate": 1,
"paymentStatus": "Faturë e Papaguar",
"generatedSourceID": -1,
"officialClassificationID": -1,
"createDate": "16/03/2018",
"lastUpdateDate": "16/03/2018",
"deleted": false,
"userID": 70,
"hasChildren": false,
"docTypeID": 4,
"fiscalRegisterMode": 3,
"exportSerialNumber": "",
"transportType": 0,
"transportNotes": "",
"transportTime": "",
"notes": "",
"salesOfferID": -1,
"salesOrderID": -1,
"agentCommission": 0,
"currencyID": 7,
"clientID": 30998,
"serviceUnitID": 140,
"transporterID": -1,
"salesAgentID": 140
},
"body": [
{
"id": 1113196,
"price": 350.8666666666667,
"quantity": 1,
"VATCoeficient": 0.19999999999999998,
"discountPercentage": 0,
"itemID": 22433,
"vatTypeClassifierID": 1
}
]
}
]
|
| Error Response | Example:
Code:401 Content: ‘UNAUTHORIZED’ Code:501 [
{
"date": "16/03/2018",
"item": {
"id": 22433,
"code": "SHP03095",
"code2": "SHP03095",
"code3": "",
"description": "01 AUREA VERE E BARDHE",
"longDescription": "",
"minimumBalance": 0,
"itemType": 1,
"createDate": "31/12/2013",
"lastUpdateDate": "13/03/2018",
"deleted": false,
"purchasePrice": 130,
"purchaseDiscount": 0,
"salesDiscount": 0,
"active": true,
"unit2Coeficient": 0,
"activeForPurchase": true,
"depreciationMethod": -1,
"depreciationCoeficient": 0,
"netWeight": 0,
"grossWeight": 0,
"customsCountryOfOrigin": "",
"customsCode": "",
"volume": 0,
"excludedFromSalesDiscount": false,
"customsTaxPercentage": 0,
"userID": 70,
"groupID": 343,
"subGroupID": 344,
"defaultSupplierID": 3083,
"itemClassifier1ID": 207,
"itemClassifier2ID": 713,
"itemClassifier3ID": 202,
"itemClassifier4ID": 652,
"itemClassifier5ID": 773,
"VATTypeID": 1,
"unitID": 20,
"unit2ID": -1,
"accountingSchemeID": 1
},
"quantity": -99821
}
]
OR Code:409 Content: ‘Exception message’ |
| Notes |
| Title | Show All Items Inventory By Service Unit |
|---|---|
| URL | /public/items/inventories |
| Method | GET |
| Required Authorization | Yes |
| Header Params | Authorization
Example: Authorization = ‘y8AgQDAFFqo=’ |
| URL Params | Required:
serviceUnitID=[integer] |
| Data Params | NONE |
| Success Response | Example:
Request: /public/items/inventories?serviceUnitID=139 Code: 200 Content: [
{
"itemID": 28619,
"inventory": 1
},
{
"itemID": 34063,
"inventory": 2
}
]
|
| Error Response | Example:
Code:401 Content: ‘UNAUTHORIZED’ OR Code:409 Content: ‘Exception message’ |
| Notes |
| Title | Save Receive Payment Document |
|---|---|
| URL | /public/documents/receivepayment |
| Method | PUT |
| Required Authorization | Yes |
| Header Params | Authorization
Example: Authorization = ‘y8AgQDAFFqo=’ |
| URL Params | NONE |
| Data Params |
                {

	"clientID":26117,

	"header":
		{
			"id":-1,
			"description":"test Rest",
			"amount":120,
			"exchangeRate":1,
			"documentDate":"19/03/2018",
			"cashUnitID":65
		},
	"body":
		[
			{
				"amountPaid":120,
				"exchangeRate":1,
				"invoiceID":216334,
				"invoiceType":4,
				"docID":-1,
				"partnerAccountID":31137,
				"currencyID":7
			}
		]

}
|
| Success Response | Example:
Request: /public/documents/receivepayment Code: 200 Content: 1 |
| Error Response | Example:
Code:401 Content: ‘UNAUTHORIZED’ OR Code:409 Content: ‘Exception message’ |
| Notes |
| Title | Show All Clients |
|---|---|
| URL | /public/clients |
| Method | GET |
| Required Authorization | Yes |
| Header Params | Authorization
Example: Authorization = ‘y8AgQDAFFqo=’ |
| URL Params | NONE |
| Data Params | NONE |
| Success Response | Example:
Code: 200 Content: [
{
"id": 7259,
"code": "",
"nipt": "3213123123",
"debtLimit": 0,
"discountPercentage": 0,
"salesTypeID": 35,
"phone": "",
"mobile": "345345345",
"contactPerson": "",
"notes": "Pocket-PC : ",
"fiscalVATNo": "",
"fiscalBusinessNo": "",
"bankAccount1": "",
"bankAccount2": "",
"bankAccount3": "",
"paymentPeriodInDays": 0,
"isBlockSalesOnMaturityPeriodActive": false,
"accountID": 13070,
"cityID": 2,
"address": "",
"deleted": false,
"isActive": true,
"name": "Aasdasdasdad",
"email": "",
"sex": -1,
"education": -1,
"latitude": 0,
"longitude": 0,
"zoneID": -1,
"subZoneID": -1,
"salesAgentID": 3,
"transporterID": 5,
"isBirthdaySet": false,
"preferredPaymentType": -1,
"salesDiscountTypeID": 0,
"birthDay": "",
"clientClassifier1ID": -1,
"clientClassifier2ID": -1,
"clientClassifier3ID": -1,
"clientClassifier4ID": -1,
"clientClassifier5ID": -1,
"clientClassifier6ID": -1,
"userID": 70,
"createDate": "05/03/2018",
"lastUpdateDate": "05/03/2018"
}
]
|
| Error Response | Example:
Code:401 Content: ‘UNAUTHORIZED’ OR Code:409 Content: ‘Exception message’ |
| Notes |
| Title | Save Client |
|---|---|
| URL | /public/clients |
| Method | PUT |
| Required Authorization | Yes |
| Header Params | Authorization
Example: Authorization = ‘y8AgQDAFFqo=’ |
| URL Params | NONE |
| Data Params |
                {
                "id": -1,
                "code": "",
                "nipt": "",
                "debtLimit": 0,
                "discountPercentage": 0,
                "salesTypeID": 35,
                "phone": "",
                "mobile": "",
                "contactPerson": "",
                "notes": "",
                "fiscalVATNo": "",
                "fiscalBusinessNo": "",
                "bankAccount1": "",
                "bankAccount2": "",
                "bankAccount3": "",
                "paymentPeriodInDays": 0,
                "isBlockSalesOnMaturityPeriodActive": false,
                "cityID": 2,
                "address": "",
                "deleted": false,
                "isActive": true,
                "name": "111111222222222",
                "email": "",
                "sex": -1,
                "education": -1,
                "latitude": 0,
                "longitude": 0,
                "zoneID": -1,
                "subZoneID": -1,
                "salesAgentID": -1,
                "transporterID": -1,
                "isBirthdaySet": false,
                "preferredPaymentType": -1,
                "salesDiscountTypeID": 0,
                "birthDay": "",
                "clientClassifier1ID": -1,
                "clientClassifier2ID": -1,
                "clientClassifier3ID": -1,
                "clientClassifier4ID": -1,
                "clientClassifier5ID": -1,
                "clientClassifier6ID": -1,
                "userID": 70,
                "createDate": "20/03/2018",
                "lastUpdateDate": "20/03/2018"
                }
|
| Success Response | Example:
Code: 200 Content: [ClientID Created] |
| Error Response | Example:
Code:401 Content: ‘UNAUTHORIZED’ OR Code:409 Content: ‘Exception message’ |
| Notes |
| Title | Update Client |
|---|---|
| URL | /public/clients |
| Method | POST |
| Required Authorization | Yes |
| Header Params | Authorization
Example: Authorization = ‘y8AgQDAFFqo=’ |
| URL Params | NONE |
| Data Params |
                {
                "id": 8263,
                "code": "",
                "nipt": "",
                "debtLimit": 0,
                "discountPercentage": 0,
                "salesTypeID": 35,
                "phone": "",
                "mobile": "",
                "contactPerson": "",
                "notes": "",
                "fiscalVATNo": "",
                "fiscalBusinessNo": "",
                "bankAccount1": "",
                "bankAccount2": "",
                "bankAccount3": "",
                "paymentPeriodInDays": 0,
                "isBlockSalesOnMaturityPeriodActive": false,
                "cityID": 2,
                "address": "",
                "deleted": false,
                "isActive": true,
                "name": "1111112222222223333333333",
                "email": "",
                "sex": -1,
                "education": -1,
                "latitude": 0,
                "longitude": 0,
                "zoneID": -1,
                "subZoneID": -1,
                "salesAgentID": -1,
                "transporterID": -1,
                "isBirthdaySet": false,
                "preferredPaymentType": -1,
                "salesDiscountTypeID": 0,
                "birthDay": "",
                "clientClassifier1ID": -1,
                "clientClassifier2ID": -1,
                "clientClassifier3ID": -1,
                "clientClassifier4ID": -1,
                "clientClassifier5ID": -1,
                "clientClassifier6ID": -1,
                "userID": 70,
                "createDate": "20/03/2018",
                "lastUpdateDate": "20/03/2018"
                }
|
| Success Response | Example:
Code: 200 Content: [Updated OK] |
| Error Response | Example:
Code:401 Content: ‘UNAUTHORIZED’ OR Code:409 Content: ‘Exception message’ |
| Notes |
| Title | Delete Client |
|---|---|
| URL | /public/clients/8263 |
| Method | Delete |
| Required Authorization | Yes |
| Header Params | Authorization
Example: Authorization = ‘y8AgQDAFFqo=’ |
| URL Params | Required:
clientID=[integer] |
| Data Params | NONE |
| Success Response | Example:
Code: 200 Content: [Delete OK] |
| Error Response | Example:
Code:401 Content: ‘UNAUTHORIZED’ OR Code:409 Content: ‘Exception message’ |
| Notes |
| Title | Get ClientRecords |
|---|---|
| URL | /public/clients/getClientRecords?clientID=119&startDate=01/01/2018&endDate=01/02/2018 |
| Method | GET |
| Required Authorization | Yes |
| Header Params | Authorization
Example: Authorization = ‘y8AgQDAFFqo=’ |
| URL Params | Required:
clientID=[integer] startDate=[string] format(dd/MM/yyyy) endDate=[string] format(dd/MM/yyyy) |
| Data Params | NONE |
| Success Response | Example:
Code: 200 Content: [
{
"situationBefore": 24338,
"situationAfter": 79512.41,
"clientRecords": [
{
"docTypeCode": "FS",
"docNumber": "5/318*POS*",
"docDate": "04/01/2018",
"serviceUnitGeneric": "Mag",
"debtOnDefaultCurrency": 110,
"creditOnDefaultCurrency": 0
},
{
"docTypeCode": "FS",
"docNumber": "5/319*POS*",
"docDate": "04/01/2018",
"serviceUnitGeneric": "Mag",
"debtOnDefaultCurrency": 110,
"creditOnDefaultCurrency": 0
}
}
]
|
| Error Response | Example:
Code:401 Content: ‘UNAUTHORIZED’ OR Code:409 Content: ‘Exception message’ |
| Notes |
| Title | Save Sales Order Document |
|---|---|
| URL | /public/documents/salesorder |
| Method | PUT |
| Required Authorization | Yes |
| Header Params | Authorization
Example: Authorization = ‘y8AgQDAFFqo=’ |
| URL Params | NONE |
| Data Params |
                {

                    "header":{
                    "id":-1,
                    "documentNumber":"24",
                    "description":"test",
                    "documentDate":"18/03/2018",
                    "deliveryDate":"18/03/2018",
                    "deliveryTime":"00:00",
                    "orderStatus" : 1,
                    "withVAT":true,
                    "rate":1,
                    "currencyID":7,
                    "serviceUnitID":15,
                    "salesAgentID":140,
                    "agentCommission":0,
                    "transporterID":140,
                    "clientID":4
                    },
                    "body":[
                    {"id":1113195,
                    "price":350.8666666666667,
                    "quantity":1,
                    "VATCoeficient":0.19999999999999998,
                    "discountPercentage":0,
                    "itemID":4,
                    "vatTypeClassifierID":1
                    }
                    ]
                }
|
| Success Response | Example:
Request: /public/documents/sales Code: 200 Content: [
{
"header": {
"id": 1125,
"documentNumber": "24",
"description": "test",
"total": 350.8666666666667,
"documentDate": "18/03/2018",
"deliveryDate": "27/03/2019",
"deliveryTime": "00:00",
"withVAT": true,
"totalWithVAT": 0,
"rate": 1,
"orderStatus": 1,
"createDate": "27/03/2019",
"lastUpdateDate": "27/03/2019",
"deleted": false,
"userID": 70,
"hasChildren": false,
"docTypeID": 74,
"transportType": 0,
"transportNotes": "",
"notes": "",
"offerID": -1,
"agentCommission": 0,
"currencyID": 7,
"clientID": 4,
"serviceUnitID": 15,
"transporterID": -1,
"salesAgentID": -1
},
"body": [
{
"id": 1847,
"price": 350.8666666666667,
"quantity": 1,
"VATCoeficient": 0.19999999999999998,
"discountPercentage": 0,
"itemID": 4,
"vatTypeClassifierID": 1
}
]
}
]
|
| Error Response | Example:
Code:401 Content: ‘UNAUTHORIZED’ OR Code:409 Content: ‘Exception message’ |
| Notes |
| Title | Show Items Inventory Situation By Service Unit |
|---|---|
| URL | /public/items/inventories/{} |
| Method | GET |
| Required Authorization | Yes |
| Header Params | Authorization
Example: Authorization = ‘y8AgQDAFFqo=’ |
| URL Params | NONE |
| Data Params |
            {
                 "id" = "21",
                 "code" = "BRUSHE DHEMBESH COLGATE",
                 "serviceUnitID" = "3"
            }
|
| Success Response | Example:
Request: /public/items/inventories/{id=21, serviceUnitID=3} Code: 200 Content:[
{
"itemID": 21,
"itemCode": "BRUSHE DHEMBESH COLGATE",
"serviceUnitID": 3,
"serviceUnitCode": "MAGAZINA",
"situation": 219
}
]
|
| Error Response | Example:
Code:401 Content: ‘UNAUTHORIZED’ OR Code:409 Content: ‘Exception message’ |
| Notes |
| Title | Save Purchase Order Document |
|---|---|
| URL | /public/documents/purchaseorder |
| Method | PUT |
| Required Authorization | Yes |
| Header Params | Authorization
Example: Authorization = ‘y8AgQDAFFqo=’ |
| URL Params | NONE |
| Data Params |
                {

                "header":{
                "id":4000,
                "documentNumber":"342",
                "notes":"From Purchase Order Public REST API",
                "description":"Test Rest API",
                "documentDate":"01/07/2019",
                "withVAT":true,
                "serialNumber":"",
                "rate":1,
                "currencyID":9,
                "serviceUnitID":3,
                "supplierID":1,
                "orderStatus":0
                },
                "body":[
                {"id":1113195,
                "price":350.8666666666667,
                "quantity":1,
                "VATCoeficient":0.19999999999999998,
                "discountPercentage":0,
                "itemID":4,
                "vatTypeClassifierID":1,
                "notes":""
                }
                ]
                }
|
| Success Response | Example:
Request: /public/documents/purchaseorder Code: 200 Content: {
"header": {
"id": 1026,
"documentNumber": "342",
"description": "Test Rest API",
"total": 350.8666666666667,
"documentDate": "01/07/2019",
"withVAT": true,
"totalWithVAT": 421.04,
"rate": 1,
"orderStatus": 0,
"createDate": "01/07/2019",
"lastUpdateDate": "01/07/2019",
"deleted": false,
"userID": 70,
"hasChildren": false,
"docTypeID": 66,
"notes": "From Purchase Order Public REST API",
"currencyID": 9,
"supplierID": 1,
"serviceUnitID": 3
},
"body": [
{
"id": 1113195,
"price": 350.8666666666667,
"quantity": 1,
"VATCoeficient": 0.19999999999999998,
"discountPercentage": 0,
"notes": "",
"itemID": 4,
"vatTypeClassifierID": 1
}
]
}
|
| Error Response | Example:
Code:401 Content: ‘UNAUTHORIZED’ OR Code:409 Content: ‘Exception message’ |
| Notes |
function translate_archive_month($list) {

  $patterns = array(

    '/January/', '/February/', '/March/', '/April/', '/May/', '/June/',

    '/July/', '/August/', '/September/', '/October/',  '/November/', '/December/'

  );

  $replacements = array(

    'Janar', 'Shkurt', 'Mars', 'Prill', 'Maj', 'Qershor',

    'Korrik', 'Gusht', 'Shtator', 'Tetor', 'Nentor', 'Dhjetor'

  );

  $list = preg_replace($patterns, $replacements, $list);

return $list;

}

I don’t think it is necessary to explain what a Varnish Cache is and how it affects the load speed of the site. At least not in this post. If you are here, I suppose that you want to know how to setup SSL in Varnish.
In fact, the developer of Varnish finds it a bad idea to implement SSL support. But there are still several ways to tackle this issue.
First, you need to understand whether it is possible to handle SSL with another service and leave communication with the server on which Varnish is installed at the default port.
Example: DigitalOcean offers Fully Managed SSL Certificates. In other words, you can create a Load Balancer and configure SSL.
Then, create a droplet on the internal network (without access from the outside), raise the environment (Varnish and other software), and attach it to the Load Balancer.
But before you start, I want to highlight that you should make sure that your hosting provider offers some solutions (Cloud Flare, etc).
Let’s imagine that we have to raise the environment to implement the API (monolith) on Laravel Framework, and we have our own VPS with root access.
The process looks like this:
So the scheme in short:
Nninx: 443 -> Varnish: 6081 -> Nginx: 81 -> PHP: 9000
Why doesn’t Varnish apply directly to PHP? Because PHP-FPM does not understand Varnish requests, and you will most likely get a 503 error.
Laravel, by the way, is a good solution since they “play nice together.”
I will skip boring guides on installing LEMP and concentrate your attention on configs.
Virtualhost for Nginx: /etc/nginx/conf.d/api.myserver.com.conf
server {

    listen 443;

    server_name www.api.myserver.com api.myserver.com;

    access_log   /var/log/nginx/access.log;
    error_log    /var/log/nginx/error.log;

    location = /favicon.ico { access_log off; log_not_found off; }
    location = /robots.txt  { access_log off; log_not_found off; }

    location / {
        proxy_pass http://127.0.0.1:6081;
        proxy_set_header Host $http_host;
        proxy_set_header X-Forwarded-Host $http_host;
        proxy_set_header X-Real-IP $remote_addr;
        proxy_set_header X-Forwarded-For $proxy_add_x_forwarded_for;
        proxy_set_header X-Forwarded-Proto https;
        proxy_set_header HTTPS "on";
    }

   location ~ /\.ht {
       deny all;
   }

   location ~ /.well-known {
       allow all;
   }

    # I used letsencrypt service )

    ssl_certificate /etc/letsencrypt/live/myserver.com/fullchain.pem;
    ssl_certificate_key /etc/letsencrypt/live/myserver.com/privkey.pem;
    include /etc/letsencrypt/options-ssl-nginx.conf;
    ssl_dhparam /etc/letsencrypt/ssl-dhparams.pem;
}

server {

    listen 80;

    server_name  www.api.myserver.com api.myserver.com;

    return 301 https://www.$host$request_uri;

}

server {

    listen 81;

    server_name api.myserver.com www.api.myserver.com;

    root /var/www/api/public;

    index index.php;

    access_log   /var/log/nginx/access.log;
    error_log    /var/log/nginx/error.log;

    location / {
        try_files $uri $uri/ /index.php?$args;
    }

    location ~ .php$ {
	    include snippets/fastcgi-php.conf;
        fastcgi_param HTTPS on;
        fastcgi_pass   127.0.0.1:9000; # OR unix:/var/run/php7.4-fpm.sock;
    }
}
I used this template. You just have to modify the backend port.
# /etc/varnish/default.vcl
...

backend server1 { # Define one backend
  .host = "127.0.0.1";    # IP or Hostname of backend
  .port = "81";           # Port Nginx or whatever is listening
  .max_connections = 300; # That's it

...
/etc/default/varnish

...

DAEMON_OPTS="-a :6081 \ # input
             -T localhost:6082 \ # admin
             -f /etc/varnish/default.vcl \ # proxy conf
             -S /etc/varnish/secret \ # secret conf
             -s malloc,256m"

...
That’s all. Those simple maneuvers can significantly accelerate a project. I hope this little guide will help you save your time and reduce your suffering.
any sysadmins know about top, the standard process management and activity monitor that comes on most Linux systems. But there are times when top does not provide the information you’re really looking for, or you want something that updates more frequently as the state of your system changes.
Look no further than htop. It’s interactive, real-time, and sports a variety of metrics and details above and beyond what top provides.
You can see CPU utilization at a glance, and that’s just the tip of the iceberg. Sort processes, kill rogue jobs right from htop, and set priorities. To learn more about htop, see the htop website.
To install htop on CentOS 7, you’ll need a few things:
There are two different ways you can get htop on your computer. First, you can install it as a binary from your package manager (on CentOS this would be yum). This is a good option if you want to get it right away and don’t much mind what version of htop you’re getting.
You can also install htop from source. Since htop is open-source, you can download the code and build it yourself on your system. This takes a little longer, but you can be sure you’re getting the most updated build available (important if you’re looking for a specific new feature).
We’ll go through both methods step by step.
The yum package manager does not contain htop by default. This is okay; we just need to add an EPEL repository so yum can find it. Here’s the commands to add that repository:
yum -y install epel-release
yum -y update
Now with the repository properly added, you can tell yum to install the htop process monitoring tool:
yum -y install htop
If the installation completes successfully, you should be able to type htop at the command line and see the status of your system.
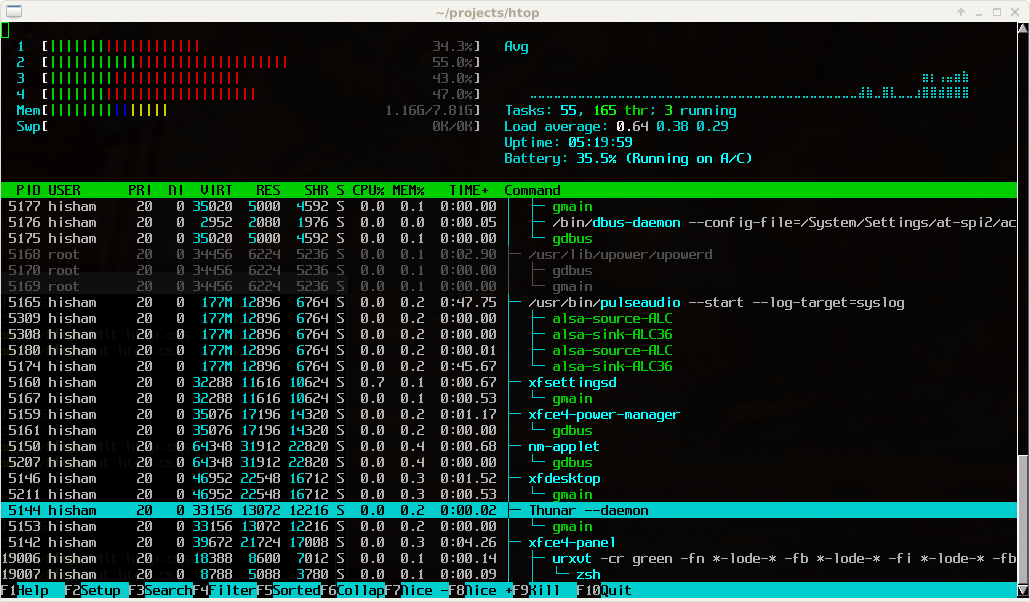
(source: htop screenshots)
To learn more about htop’s features and how to customize it, see the htop website or htop explained.
To ensure you have the most recent version of htop and all the new features, you can install htop from source. This involves downloading the source code and building it on your machine.
Installing from source means you need to gather the dependencies yourself. Before we can install htop, we’ll need Development Tools (gcc and other compilers) and ncurses.
yum groupinstall “Development Tools”
yum install ncurses ncurses-devel
With the dependencies installed, we can grab the source code and extract it:
wget http://hisham.hm/htop/releases/2.0.2/htop-2.0.2.tar.gz
tar xvfvz htop-2.0.2.tar.gz
cd htop-2.0.2
Now that we’re in the folder with the htop source code, we can run these three commands to prepare and build the code:
./configure
make
make install
Once the make install step completes, you should be able to use htop. Try typing htop into your terminal and you should see the system monitor appear.
If you get a htop: command not found error, you’ll need to specify the location of the htop executable in your PATH.
There’s so much you can do with htop, and we hope it will help monitor your processes more quickly and easily. As always, if you have questions please leave them in the comments below.
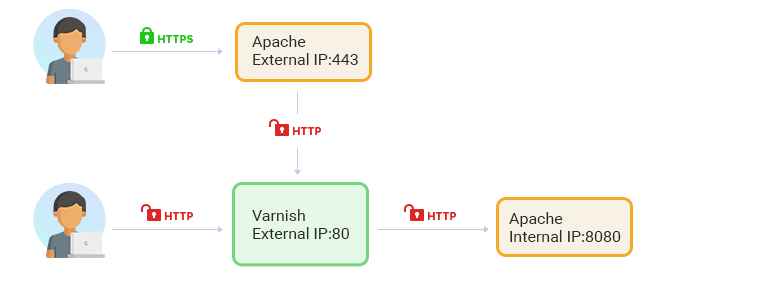
In this guide, we will show you how to install and configure the Varnish cache for the Apache webserver with SSL termination. One limitation of Varnish Cache is that it is designed to accelerate HTTP, not the secure HTTPS protocol. Therefore, some workarounds must be performed to allow Varnish to work on SSL enabled website.
SSL/TLS Termination is the process of decrypting SSL-encrypted traffic. In our case, Apache acts like a proxy server and intermediary point between the client and Varnish and is used to convert HTTPS to HTTP.
We had CentOS 8 installed on our web server, which uses dnf package manager. However, if you are familiar with Linux systems, you can apply this manual almost entirely to other OS, such as Centos 7 (use yum) or Ubuntu and Debian (use apt instead).
Make sure to replace the “example.com” with your domain name:
Use aux | grep httpd or ps aux | grep apache to see what user Apache is using on your system.
In our case, the Apache user is “apache” (you may see “www-data” or other username displayed), therefore we will run the following commands to grant necessary permissions:
Tell Apache to look for virtual hosts in the sites-enabled directory:
Add this line at the end of httpd.conf file:
IncludeOptional sites-enabled/*.conf
Create the new virtual host file:
Enable the new virtual host files
Restart Apache
Open access to the HTTP service in the firewall
Open your domain in the web browser to see the “Hello, World!” message, e.g.:
http://example.com or http://example.com:80

Change the default Varnish Listen port from 6081 to 80.
Find the following line:
ExecStart=/usr/sbin/varnishd -a :6081 -f /etc/varnish/default.vcl -s malloc,256m
And replace it with this one:
ExecStart=/usr/sbin/varnishd -a :80 -f /etc/varnish/default.vcl -s malloc,256m
Save changes.
Check the default Varnish backend IP and port.
It should look like this:
Find the following line:
Listen 80
And replace it with this one:
Listen 8080
Save changes.
Open your virtual host file:
Find the following line:
ServerName example.com
And replace it with this one:
ServerName example.com
Save changes.
Launch Varnish, start it automatically at boot and check service status
Restart Apache
Open your website in browser to see the “Hello, World!” message, e.g.:

For the purpose of this tutorial, we will create self-signed SSL certificates. Nevertheless, you can also install free let’s encrypt certificates using this online manual.
First, you have to be sure that the mod_ssl Apache module is installed on the server.
Check if mod SSL is enabled:
Open your virtual host file:
Add a new proxy virtual host that will listen to 443 port and redirect all traffic to Varnish (port 80), e.g. perform SSL termination.
Save changes and restart Apache
Open your domain in the web browser to test if the Varnish Cache is working properly:
Run one of the following three commands from shell to test varnish while simultaneously refreshing the web page:
Enter Ctrl + C to stop the above commands from running.
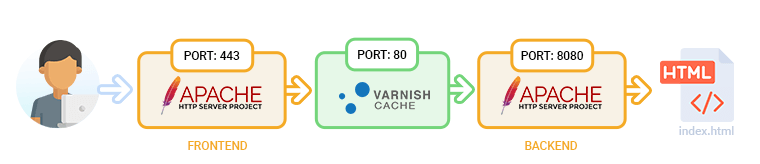
If you experience any errors, it’s always wise to test each portion of our setup separately. If you look at diagram 3 above, you will see that our setup consists of 3 logical sections – Apache frontend, Varnish, and Apache backend.
Test Apache backend to see if the virtual host is accessible from the shell:
Test Varnish Cache to see if it is accessible from the shell:
Finally, test the Apache frontend from the shell:
Varnish is useful to speed up site load time and we oftentimes suggest our clients optimize their Magento store performance. Please don’t hesitate to contact us if you need assistance speeding up your Magento store. If you find this tutorial useful, please like and share it with the world.
This is just a friendly warning and not really a problem (as in that something does not work).
If you go to:
/etc/apache2/apache2.conf
and insert:
ServerName localhost and then restart apache by typing into the terminal:
sudo systemctl reload apache2
the notice will disappear.
If you have a name inside /etc/hostname you can also use that name instead of localhost
Option 01:
$active_group = 'default';
$query_builder = TRUE;

$db['default'] = array(
    'dsn'   => '',
    'hostname' => '192.168.0.109:1521/orcl', //hostname:db_port/service_name
    //'hostname' => 'localhost:1521/orcl',
    'username' => 'db_username',
    'password' => 'db_password',
    'database' => 'db_name',
    'dbdriver' => 'oci8',
    'dbprefix' => '',
    'pconnect' => FALSE,
    'db_debug' => (ENVIRONMENT !== 'production'),
    'cache_on' => FALSE,
    'cachedir' => '',
    'char_set' => 'utf8',
    'dbcollat' => 'utf8_general_ci',
    'swap_pre' => '',
    'encrypt' => FALSE,
    'compress' => FALSE,
    'stricton' => FALSE,
    'failover' => array(),
    'save_queries' => TRUE
);


Option 02:
$active_group = 'default';
$active_record = TRUE;
$db['default']['hostname'] = '(DESCRIPTION=(ADDRESS=(PROTOCOL=TCP)(HOST=192.168.0.246)(PORT=1521))(CONNECT_DATA=(SID=orcl)))';
$db['default']['username'] = 'db_username';
$db['default']['password'] = 'db_password';
$db['default']['database'] = 'db_name';
$db['default']['dbdriver'] = 'oci8';
$db['default']['dbprefix'] = '';
$db['default']['pconnect'] = TRUE;
$db['default']['db_debug'] = TRUE;
$db['default']['cache_on'] = FALSE;
$db['default']['cachedir'] = '';
$db['default']['char_set'] = 'utf8';
$db['default']['dbcollat'] = 'utf8_general_ci';
$db['default']['swap_pre'] = '';
$db['default']['autoinit'] = TRUE;
$db['default']['stricton'] = FALSE;Postgresql extension in php.iniextension=php_pgsql.dll
You also can enable Postgresql extension for PDO as well.
extension=php_pdo_pgsql.dll
$db['default'] = array(
    'port'   => 5432, # Add
);
OR
$db['default'] = array(
    'dsn'   => 'pgsql:host=localhost;port=5432;dbname=database_name',
    'dbdriver' => 'pdo',
);
$active_group = ‘default’;
$query_builder = TRUE;
$db[‘default’] = array(
‘dsn’ => ”,
‘hostname’ => ‘localhost’,
‘username’ => ‘postgres’,
‘password’ => ”,
‘database’ => ‘fmsdb’,
‘dbdriver’ => ‘postgre’,
‘dbprefix’ => ”,
‘pconnect’ => FALSE,
‘db_debug’ => (ENVIRONMENT !== ‘production’),
‘cache_on’ => FALSE,
‘cachedir’ => ”,
‘char_set’ => ‘utf8’,
‘dbcollat’ => ‘utf8_general_ci’,
‘swap_pre’ => ”,
‘encrypt’ => FALSE,
‘compress’ => FALSE,
‘stricton’ => FALSE,
‘failover’ => array(),
‘save_queries’ => TRUE
);
CREATE TABLE IF NOT EXISTS `ci_sessions` (
`id` varchar(40) NOT NULL,
`ip_address` varchar(45) NOT NULL,
`timestamp` int(10) unsigned DEFAULT 0 NOT NULL,
`data` blob NOT NULL,
KEY `ci_sessions_timestamp` (`timestamp`)
)
How do I install MySQL server 8.0 on CentOS 8 Linux server running on Linode and AWS cloud? How do I add and set up a new MySQL user and database account on the newly created CentOS server?
Oracle MySQL server version 8.0 is a free and open-source free database server. It is one of the most popular database system used in web apps and websites on the Internet.
Typically MySQL is part of the LAMP (Linux, Apache/Nginx, MySQL, Perl/Python/PHP) stack. Popular open-source software such as WordPress, MediaWiki, and others profoundly used by MySQL as a database storage engine. Let us see how to install MySQL server version 8.x on CentOS 8 Linux server.
| Tutorial requirements | |
|---|---|
| Requirements | CentOS Linux 8 |
| Root privileges | Yes |
| Difficulty | Easy |
| Est. reading time | 15m |
First, open the terminal app and then log in to your CentOS server using the ssh command:
$ ssh vivek@centos-8-ec2-box-ip
Now, update CentOS system to apply security updates and fixes on Linux system using the dnf command/yum command:
$ sudo yum update

## or ##

$ sudo dnf update
Sample outputs:
CentOS-8 - AppStream                            21 MB/s | 5.8 MB     00:00
CentOS-8 - Base                                 14 MB/s | 2.2 MB     00:00
CentOS-8 - Extras                               50 kB/s | 8.6 kB     00:00
Dependencies resolved.
Nothing to do.
Complete!
Luckily our CentOS 8 box comes with MySQL 8 server package. Let us search for it:
$ sudo yum search mysql-server

$ sudo yum module list mysql
And we see:
Last metadata expiration check: 0:02:47 ago on Mon Nov 23 16:26:31 2020.
===================== Name Exactly Matched: mysql-server ======================
mysql-server.x86_64 : The MySQL server and related files
Next, find out version information, run:
$ sudo yum info mysql-server
Here is what we see:
Last metadata expiration check: 0:02:22 ago on Mon Nov 23 16:26:31 2020.
Available Packages
Name         : mysql-server
Version      : 8.0.21
Release      : 1.module_el8.2.0+493+63b41e36
Architecture : x86_64
Size         : 22 M
Source       : mysql-8.0.21-1.module_el8.2.0+493+63b41e36.src.rpm
Repository   : AppStream
Summary      : The MySQL server and related files
URL          : http://www.mysql.com
License      : GPLv2 with exceptions and LGPLv2 and BSD
Description  : MySQL is a multi-user, multi-threaded SQL database server. MySQL
             : is a client/server implementation consisting of a server daemon
             : (mysqld) and many different client programs and libraries. This
             : package contains the MySQL server and some accompanying files
             : and directories.
Install it:
$ sudo yum install mysql-server

Click to enlarge
The service name is mysqld.service, and we need to enable it using the following systemctl command:
$ sudo systemctl enable mysqld.service
Confirmation displayed:
reated symlink /etc/systemd/system/multi-user.target.wants/mysqld.service → /usr/lib/systemd/system/mysqld.service.
Start the service and then verify it:
$ sudo systemctl start mysqld.service

$ sudo systemctl status mysqld.service
● mysqld.service - MySQL 8.0 database server
   Loaded: loaded (/usr/lib/systemd/system/mysqld.service; enabled; vendor preset: disabled)
   Active: active (running) since Mon 2020-11-23 16:50:14 UTC; 4s ago
  Process: 551 ExecStopPost=/usr/libexec/mysql-wait-stop (code=exited, status=0/SUCCESS)
  Process: 681 ExecStartPost=/usr/libexec/mysql-check-upgrade (code=exited, status=0/SUCCESS)
  Process: 601 ExecStartPre=/usr/libexec/mysql-prepare-db-dir mysqld.service (code=exited, status=0/SUCCESS)
  Process: 577 ExecStartPre=/usr/libexec/mysql-check-socket (code=exited, status=0/SUCCESS)
 Main PID: 637 (mysqld)
   Status: "Server is operational"
    Tasks: 39 (limit: 24960)
   Memory: 331.0M
   CGroup: /system.slice/mysqld.service
           └─637 /usr/libexec/mysqld --basedir=/usr

Nov 23 16:50:13 centos-aws-mysql systemd[1]: Stopped MySQL 8.0 database server.
Nov 23 16:50:13 centos-aws-mysql systemd[1]: Starting MySQL 8.0 database server...
Nov 23 16:50:14 centos-aws-mysql systemd[1]: Started MySQL 8.0 database server.
All you need to do is type the following command, and it will secure MySQL 8 server installation on CentOS Linux:
$ sudo mysql_secure_installation
Please set the password for root here.

New password:

Re-enter new password:

Estimated strength of the password: 100
Do you wish to continue with the password provided?(Press y|Y for Yes, any other key for No) : y
By default, a MySQL installation has an anonymous user,
allowing anyone to log into MySQL without having to have
a user account created for them. This is intended only for
testing, and to make the installation go a bit smoother.
You should remove them before moving into a production
environment.

Remove anonymous users? (Press y|Y for Yes, any other key for No) : y
Success.


Normally, root should only be allowed to connect from
'localhost'. This ensures that someone cannot guess at
the root password from the network.

Disallow root login remotely? (Press y|Y for Yes, any other key for No) : y
Success.

By default, MySQL comes with a database named 'test' that
anyone can access. This is also intended only for testing,
and should be removed before moving into a production
environment.


Remove test database and access to it? (Press y|Y for Yes, any other key for No) : y
 - Dropping test database...
Success.

 - Removing privileges on test database...
Success.

Reloading the privilege tables will ensure that all changes
made so far will take effect immediately.

Reload privilege tables now? (Press y|Y for Yes, any other key for No) : y
Success.

All done!
The syntax is:
$ sudo systemctl start mysql.service

$ sudo systemctl stop mysql.service

$ sudo systemctl restart mysql.service
To view the MySQL 8 service log as follows using the journalctl command:
$ sudo journalctl -u mysqld.service -xe

$ sudo tail -f /var/log/mysql/mysqld.log
MySQL 8 log file sample entries:
2020-11-23T16:55:19.101316Z 0 [System] [MY-013172] [Server] Received SHUTDOWN from user . Shutting down mysqld (Version: 8.0.21).
2020-11-23T16:55:21.728819Z 0 [Warning] [MY-010909] [Server] /usr/libexec/mysqld: Forcing close of thread 10  user: 'root'.
2020-11-23T16:55:23.083389Z 0 [System] [MY-010910] [Server] /usr/libexec/mysqld: Shutdown complete (mysqld 8.0.21)  Source distribution.
2020-11-23T16:56:19.225544Z 0 [System] [MY-010116] [Server] /usr/libexec/mysqld (mysqld 8.0.21) starting as process 524
2020-11-23T16:56:19.237500Z 1 [System] [MY-013576] [InnoDB] InnoDB initialization has started.
2020-11-23T16:56:19.562441Z 1 [System] [MY-013577] [InnoDB] InnoDB initialization has ended.
2020-11-23T16:56:19.677202Z 0 [System] [MY-011323] [Server] X Plugin ready for connections. Bind-address: '::' port: 33060, socket: /var/lib/mysql/mysqlx.sock
2020-11-23T16:56:19.754024Z 0 [Warning] [MY-010068] [Server] CA certificate ca.pem is self signed.
2020-11-23T16:56:19.754207Z 0 [System] [MY-013602] [Server] Channel mysql_main configured to support TLS. Encrypted connections are now supported for this channel.
2020-11-23T16:56:19.780843Z 0 [System] [MY-010931] [Server] /usr/libexec/mysqld: ready for connections. Version: '8.0.21'  socket: '/var/lib/mysql/mysql.sock'  port: 3306  Source distribution.
So far, so good. You learned how to install, set up, secure, and start/stop the MySQL 8 on CentOS 8 Linux cloud server. It is time to log in as a
mysql root user. The syntax is:
$ mysql -u root -p

$ mysql -u USER -h host -p

$ mysql -u USER -h host -p mysql
Let us type a few SQL commands at the mysql> prompt:
STATUS;

SHOW VARIABLES LIKE "%version%";

quit

Let create a new database called ‘spacedb‘, type at the mysql> prompt:
CREATE DATABASE spacedb;
Next, we are going to create a new user named ‘mars‘ for our database called ‘spacedb’ as follows:
CREATE USER 'mars'@'%' IDENTIFIED BY 'User_Password_Here';
Finally, give permissions:
GRANT SELECT, INSERT, UPDATE, DELETE ON spacedb.* TO 'mars'@'%';
Of course, we can grant ALL PRIVILEGES too as follows:
GRANT ALL PRIVILEGES ON spacedb.* TO 'mars'@'%';
See MySQL 8 users and their grants/permissions as follows:
SELECT user,host FROM mysql.user;

SHOW GRANTS for mars;

quit
Test new user settings and DB as follows:
mysql -u mars -p spacedb

mysql -u mars -h localhost -p spacedb

Where,
Let us see default config file using the cat command:
# cat /etc/my.cnf.d/mysql-server.cnf
Config:
[mysqld]
datadir=/var/lib/mysql
socket=/var/lib/mysql/mysql.sock
log-error=/var/log/mysql/mysqld.log
pid-file=/run/mysqld/mysqld.pid
Want to allow remote connections to your MySQL server? Edit the /etc/my.cnf.d/mysql-server.cnf and append the following line under [mysqld]:
bind_address = 0.0.0.0
WARNING: See MySQL documentation for a detailed explanation for tuning options as to each server and set up is unique. Do not set up values blindly. I provide them as a starting point for optimizing MySQL 8 installation and values depending upon available RAM, CPU cores, server load and other circumstances.
Set InnoDB settings:
default_storage_engine          = InnoDB
innodb_buffer_pool_instances    = 1
innodb_buffer_pool_size         = 512M
innodb_file_per_table           = 1
innodb_flush_log_at_trx_commit  = 0
innodb_flush_method             = O_DIRECT
innodb_log_buffer_size          = 16M
innodb_log_file_size            = 512M
innodb_stats_on_metadata        = 0
innodb_read_io_threads          = 64
innodb_write_io_threads         = 64
MyISAM settings:
# UPD
key_buffer_size                 = 32M
low_priority_updates            = 1
concurrent_insert               = 2
# UPD
max_connections                 = 100
back_log                        = 512
thread_cache_size               = 100
thread_stack                    = 192K
interactive_timeout             = 180
wait_timeout                    = 180
Buffer settings UPD:
join_buffer_size                = 4M
read_buffer_size                = 3M
read_rnd_buffer_size            = 4M
sort_buffer_size                = 4M
Edit and config logging if needed (by default slow_query disabled):
log_queries_not_using_indexes   = 1
long_query_time                 = 5
#slow_query_log                  = 0
#slow_query_log_file             = /var/log/mysql/mysql_slow.log
This is useful for mysqldump command to make backups:
[mysqldump]
quick
quote_names
max_allowed_packet              = 64M
Are you using MySQL 8 server remotely? Do you have Apache/Nginx/PHP/Python/Perl app on another server? Then open port for everyone:
$ sudo firewall-cmd --zone=public --add-service=mysql --permanent
Only allow access from 192.168.1.0/24 CIDR:
$ sudo firewall-cmd \

--add-rich-rule 'rule family="ipv4" \

source address="192.168.1.0/24" \

service name="mysql" accept' --permanent
The above is fine grained firewalld access rules to restrict access to MySQL 8 server to VLAN users only. See how to set up a firewall using FirewallD on CentOS 8 Linux for more info.
And there you have it, Oracle MySQL server version 8.x set up and running correctly on a CentOS Linux 8 server with Firewalld config. Further, you learned how to add a new database, user, and password for your project including MySQL 8 server tuning options.


