Create a MySQL database for Laravel application; so execute the following command on command line to create database for laravel app:
$ sudo mysql
MariaDB [(none)]> CREATE DATABASE laraveldb;
MariaDB [(none)]> GRANT ALL ON laraveldb.* to 'webmaster'@'localhost' IDENTIFIED BY 'tecmint';
MariaDB [(none)]> FLUSH PRIVILEGES;
MariaDB [(none)]> quit
Step 3 – Install Composer in Ubuntu 22.04
Then use the following command to install composer (a dependency manager for PHP) on ubuntu 22.04 system:
Also, set the fastcgi_pass directive should point to the medium PHP-FPM is listening on for requests (for example fastcgi_pass unix:/run/php/php7.4-fpm.sock):
Save the file and then enable the Laravel site configuration by creating a link from /etc/nginx/sites-available/example.com.conf to the /etc/nginx/sites-enabled/ directory. Besides, remove the default server block configuration.
If you have a huge site, chances are you also do a lot of data processing – imports, exports, calculations etc.
These kind of batch processing jobs that max out the CPU and disk are the mortal enemy of real-time transactions. Your web visitors demand real-time interaction and fast response from your site, so if you are running imports and maxing out your CPU and disk on the same server hosting your web traffic then your users are regularly going to encounter slowness. This leads to loss of interest from your visitors, loss of sales and loss of SEO rank.
Ultimately, to solve this, once you have exhausted scaling up, you need to architect a better solution.
Scaling Up WordPress – check before building your cluster!
If you are considering building a cluster, it means you think you can’t get more speed from a single server. If you have not yet used our Super Speedy Pack yet then you should definitely try that before building a cluster. We built our Super Speedy Pack to solve search, filtering and underlying scalability issues exhibited in WordPress and WooCommerce.
It is not uncommon for customers with large sites to get 10x or more speed boost from our Super Speedy Plugin pack so prior to building your cluster, check out our Super Speedy Plugin pack.
Scaling Out with a WordPress Cluster
You need to separate the batch processing from the realtime stuff. That means you need a minimum of 2 servers. 1 server processes all the data imports, exports, calculations, category counts, etc – the data is replicated to the 2nd server and that server serves your web traffic.
If you’re going to the bother of getting 2 servers, you’re better off going further and getting 3 servers. It’s very little extra hassle and then gives you the ability to have 3 servers online at once with no batch processing, or 1 or 2 of the servers handling batch processing and the remaining ones serving web traffic.
Using this model, you can also easily switch servers offline to upgrade them without interrupting visitors to your website. That means you can be online 100% of the time!
Note that this setup technically uses 4 servers – the 4th server being a load balancer. Instead of this server, you could use the Digital Ocean load balancer feature/server instead but I provide details below for installing this easily.
If you’re looking at building a cluster for more speed, you may find our plugin pack will help give you the speed boost you need.
Step by step guide to building your cluster
This is the guide I use to install these clusters, so hopefully it helps some of you out there who wish to go huge with your WordPress sites.
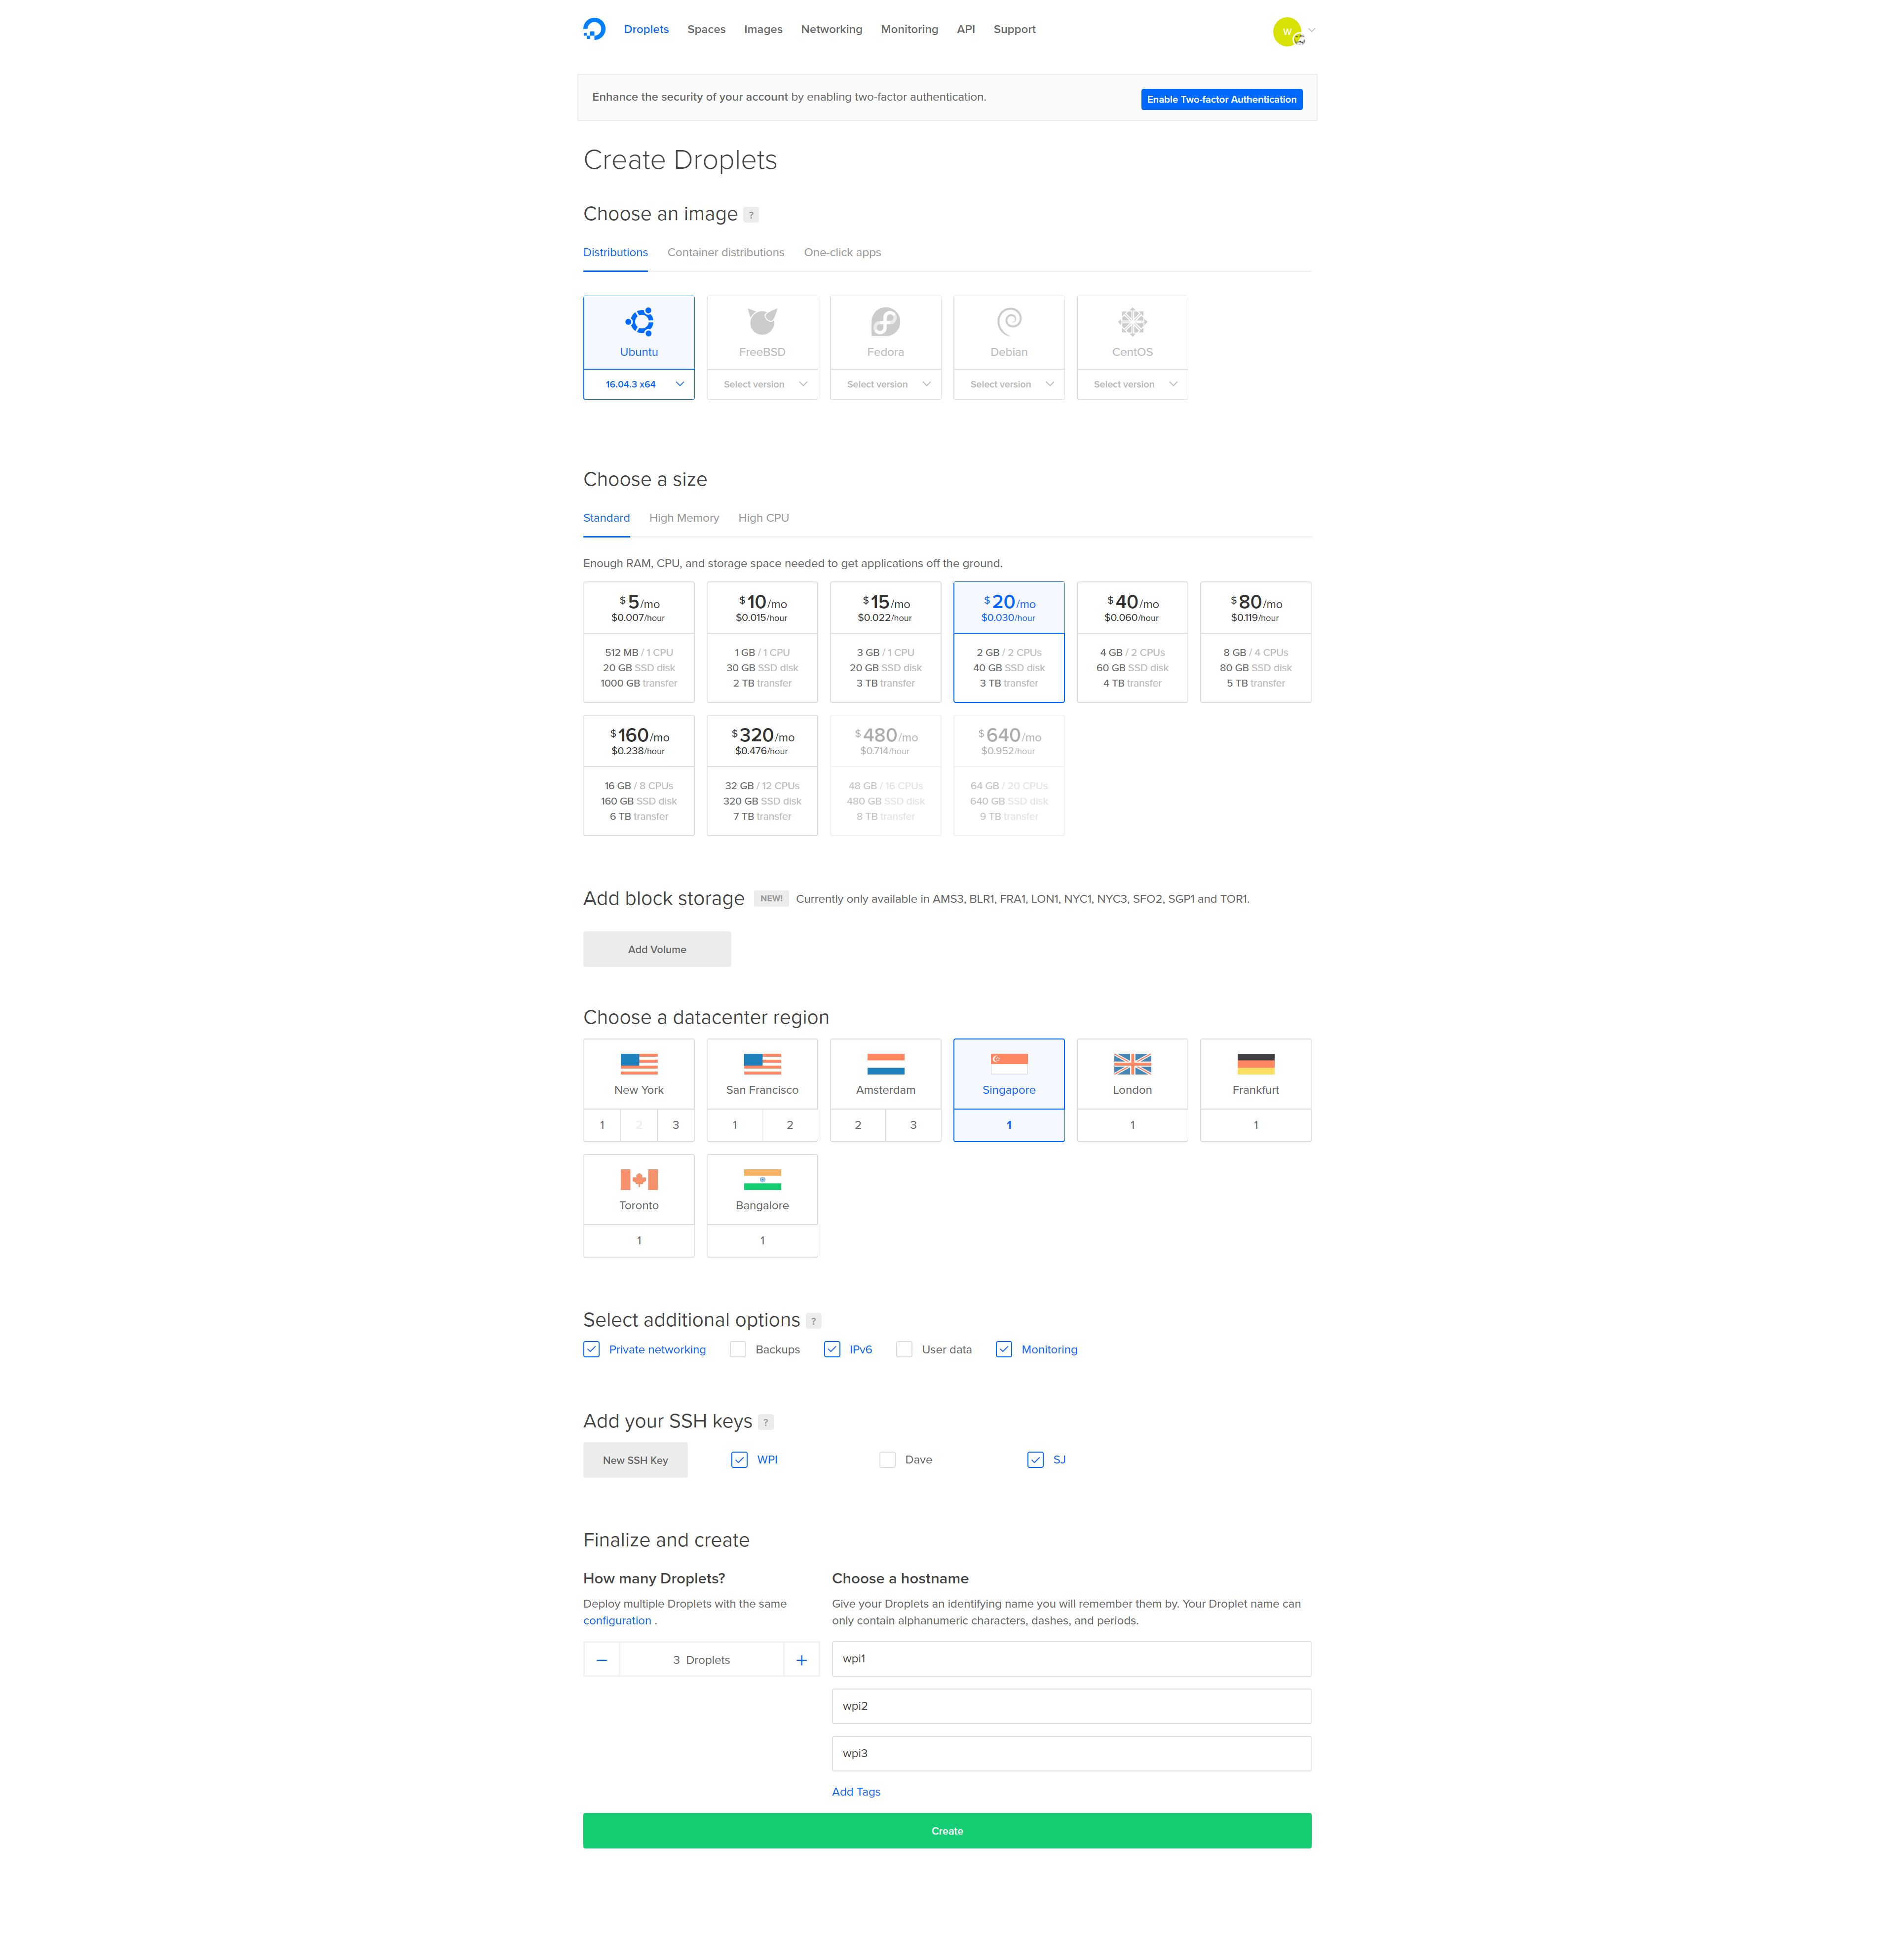
Create 3 Ubuntu 16.04 servers
I like Digital Ocean, so this guide is using their hosting, but you can use any host provided they offer private networking and Ubuntu 16.04.
Create 3 Ubuntu 16.04 (or 3 servers on any platform) – they make it easy to make multiple at once – make sure to enable private networking and add your ssh key.
Install PerconaDB XtraDB Cluster on your cluster-nodes
Log into your 3 droplets and run the following commands on each node:
Note: You will be asked to enter a new root password for the cluster. To make life easier, use the same password for each PerconaDB node, or leave the root password blank and it will infer security if you log in as root and connect.
Configure private networking
We want the nodes to share data over the private network, rather than out and in from your hosting company. This prevents crazy bandwidth costs, speeds things up and improves security.
Even though private networking is already enabled, we need to be able to reliably use eth1 (rather than eth0) as the private network device.
On each node edit the grub networking file. I prefer vi to edit files, but you can use nano or even edit the files with Filezilla.
vi /etc/default/grub.d/50-cloudimg-settings.cfg
Find the line that begins GRUB_CMDLINE_LINUX_DEFAULT and alter it as follows (add net.ifnames=0):
Save the file then run the update grub command and reboot (only time I know of where you need to reboot a linux box!).
update-grub
shutdown -r now
Repeat the above for all your nodes. Then you can check config with this:
ifconfig -a
You should see the public IP address against eth0 and the private address against eth1.
You can also view each ethernet devices configuration here:
cat /etc/network/interfaces.d/50-cloud-init.cfg
The file above will already be configured if you selected private networking when you created the droplet.
Take a note of the private IP address for each of your 3 nodes. This information is also available from your Digital Ocean interface when you click through to each droplet.
You can test private networking is working by pinging the private IP address of another node from one of the nodes:
ping 10.130.45.161
Configure replication
Firstly, we need a replication user. Create this user on all 3 nodes.
Log into mysql:
mysql
or if you chose a password for your mysql server earlier, use this:
mysql -u root -p
Enter the root DB password you chose earlier then create a new user for replication purposes (choose a strong password and note it down so we can add it to the configuration files):
CREATE USER 'sstuser'@'localhost' IDENTIFIED BY 'password';
GRANT RELOAD, LOCK TABLES, PROCESS, REPLICATION CLIENT ON *.* TO 'sstuser'@'localhost';
FLUSH PRIVILEGES;
Next exit MySQL by typing ‘exit’ then hitting enter, then stop MySQL on all 3 nodes using:
service mysql stop
On node1, customise the configuration file below according to your private IP addresses and replication user password enter it into this file:
vi /etc/mysql/percona-xtradb-cluster.conf.d/wsrep.cnf
Enter the 3 private IP addresses for wsrep_cluster_address, separated by commas.
Enter node 1 private IP address for wsrep_node_address.
Enter the sst password for wsrep_sst_auth.
Change the name of the node on the line wsrep_node_name
Your file will end up looking something like this (lines in bold are the lines you need to alter from the default config):
[mysqld]
# Path to Galera library
wsrep_provider=/usr/lib/galera3/libgalera_smm.so

# Cluster connection URL contains IPs of nodes
#If no IP is found, this implies that a new cluster needs to be created,
#in order to do that you need to bootstrap this node
wsrep_cluster_address=gcomm://10.130.45.161,10.130.47.4,10.130.47.11

# In order for Galera to work correctly binlog format should be ROW
binlog_format=ROW

# MyISAM storage engine has only experimental support
default_storage_engine=InnoDB

# Slave thread to use
wsrep_slave_threads= 8

wsrep_log_conflicts
# This changes how InnoDB autoincrement locks are managed and is a requirement for Galera
innodb_autoinc_lock_mode=2

# Node IP address
wsrep_node_address=10.130.45.161
# Cluster name
wsrep_cluster_name=pxc-cluster

#If wsrep_node_name is not specified, then system hostname will be used
wsrep_node_name=pxc-cluster-node-1

#pxc_strict_mode allowed values: DISABLED,PERMISSIVE,ENFORCING,MASTER
pxc_strict_mode=ENFORCING

# SST method
wsrep_sst_method=xtrabackup-v2

#Authentication for SST method
wsrep_sst_auth="sstuser:password"
Note: You will also need to remove the # comment from the beginning of the lines with the wsrep_node_address and the wsrep_sst_auth.
Copy the contents of the file and then save it. Configure node 2 and node 3 by editing the same file on those nodes and altering 2 rows from the file above:
Change wsrep_node_address to be the private IP address of node 2 (or node 3 for that node)
Change wsrep_node_name to pxc-cluster-node-2 or pxc-cluster-node-3
Once you’ve done this, you’re ready to bootstrap your cluster.
Bootstrap your cluster
On node 1, run the following command:
/etc/init.d/mysql bootstrap-pxc
Check it’s running by logging into mysql and running this command:
showstatuslike'wsrep%';
Note: The above command can be useful in future to check for replication status – you can see things like how many items are queued to be replicated amongst other details.
On node 2 and 3, run the following:
/etc/init.d/mysql start
You now have a Percona cluster with 3 nodes replicating data to each other.
Install Nginx and PHP 7 on all 3 nodes
On each node, install Nginx and PHP 7 using the following sequence of commands:
After much testing, GlusterFS is not well-suited to WordPress file-replication. GlusterFS slows down a LOT when there are a lot of files in each directory. The guide has been updated to use Unison instead. This Unison setup uses a star schema for file replication, with node 1 at the centre of the star.
That means a file edit on node 3 will replicate to node 1 and then to node 2. A file edit on node 1 will replicate out directly to node 2 and 3. Because of this, it makes sense to make node 1 our wp-admin server where we upload plugin files. Because of this star schema for file replication, node 1 is your most important node. If it goes down, or you switch it off, file replication will be paused until you bring it back online.
On each node, install unison:
apt-get -y install unison openssh-server
This will allow us to run the replication commands later once we have installed the WordPress files.
Configure SSH so nodes can connect to each other
SSH access is required for Unison to be able to replicate files. Run the following on all 3 nodes:
ssh-keygen
Hit enter 3 times to accept 3 defaults inc 2 blank passwords for the keyfile so it works non-interactively
Now, grab a copy of the id_rsa.pub files for each node and paste them into the other 2 nodes authorized_keys file. Find the public keys of each node by running this command:
cat /root/.ssh/id_rsa.pub
Then paste those public keys into the authorized_keys file of the other 2 nodes:
vi /root/.ssh/authorized_keys
Authenticate each node
On node 1, run:
ssh ipofnode2
ssh ipofnode3
You will be asked if you wish to trust the other node. Answer yes.
Repeat this on node 2 and node 3, connecting to the other 2 nodes.
Replicate the web folder files using Unison
Now that we have ssh authentication, we can set up Unison to replicate the website files to node 2 and 3. Run the following commands on node 1 of your cluster:
Change IP addresses and folder locations. Use internal IP addresses so traffic goes over the faster internal network card.
Install WordPress files onto Node 1 only
Because we are using file replication and we already have database replication in our cluster, we only need to install WordPress onto node 1. On node 1, run the following:
Note: Instead of /var/www/wpicluster you could use /var/www/yourdomain.com but if you do, ensure you alter the nginx config files in the next section.
Configure Nginx to load your WordPress site on each node
I’ve created some configuration files to make this part quicker and easier. The configuration files set Nginx up to work over port 80 – later, we will add SSL to our load balancer. This reduces load on our servers since they won’t have to decrypt SSL traffic.
The configuration files here also configure the Nginx fastcgi-cache, so you don’t need to install Varnish. They’re also domain-name independent, so no configuration required.
Digital Ocean provide a load balancer, but with that approach you have to manually renew your SSL certificates. Plus you get less control – we want control so we can send wp-admin traffic to node 1. So follow the instructions below to set up your own load balancer.
First, create a droplet with Ubuntu 16.04 again, private networking and your SSH keys.
Then log onto your load balancer droplet and run the following commands:
Then create a new file at /etc/nginx/conf.d/loadbalancer.conf.
vi /etc/nginx/conf.d/loadbalancer.conf
This will automatically be loaded when you restart nginx. Enter the following in the file, adjusted for your private IP addresses.
upstream clusterwpadmin {
     server 10.130.45.161;
}
upstream clusternodes {
     ip_hash;
 server 10.130.47.4 max_fails=3;
 server 10.130.47.11 max_fails=3;
}
server {
     listen 80;
# this block is for letsencrypt
 root /var/www/html;
 location ~ /.well-known {
      allow all;
  try_files $uri $uri/ =404;
 }
 server_name _;
 #return 301 https://$host$request_uri;
 location ~ /wp-(admin/|login\.php\b|cron\.php) {
     proxy_pass http://clusterwpadmin;
 proxy_set_header X-Forwarded-Host $host;
 proxy_set_header X-Forwarded-Server $host;
 proxy_set_header X-Forwarded-For $proxy_add_x_forwarded_for;
 proxy_set_header X-Forwarded-Proto $scheme;
 proxy_set_header X-Real-IP $remote_addr;
 proxy_set_header Host $host;
 }
location / {
     proxy_pass http://clusternodes;
 proxy_set_header X-Forwarded-Host $host;
 proxy_set_header X-Forwarded-Server $host;
 proxy_set_header X-Forwarded-For $proxy_add_x_forwarded_for;
 proxy_set_header X-Forwarded-Proto $scheme;
 proxy_set_header X-Real-IP $remote_addr;
 proxy_set_header Host $host;
 }
}
server {
     listen 443 ssl;
 #ssl_certificate /etc/letsencrypt/live/yourdomain.com/cert.pem;
 #ssl_certificate_key /etc/letsencrypt/live/yourdomain.com/privkey.pem;
location ~ /wp-(admin/|login\.php\b|cron\.php) {
     proxy_pass http://clusterwpadmin;
 proxy_set_header X-Forwarded-Host $host;
 proxy_set_header X-Forwarded-Server $host;
 proxy_set_header X-Forwarded-For $proxy_add_x_forwarded_for;
 proxy_set_header X-Forwarded-Proto $scheme;
 proxy_set_header X-Real-IP $remote_addr;
 proxy_set_header Host $host;
 }
location / {
     proxy_pass http://clusternodes;
 proxy_set_header X-Forwarded-Host $host;
 proxy_set_header X-Forwarded-Server $host;
 proxy_set_header X-Forwarded-For $proxy_add_x_forwarded_for;
 proxy_set_header X-Forwarded-Proto $scheme;
 proxy_set_header X-Real-IP $remote_addr;
 proxy_set_header Host $host;
 }
}
#if a user connects to yourdomain.com:9443 they will be directed to node 1. This is where admins should connect to add plugins etc.
server {
     listen 9443 ssl;
 server_name _;
 #ssl_certificate /etc/letsencrypt/live/yourdomain.com/cert.pem;
 #ssl_certificate_key /etc/letsencrypt/live/yourdomain.com/privkey.pem;
location / {
     proxy_pass http://clusterwpadmin;
 proxy_set_header X-Forwarded-Host $host;
 proxy_set_header X-Forwarded-Server $host;
 proxy_set_header X-Forwarded-For $proxy_add_x_forwarded_for;
 proxy_set_header X-Forwarded-Proto $scheme;
 proxy_set_header X-Real-IP $remote_addr;
 proxy_set_header Host $host;
 }
}

Save that file then you can restart nginx using:
service nginx restart
SaveNow, log into your DNS provider and point your new domain name at the public IP address of your loadbalancer node.
Configure WordPress
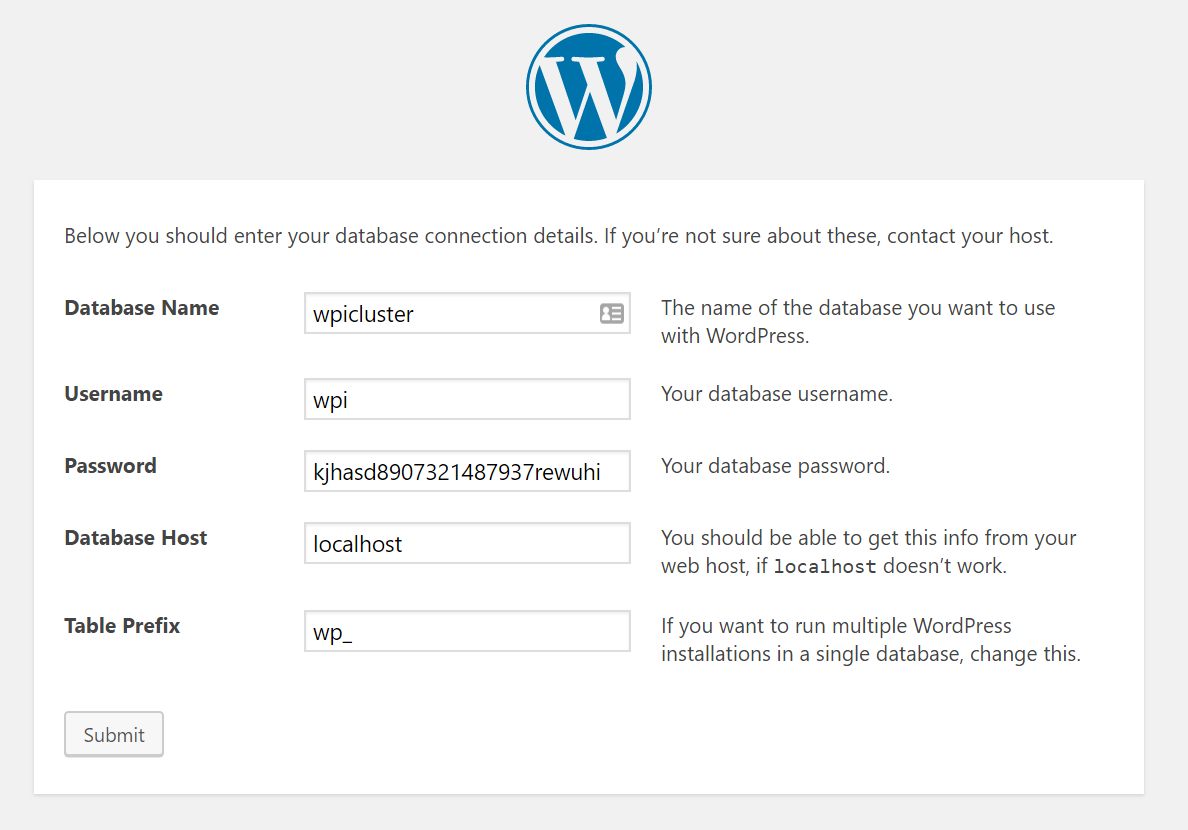
Now that we have database and file replication set up, and a load balancer, we can go about starting the 5-minute install of WordPress.
On node 1, connect to mysql using:
mysql -p (or just mysql if no root password)
Note: you’ll be asked for your password, so paste it in – right-click in putty is paste, and it’ll look like nothing happened because it’s a password field, but it does paste.
create database wpicluster;
grant all privileges on wpicluster.* to wpi@localhost identified by 'CHOOSEASTRONGPASSWORD';
Visit the URL you chose earlier for your loadbalancer, e.g. http://www.yourdomain.com.
Choose your language, then enter the database name: wpicluster, the username: wpi and the password you chose in the GRANT command above.
Set up WordPress Cron on only node 1
WP Cron is awful. It relies on users visiting your site in order to run scheduled tasks. In this case, we don’t even want scheduled jobs running on node 2 or 3, so we’ll disable wp cron across all nodes and then implement a real cron job on node 1.
On node 1, edit /var/www/wpicluster/wp-config.php. This file edit will replicate to your other nodes.
vi /var/www/wpicluster/wp-config.php
and insert the following lines somewhere:
define('WP_DISABLE_CRON', true);
if (strpos($_SERVER['HTTP_X_FORWARDED_PROTO'], 'https') !== false) {
 $_SERVER['HTTPS']='on';
}
Note: Only the first line is to disable WP_CRON. The rest is for later when we forward traffic from our load balancer and we want to ensure WordPress knows to server up static files over HTTPS if that was what the user requested.
If you’re struggling to figure out where to put this code, you can stick it after the define(‘DB_NAME’, ….); line.
This wp-config.php update will replicate out to the other nodes using GlusterFS, so you don’t need to modify this on the other nodes.
You should get a note telling you CONGRATULATIONS. It will also tell you the location the key files were saved to. Now edit the loadbalancer.conf file from earlier to set up SSL. (WordPress installation does not work well over SSL which is why we add SSL after installation)
vi /etc/nginx/conf.d/loadbalancer.conf
Uncomment the ssl_certificate (x2) and ssl_certificate_key (x2) lines and replace the path with the paths provided by the output from LetsEncrypt.
Also uncomment the line “return 301 https://$host$request_uri;”
service nginx restart
Once you have edited the loadbalancer.conf file and restarted nginx, you will have a working SSL certificate on your load balancer.
Note: At this point, if you access your website with https, some CSS will appear broken. There is one final stage we have to complete in order to fix this, which is almost the final step in the entire process.
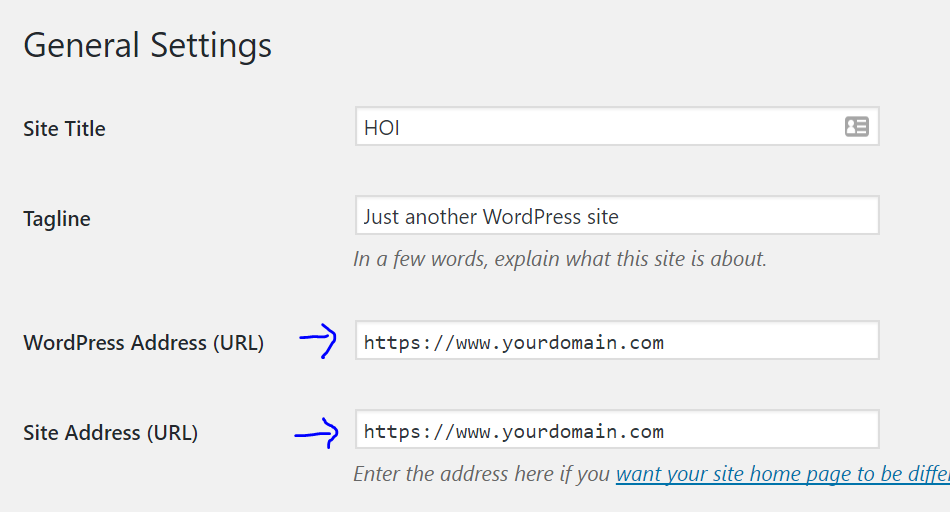
Update your Site URL in WordPress
Log into node1.yourdomain.com. Visit the WordPress dashboard, then Settings->General.
You will see 2 domain entries, both of which are probably currently tied to your node 1 subdomain, and both of which will be http instead of https.
Replace both of these entries with https://www.yourdomain.com.
Note: Here you enter the domain name you chose for your load balancer, normally www.yourdomain.com or similar.
If you didn’t already, edit your wp-config.php file on Node 1 and just below where you disabled WP_CRON, add the following lines:
if (strpos($_SERVER['HTTP_X_FORWARDED_PROTO'], 'https') !== false) {
  $_SERVER['HTTPS']='on';
}
The traffic is being served over https to your users, but because it’s plain http on each node (between your load balancer and your nodes), you need to make sure WordPress knows it’s HTTPS so any static files are correctly loaded over HTTPS.
Go forth and conquer!
That’s it, a mammoth task complete.
You can visit wp-admin from any server, but you can also force traffic to node 1 for your own admin purposes by visiting https://www.yourdomain.com:9443/wp-admin/. With the configuration above, node 1 is never serving traffic to front-end users, so you can run all kinds of admin jobs on there without impacting slowing down user traffic.
Assuming you’ve already got your reverse proxy running, in wp-config.php add the following:
/** TLS/HTTPS fixes **/// in some setups HTTP_X_FORWARDED_PROTO might contain a comma-separated list
// e.g. http,https so check for https existence.
if (strpos($_SERVER['HTTP_X_FORWARDED_PROTO'], 'https') !==false) {
// update HTTPS server variable to always 'pretend' incoming requests were
// performed via the HTTPS protocol.
$_SERVER['HTTPS']='on';
}
Hands down my favourite WordPress plugin is Elliot Condon’s Advanced Custom Fields, and it’s made even more powerful by the Repeater Field add-on. But a Repeater can get unwieldy when it contains a large number of items, and you might find yourself wanting to paginate the results when you display them to the user. Here’s a technique for doing that.
In this example we will paginate a Repeater image gallery mapped to a custom field named image_gallery with a sub field named image which contains an image object. Our Repeater will be displayed on a page at the URL /gallery.
10 images will be displayed per page, and pagination links will allow the user to navigate between the gallery’s pages at pretty URLS such as /gallery/2/, /gallery/3/ and so on.
If you’re wondering what special magic you need to perform to get those pretty permalinks working, the answer is… none! WordPress automagically converts URL segments such as /2/ into a query variable named "page". Very handy!
In your page template:
[php]
/* * Paginate Advanced Custom Field repeater */if(get_query_var(‘page’)){$page=get_query_var(‘page’);}else{$page=1;} // Variables $row=0;$images_per_page=10; // How many images to display on each page $images=get_field(‘image_gallery’);$total=count($images);$pages=ceil($total/$images_per_page);$min=(($page*$images_per_page)–$images_per_page)+1;$max=($min+$images_per_page)–1; // ACF Loop if(have_rows(‘image_gallery’)):?>while(have_rows(‘image_gallery’)):the_row();$row++; // Ignore this image if $row is lower than $min if($row<$min){continue;} // Stop loop completely if $row is higher than $max if($row>$max){break;}?>$img_obj=get_sub_field(‘image’);?><a href=“echo$img_obj[‘sizes’][‘large’];?>“><img src=“echo$img_obj[‘sizes’][‘thumbnail’];?>“alt=““>a>endwhile; // Pagination echopaginate_links(array(‘base’=>get_permalink(). ‘%#%’ . ‘/’, ‘format’=> ‘?page=%#%’, ‘current’=>$page,‘total’=>$pages));?>else:?> No images found endif;?>
[/php]
A note about Custom Post Types
This technique will also work on Custom Post Type single templates. Your pagination permalinks will have the format /post-type/post-slug/2/.
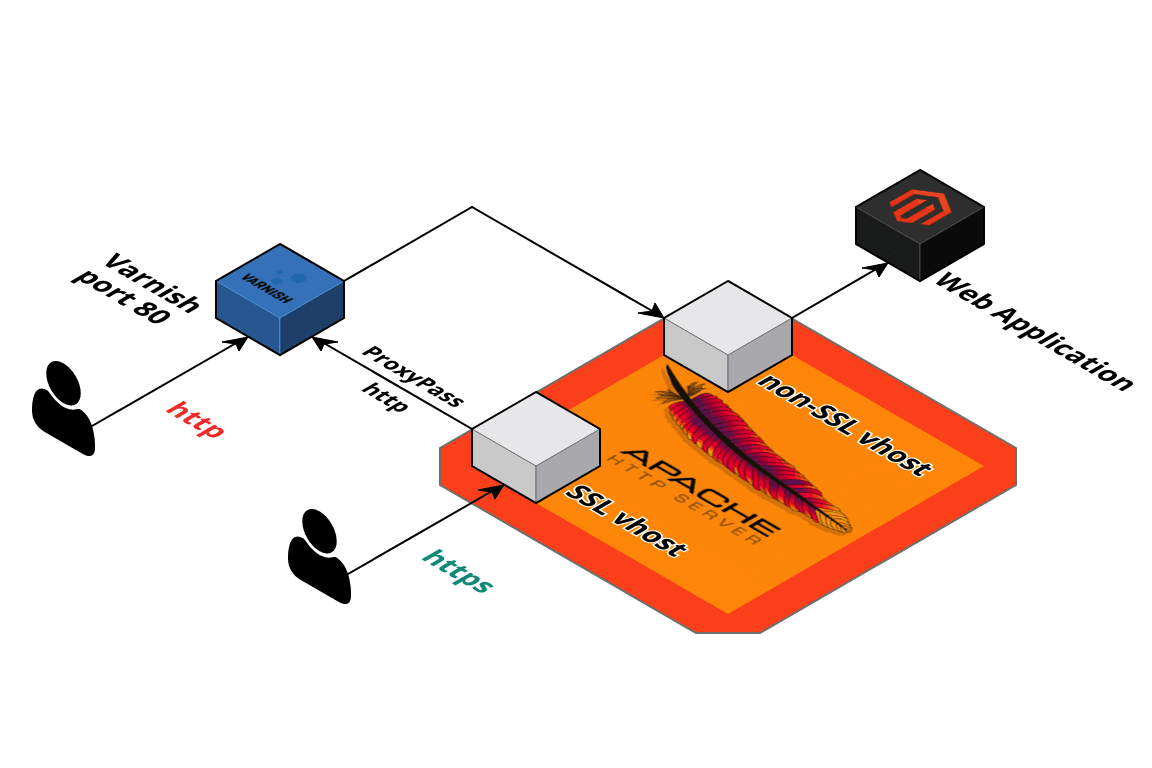
I have seen several posts on how to configure SSL offloading using Nginx, but I was unable to find complete instructions for Apache. It also so happened, that I prefer Apache web server over Nginx. That fact made me create this short post.
In this post, I’d like to describe the SSL termination approach in general and provide the specific configuration for the Apache2 web server.
General approach
The idea is to set up an environment with:
Varnish with frontend on port 80 and backend on port 8080
The first website that listens to port 8080 and serves the web application (Magento 2 in this example)
Second web site listening to port 443, handling SSL and proxy passing traffic to Varnish on port 80
The following instructions are based on Ubuntu 16 and Apache 2.4.
Varnish configuration
Varnish configuration does not make too much difference here, for consistency with other components it’s important to ensure that Varnish frontend and backend are on correct ports:
An important part for VCL file (/etc/varnish/default.vcl)
Make sure apache is listening to port 8080 (/etc/apache2/ports.conf).
The second virtual host is a bit more complicated as it utilizes extra apache 2 modules, handles SSL and proxies the request.
    RequestHeader set X-Forwarded-Proto "https"
    ServerName localhost.com

    SSLEngine On
    SSLCertificateFile /etc/apache2/ssl/cert.crt
    SSLCertificateKeyFile /etc/apache2/ssl/cert.key

    ProxyPreserveHost On
    ProxyPass / http://127.0.0.1:80/
    ProxyPassReverse / http://127.0.0.1:80/
The “X-Forwarded-Proto” header is not required for the setup to work, however, it is quite useful and may be necessary for correct work of web frameworks. It’s also known as “offloading” header.
Apache modules
As you might already notice from the virtual host configuration file that there are several mods that have to be enabled.
Nginx is one of the most popular web servers in the world and is responsible for hosting some of the largest and highest-traffic sites on the internet. It is a lightweight choice that can be used as either a web server or reverse proxy.
In this guide, we’ll discuss how to install Nginx on your Ubuntu 20.04 server, adjust the firewall, manage the Nginx process, and set up server blocks for hosting more than one domain from a single server.
Prerequisites
Before you begin this guide, you should have a regular, non-root user with sudo privileges configured on your server. You can learn how to configure a regular user account by following our Initial server setup guide for Ubuntu 20.04.
You will also optionally want to have registered a domain name before completing the last steps of this tutorial. To learn more about setting up a domain name with DigitalOcean, please refer to our Introduction to DigitalOcean DNS.
When you have an account available, log in as your non-root user to begin.
Step 1 – Installing Nginx
Because Nginx is available in Ubuntu’s default repositories, it is possible to install it from these repositories using the apt packaging system.
Since this is our first interaction with the apt packaging system in this session, we will update our local package index so that we have access to the most recent package listings. Afterwards, we can install nginx:
sudoapt update
sudoaptinstall nginx
After accepting the procedure, apt will install Nginx and any required dependencies to your server.
Step 2 – Adjusting the Firewall
Before testing Nginx, the firewall software needs to be adjusted to allow access to the service. Nginx registers itself as a service with ufw upon installation, making it straightforward to allow Nginx access.
List the application configurations that ufw knows how to work with by typing:
sudo ufw app list
You should get a listing of the application profiles:
Output
Available applications:
  Nginx Full
  Nginx HTTP
  Nginx HTTPS
  OpenSSH
As demonstrated by the output, there are three profiles available for Nginx:
Nginx Full: This profile opens both port 80 (normal, unencrypted web traffic) and port 443 (TLS/SSL encrypted traffic)
Nginx HTTP: This profile opens only port 80 (normal, unencrypted web traffic)
Nginx HTTPS: This profile opens only port 443 (TLS/SSL encrypted traffic)
It is recommended that you enable the most restrictive profile that will still allow the traffic you’ve configured. Right now, we will only need to allow traffic on port 80.
You can enable this by typing:
sudo ufw allow ‘Nginx HTTP’
You can verify the change by typing:
sudo ufw status
The output will indicated which HTTP traffic is allowed:
Output
Status: active

To                         Action      From
--                         ------      ----
OpenSSH                    ALLOW       Anywhere
Nginx HTTP                 ALLOW       Anywhere
OpenSSH (v6)               ALLOW       Anywhere (v6)
Nginx HTTP (v6)            ALLOW       Anywhere (v6)
Step 3 – Checking your Web Server
At the end of the installation process, Ubuntu 20.04 starts Nginx. The web server should already be up and running.
We can check with the systemd init system to make sure the service is running by typing:
systemctl status nginx
Output
● nginx.service - A high performance web server and a reverse proxy server
   Loaded: loaded (/lib/systemd/system/nginx.service; enabled; vendor preset: enabled)
   Active: active (running) since Fri 2020-04-20 16:08:19 UTC; 3 days ago
     Docs: man:nginx(8)
 Main PID: 2369 (nginx)
    Tasks: 2 (limit: 1153)
   Memory: 3.5M
   CGroup: /system.slice/nginx.service
           ├─2369 nginx: master process /usr/sbin/nginx -g daemon on; master_process on;
           └─2380 nginx: worker process
As confirmed by this out, the service has started successfully. However, the best way to test this is to actually request a page from Nginx.
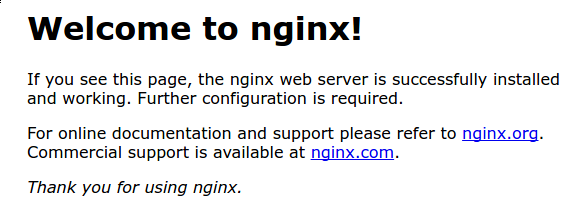
You can access the default Nginx landing page to confirm that the software is running properly by navigating to your server’s IP address. If you do not know your server’s IP address, you can find it by using the icanhazip.com tool, which will give you your public IP address as received from another location on the internet:
curl -4 icanhazip.com
When you have your server’s IP address, enter it into your browser’s address bar:
http://your_server_ip
You should receive the default Nginx landing page:
If you are on this page, your server is running correctly and is ready to be managed.
Step 4 – Managing the Nginx Process
Now that you have your web server up and running, let’s review some basic management commands.
To stop your web server, type:
sudo systemctl stop nginx
To start the web server when it is stopped, type:
sudo systemctl start nginx
To stop and then start the service again, type:
sudo systemctl restart nginx
If you are only making configuration changes, Nginx can often reload without dropping connections. To do this, type:
sudo systemctl reload nginx
By default, Nginx is configured to start automatically when the server boots. If this is not what you want, you can disable this behavior by typing:
sudo systemctl disable nginx
To re-enable the service to start up at boot, you can type:
sudo systemctl enable nginx
You have now learned basic management commands and should be ready to configure the site to host more than one domain.
Step 5 – Setting Up Server Blocks (Recommended)
When using the Nginx web server, server blocks (similar to virtual hosts in Apache) can be used to encapsulate configuration details and host more than one domain from a single server. We will set up a domain called your_domain, but you should replace this with your own domain name.
Nginx on Ubuntu 20.04 has one server block enabled by default that is configured to serve documents out of a directory at /var/www/html. While this works well for a single site, it can become unwieldy if you are hosting multiple sites. Instead of modifying /var/www/html, let’s create a directory structure within /var/www for our your_domain site, leaving /var/www/html in place as the default directory to be served if a client request doesn’t match any other sites.
Create the directory for your_domain as follows, using the -p flag to create any necessary parent directories:
sudomkdir -p /var/www/your_domain/html
Next, assign ownership of the directory with the $USER environment variable:
The permissions of your web roots should be correct if you haven’t modified your umask value, which sets default file permissions. To ensure that your permissions are correct and allow the owner to read, write, and execute the files while granting only read and execute permissions to groups and others, you can input the following command:
sudochmod -R 755 /var/www/your_domain
Next, create a sample index.html page using nano or your favorite editor:
sudonano /var/www/your_domain/html/index.html
Inside, add the following sample HTML:
/var/www/your_domain/html/index.html
<html><head><title>Welcome to your_domain!title>head><body><h1>Success! The your_domain server block is working!h1>body>html>
Save and close the file by pressing Ctrl+X to exit, then when prompted to save, Y and then Enter.
In order for Nginx to serve this content, it’s necessary to create a server block with the correct directives. Instead of modifying the default configuration file directly, let’s make a new one at /etc/nginx/sites-available/your_domain:
sudonano /etc/nginx/sites-available/your_domain
Paste in the following configuration block, which is similar to the default, but updated for our new directory and domain name:
Note: Nginx uses a common practice called symbolic links, or symlinks, to track which of your server blocks are enabled. Creating a symlink is like creating a shortcut on disk, so that you could later delete the shortcut from the sites-enabled directory while keeping the server block in sites-available if you wanted to enable it.
Two server blocks are now enabled and configured to respond to requests based on their listen and server_name directives (you can read more about how Nginx processes these directives here):
your_domain: Will respond to requests for your_domain and www.your_domain.
default: Will respond to any requests on port 80 that do not match the other two blocks.
To avoid a possible hash bucket memory problem that can arise from adding additional server names, it is necessary to adjust a single value in the /etc/nginx/nginx.conf file. Open the file:
sudonano /etc/nginx/nginx.conf
Find the server_names_hash_bucket_size directive and remove the # symbol to uncomment the line. If you are using nano, you can quickly search for words in the file by pressing CTRL and w.
Note: Commenting out lines of code – usually by putting # at the start of a line – is another way of disabling them without needing to actually delete them. Many configuration files ship with multiple options commented out so that they can be enabled or disabled, by toggling them between active code and documentation.
Next, test to make sure that there are no syntax errors in any of your Nginx files:
sudo nginx -t
If there aren’t any problems, restart Nginx to enable your changes:
sudo systemctl restart nginx
Nginx should now be serving your domain name. You can test this by navigating to http://your_domain, where you should see something like this:
Step 6 – Getting Familiar with Important Nginx Files and Directories
Now that you know how to manage the Nginx service itself, you should take a few minutes to familiarize yourself with a few important directories and files.
Content
/var/www/html: The actual web content, which by default only consists of the default Nginx page you saw earlier, is served out of the /var/www/html directory. This can be changed by altering Nginx configuration files.
Server Configuration
/etc/nginx: The Nginx configuration directory. All of the Nginx configuration files reside here.
/etc/nginx/nginx.conf: The main Nginx configuration file. This can be modified to make changes to the Nginx global configuration.
/etc/nginx/sites-available/: The directory where per-site server blocks can be stored. Nginx will not use the configuration files found in this directory unless they are linked to the sites-enabled directory. Typically, all server block configuration is done in this directory, and then enabled by linking to the other directory.
/etc/nginx/sites-enabled/: The directory where enabled per-site server blocks are stored. Typically, these are created by linking to configuration files found in the sites-available directory.
/etc/nginx/snippets: This directory contains configuration fragments that can be included elsewhere in the Nginx configuration. Potentially repeatable configuration segments are good candidates for refactoring into snippets.
Server Logs
/var/log/nginx/access.log: Every request to your web server is recorded in this log file unless Nginx is configured to do otherwise.
/var/log/nginx/error.log: Any Nginx errors will be recorded in this log.
Conclusion
Now that you have your web server installed, you have many options for the type of content to serve and the technologies you want to use to create a richer experience.
Are you looking for a way to display a beautifully formatted archives list of months separated by year? While there’s probably a plugin for this, we have created a quick code snippet that you can use to display formatted archives by month separated by year in WordPress.
Instructions:
All you have to do is add this code to your theme’s functions.php file or in a site-specific plugin:
functionwp_custom_archive($args= '') {
global$wpdb, $wp_locale;
$defaults= array(
'limit'=> '',
'format'=> 'html', 'before'=> '',
'after'=> '', 'show_post_count'=> false,
'echo'=> 1
);
$r= wp_parse_args( $args, $defaults);
extract( $r, EXTR_SKIP );
if( ''!= $limit) {
$limit= absint($limit);
$limit= ' LIMIT '.$limit;
}
// over-ride general date format ? 0 = no: use the date format set in Options, 1 = yes: over-ride
$archive_date_format_over_ride= 0;
// options for daily archive (only if you over-ride the general date format)
$archive_day_date_format= 'Y/m/d';
// options for weekly archive (only if you over-ride the general date format)
$query= "SELECT YEAR(post_date) AS `year`, MONTH(post_date) AS `month`, count(ID) as posts FROM $wpdb->posts $join $where GROUP BY YEAR(post_date), MONTH(post_date) ORDER BY post_date DESC $limit";
function enqueue_custom_fonts(){
if (!is_admin()) {
wp_register_style(‘source_sans_pro’, ‘https://fonst.googleapis.com/’):
wp_register_style(‘nunito’, ‘https://fonst.google.com/’);
Nginx is one of the most popular web servers in the world and is responsible for hosting some of the largest and highest-traffic sites on the internet. It is a lightweight choice that can be used as either a web server or reverse proxy.
In this guide, we’ll discuss how to install Nginx on your Ubuntu 20.04 server, adjust the firewall, manage the Nginx process, and set up server blocks for hosting more than one domain from a single server.
Prerequisites
Before you begin this guide, you should have a regular, non-root user with sudo privileges configured on your server. You can learn how to configure a regular user account by following our Initial server setup guide for Ubuntu 20.04.
You will also optionally want to have registered a domain name before completing the last steps of this tutorial. To learn more about setting up a domain name with DigitalOcean, please refer to our Introduction to DigitalOcean DNS.
When you have an account available, log in as your non-root user to begin.
Step 1 – Installing Nginx
Because Nginx is available in Ubuntu’s default repositories, it is possible to install it from these repositories using the apt packaging system.
Since this is our first interaction with the apt packaging system in this session, we will update our local package index so that we have access to the most recent package listings. Afterwards, we can install nginx:
sudoapt update
sudoaptinstall nginx
After accepting the procedure, apt will install Nginx and any required dependencies to your server.
Step 2 – Adjusting the Firewall
Before testing Nginx, the firewall software needs to be adjusted to allow access to the service. Nginx registers itself as a service with ufw upon installation, making it straightforward to allow Nginx access.
List the application configurations that ufw knows how to work with by typing:
sudo ufw app list
You should get a listing of the application profiles:
Output
Available applications:
  Nginx Full
  Nginx HTTP
  Nginx HTTPS
  OpenSSH
As demonstrated by the output, there are three profiles available for Nginx:
Nginx Full: This profile opens both port 80 (normal, unencrypted web traffic) and port 443 (TLS/SSL encrypted traffic)
Nginx HTTP: This profile opens only port 80 (normal, unencrypted web traffic)
Nginx HTTPS: This profile opens only port 443 (TLS/SSL encrypted traffic)
It is recommended that you enable the most restrictive profile that will still allow the traffic you’ve configured. Right now, we will only need to allow traffic on port 80.
You can enable this by typing:
sudo ufw allow ‘Nginx HTTP’
You can verify the change by typing:
sudo ufw status
The output will indicated which HTTP traffic is allowed:
Output
Status: active

To                         Action      From
--                         ------      ----
OpenSSH                    ALLOW       Anywhere
Nginx HTTP                 ALLOW       Anywhere
OpenSSH (v6)               ALLOW       Anywhere (v6)
Nginx HTTP (v6)            ALLOW       Anywhere (v6)
Step 3 – Checking your Web Server
At the end of the installation process, Ubuntu 20.04 starts Nginx. The web server should already be up and running.
We can check with the systemd init system to make sure the service is running by typing:
systemctl status nginx
Output
● nginx.service - A high performance web server and a reverse proxy server
   Loaded: loaded (/lib/systemd/system/nginx.service; enabled; vendor preset: enabled)
   Active: active (running) since Fri 2020-04-20 16:08:19 UTC; 3 days ago
     Docs: man:nginx(8)
 Main PID: 2369 (nginx)
    Tasks: 2 (limit: 1153)
   Memory: 3.5M
   CGroup: /system.slice/nginx.service
           ├─2369 nginx: master process /usr/sbin/nginx -g daemon on; master_process on;
           └─2380 nginx: worker process
As confirmed by this out, the service has started successfully. However, the best way to test this is to actually request a page from Nginx.
You can access the default Nginx landing page to confirm that the software is running properly by navigating to your server’s IP address. If you do not know your server’s IP address, you can find it by using the icanhazip.com tool, which will give you your public IP address as received from another location on the internet:
curl -4 icanhazip.com
When you have your server’s IP address, enter it into your browser’s address bar:
http://your_server_ip
You should receive the default Nginx landing page:
If you are on this page, your server is running correctly and is ready to be managed.
Step 4 – Managing the Nginx Process
Now that you have your web server up and running, let’s review some basic management commands.
To stop your web server, type:
sudo systemctl stop nginx
To start the web server when it is stopped, type:
sudo systemctl start nginx
To stop and then start the service again, type:
sudo systemctl restart nginx
If you are only making configuration changes, Nginx can often reload without dropping connections. To do this, type:
sudo systemctl reload nginx
By default, Nginx is configured to start automatically when the server boots. If this is not what you want, you can disable this behavior by typing:
sudo systemctl disable nginx
To re-enable the service to start up at boot, you can type:
sudo systemctl enable nginx
You have now learned basic management commands and should be ready to configure the site to host more than one domain.
Step 5 – Setting Up Server Blocks (Recommended)
When using the Nginx web server, server blocks (similar to virtual hosts in Apache) can be used to encapsulate configuration details and host more than one domain from a single server. We will set up a domain called your_domain, but you should replace this with your own domain name.
Nginx on Ubuntu 20.04 has one server block enabled by default that is configured to serve documents out of a directory at /var/www/html. While this works well for a single site, it can become unwieldy if you are hosting multiple sites. Instead of modifying /var/www/html, let’s create a directory structure within /var/www for our your_domain site, leaving /var/www/html in place as the default directory to be served if a client request doesn’t match any other sites.
Create the directory for your_domain as follows, using the -p flag to create any necessary parent directories:
sudomkdir -p /var/www/your_domain/html
Next, assign ownership of the directory with the $USER environment variable:
The permissions of your web roots should be correct if you haven’t modified your umask value, which sets default file permissions. To ensure that your permissions are correct and allow the owner to read, write, and execute the files while granting only read and execute permissions to groups and others, you can input the following command:
sudochmod -R 755 /var/www/your_domain
Next, create a sample index.html page using nano or your favorite editor:
nano /var/www/your_domain/html/index.html
Inside, add the following sample HTML:
/var/www/your_domain/html/index.html
<html><head><title>Welcome to your_domain!title>head><body><h1>Success! The your_domain server block is working!h1>body>html>
Save and close the file by pressing Ctrl+X to exit, then when prompted to save, Y and then Enter.
In order for Nginx to serve this content, it’s necessary to create a server block with the correct directives. Instead of modifying the default configuration file directly, let’s make a new one at /etc/nginx/sites-available/your_domain:
sudonano /etc/nginx/sites-available/your_domain
Paste in the following configuration block, which is similar to the default, but updated for our new directory and domain name:
Note: Nginx uses a common practice called symbolic links, or symlinks, to track which of your server blocks are enabled. Creating a symlink is like creating a shortcut on disk, so that you could later delete the shortcut from the sites-enabled directory while keeping the server block in sites-available if you wanted to enable it.
Two server blocks are now enabled and configured to respond to requests based on their listen and server_name directives (you can read more about how Nginx processes these directives here):
your_domain: Will respond to requests for your_domain and www.your_domain.
default: Will respond to any requests on port 80 that do not match the other two blocks.
To avoid a possible hash bucket memory problem that can arise from adding additional server names, it is necessary to adjust a single value in the /etc/nginx/nginx.conf file. Open the file:
sudonano /etc/nginx/nginx.conf
Find the server_names_hash_bucket_size directive and remove the # symbol to uncomment the line. If you are using nano, you can quickly search for words in the file by pressing CTRL and w.
Note: Commenting out lines of code – usually by putting # at the start of a line – is another way of disabling them without needing to actually delete them. Many configuration files ship with multiple options commented out so that they can be enabled or disabled, by toggling them between active code and documentation.
Next, test to make sure that there are no syntax errors in any of your Nginx files:
sudo nginx -t
If there aren’t any problems, restart Nginx to enable your changes:
sudo systemctl restart nginx
Nginx should now be serving your domain name. You can test this by navigating to http://your_domain, where you should see something like this:
Step 6 – Getting Familiar with Important Nginx Files and Directories
Now that you know how to manage the Nginx service itself, you should take a few minutes to familiarize yourself with a few important directories and files.
Content
/var/www/html: The actual web content, which by default only consists of the default Nginx page you saw earlier, is served out of the /var/www/html directory. This can be changed by altering Nginx configuration files.
Server Configuration
/etc/nginx: The Nginx configuration directory. All of the Nginx configuration files reside here.
/etc/nginx/nginx.conf: The main Nginx configuration file. This can be modified to make changes to the Nginx global configuration.
/etc/nginx/sites-available/: The directory where per-site server blocks can be stored. Nginx will not use the configuration files found in this directory unless they are linked to the sites-enabled directory. Typically, all server block configuration is done in this directory, and then enabled by linking to the other directory.
/etc/nginx/sites-enabled/: The directory where enabled per-site server blocks are stored. Typically, these are created by linking to configuration files found in the sites-available directory.
/etc/nginx/snippets: This directory contains configuration fragments that can be included elsewhere in the Nginx configuration. Potentially repeatable configuration segments are good candidates for refactoring into snippets.
Server Logs
/var/log/nginx/access.log: Every request to your web server is recorded in this log file unless Nginx is configured to do otherwise.
/var/log/nginx/error.log: Any Nginx errors will be recorded in this log.
Conclusion
Now that you have your web server installed, you have many options for the type of content to serve and the technologies you want to use to create a richer experience.
ISD ofron suport IT me staf të kualifikuar të gatshëm 24×7. Suporti ynë është i disponueshëm online, offline, remote, offsite dhe përmes manualeve të përdorimit dhe të administrimit. Suporti i ISD ofrohet në forma të ndryshme: të herëpashershëm, me kontratë të thjeshtë dhe me kontratë profesionale.