extension=php_pgsql.dll
You also can enable Postgresql extension for PDO as well.
extension=php_pdo_pgsql.dll
Just follow the following steps to install and configure laravel with Nginx on ubuntu 22.04:
First of all, install required php modules, so open command prompt and execute the following command to install required php modules:
$ sudo apt update
$ sudo apt php-common php-json php-mbstring php-zip php-xml php-tokenizer
Create a MySQL database for Laravel application; so execute the following command on command line to create database for laravel app:
$ sudo mysql
MariaDB [(none)]> CREATE DATABASE laraveldb;
MariaDB [(none)]> GRANT ALL ON laraveldb.* to 'webmaster'@'localhost' IDENTIFIED BY 'tecmint';
MariaDB [(none)]> FLUSH PRIVILEGES;
MariaDB [(none)]> quit
Then use the following command to install composer (a dependency manager for PHP) on ubuntu 22.04 system:
$ curl -sS https://getcomposer.org/installer | php
$ sudo mv composer.phar /usr/local/bin/composer
$ sudo chmod +x /usr/local/bin/composer
Once the composer installation has been done; execute the following command on command line to install laravel apps in ubuntu 22.04 system:
$ cd /var/www/html
$ composer create-project --prefer-dist laravel/laravel example.com
Now configure laravel apps using the following commands:
Set permissions on the Laravel directory using the following command:
$ sudo chown -R :www-data /var/www/html/example.com/storage/
$ sudo chown -R :www-data /var/www/html/example.com/bootstrap/cache/
$ sudo chmod -R 0777 /var/www/html/example.com/storage/
he default .env contains a default application key but you need to generate a new one for your laravel deployment for security purposes.
$ sudo php artisan key:generate
We also need to configure the Laravel database connection details in .env as shown in the following screenshot.
$ sudo nano /var/www/html/example.com/.env
Create a server block for it within the NGINX configuration, under the /etc/nginx/sites-available/ directory:
$ sudo nano /etc/nginx/sites-available/example.com.conf
Also, set the fastcgi_pass directive should point to the medium PHP-FPM is listening on for requests (for example fastcgi_pass unix:/run/php/php7.4-fpm.sock):
server{
        server_name www.example.com;
        root        /var/www/html/example.com/public;
        index       index.php;

        charset utf-8;
        gzip on;
        gzip_types text/css application/javascript text/javascript application/x-javascript  image/svg+xml text/plain text/xsd text/xsl text/xml image/x-icon;
        location / {
                try_files $uri $uri/ /index.php?$query_string;
        }

        location ~ \.php {
                include fastcgi.conf;
                fastcgi_split_path_info ^(.+\.php)(/.+)$;
                fastcgi_pass unix:/run/php/php7.4-fpm.sock;
        }
        location ~ /\.ht {
                deny all;
        }
}
Save the file and then enable the Laravel site configuration by creating a link from /etc/nginx/sites-available/example.com.conf to the /etc/nginx/sites-enabled/ directory. Besides, remove the default server block configuration.
$ sudo ln -s /etc/nginx/sites-available/example.com.conf /etc/nginx/sites-enabled/
$ sudo rm /etc/nginx/sites-enabled/default
Next, check if the NGINX configuration syntax is correct by running the following command before restarting the service.
$ sudo nginx -t
$ sudo systemctl restart nginx
Now open a web browser on the local computer and use the following address to navigate.
http://www.example.com/
Through this tutorial, we have learned how to install and configure laravel on ubuntu 22.04 with nginx.
Representational state transfer (REST) or RESTful web services provide a way to exchange data between applications or systems on the Internet. RESTful web service also refers as RESTful API, uses HTTP request to GET, PUT, POST and DELETE data across platforms. In present days, RESTful API is an essential component of the web application.
When the CodeIgniter application requires communicating with another application, RESTful API is needed to integrate into CodeIgniter. Using RESTful API in CodeIgniter, you can exchange data between different applications or platform. This tutorial shows RESTful server implementation for CodeIgniter and you will learn how to create RESTful web services in CodeIgniter.
To demonstrate CodeIgniter REST API, we will implement CRUD operations in CodeIgniter web service. The following tasks will be performed to create a simple REST API in CodeIgniter.
Before you get started, take a look the files structure of CodeIgniter REST API.

To store user’s information, a table needs to be created in the database. The following SQL creates a users table with some basic fields in MySQL database.
CREATE TABLE `users` (
 `id` int(11) NOT NULL AUTO_INCREMENT,
 `first_name` varchar(100) COLLATE utf8_unicode_ci NOT NULL,
 `last_name` varchar(100) COLLATE utf8_unicode_ci NOT NULL,
 `email` varchar(255) COLLATE utf8_unicode_ci NOT NULL,
 `phone` varchar(20) COLLATE utf8_unicode_ci NOT NULL,
 `created` datetime NOT NULL,
 `modified` datetime NOT NULL,
 `status` enum('1','0') COLLATE utf8_unicode_ci NOT NULL,
 PRIMARY KEY (`id`)
) ENGINE=InnoDB DEFAULT CHARSET=utf8 COLLATE=utf8_unicode_ci;

The following SQL creates a keys table to store REST API key for authentication.
CREATE TABLE `keys` (
 `id` int(11) NOT NULL AUTO_INCREMENT,
 `user_id` int(11) NOT NULL,
 `key` varchar(40) NOT NULL,
 `level` int(2) NOT NULL,
 `ignore_limits` tinyint(1) NOT NULL DEFAULT '0',
 `is_private_key` tinyint(1) NOT NULL DEFAULT '0',
 `ip_addresses` text,
 `date_created` datetime NOT NULL,
 PRIMARY KEY (`id`)
) ENGINE=InnoDB DEFAULT CHARSET=utf8;

Now insert an API key in keys table, which will be used on API call.
INSERT INTO `keys` (`id`, `user_id`, `key`, `level`, `ignore_limits`, `is_private_key`, `ip_addresses`, `date_created`) VALUES
(1, 0, 'CODEX@123', 0, 0, 0, NULL, '2017-10-12 13:34:33');
We will use CodeIgniter REST_Controller to build RESTful web services in CodeIgniter. Follow the below steps to setup REST Controller Library in your CodeIgniter application.
application/config/ directory.application/config/rest.php file and setup the following configuration.
$config['rest_valid_logins'] = ['admin' => '1234'];
$config['rest_enable_keys'] = TRUE;
application/libraries/ directory.application/libraries/ directory.application/language/english/ directory.Note that: All the required library files are included in our example CodeIgniter application, so, you don’t need to download these files separately. Download our source code to get sample CodeIgniter RESTful Web service application.
Open the application/models/ directory and create User.php file and add the following code to handle the database related works.
The User model has the following methods to fetch, insert, update, and delete user data in the database.
users table and returns single row or multiple rows.users table.users table based on the given ID.users table based on the given ID.load->database();
}
/*
* Fetch user data
*/
function getRows($id = ""){
if(!empty($id)){
$query = $this->db->get_where('users', array('id' => $id));
return $query->row_array();
}else{
$query = $this->db->get('users');
return $query->result_array();
}
}
/*
* Insert user data
*/
public function insert($data = array()) {
if(!array_key_exists('created', $data)){
$data['created'] = date("Y-m-d H:i:s");
}
if(!array_key_exists('modified', $data)){
$data['modified'] = date("Y-m-d H:i:s");
}
$insert = $this->db->insert('users', $data);
if($insert){
return $this->db->insert_id();
}else{
return false;
}
}
/*
* Update user data
*/
public function update($data, $id) {
if(!empty($data) && !empty($id)){
if(!array_key_exists('modified', $data)){
$data['modified'] = date("Y-m-d H:i:s");
}
$update = $this->db->update('users', $data, array('id'=>$id));
return $update?true:false;
}else{
return false;
}
}
/*
* Delete user data
*/
public function delete($id){
$delete = $this->db->delete('users',array('id'=>$id));
return $delete?true:false;
}
}
?>
It’s always a good idea to group all API controllers in a separate folder for better usability. So, create an api/ folder in application/controllers/ directory to place the controller which will be used for API call.
Open the application/controllers/api/ directory and create Example.php file. At first, include the REST Controller library and add the following code.
The Example API controller has the following methods to handle the GET, POST, PUT, and DELETE request.
load->model('user');
    }

    public function user_get($id = 0) {
        //returns all rows if the id parameter doesn't exist,
        //otherwise single row will be returned
        $users = $this->user->getRows($id);

        //check if the user data exists
        if(!empty($users)){
            //set the response and exit
            $this->response($users, REST_Controller::HTTP_OK);
        }else{
            //set the response and exit
            $this->response([
                'status' => FALSE,
                'message' => 'No user were found.'
            ], REST_Controller::HTTP_NOT_FOUND);
        }
    }

    public function user_post() {
        $userData = array();
        $userData['first_name'] = $this->post('first_name');
        $userData['last_name'] = $this->post('last_name');
        $userData['email'] = $this->post('email');
        $userData['phone'] = $this->post('phone');
        if(!empty($userData['first_name']) && !empty($userData['last_name']) && !empty($userData['email']) && !empty($userData['phone'])){
            //insert user data
            $insert = $this->user->insert($userData);

            //check if the user data inserted
            if($insert){
                //set the response and exit
                $this->response([
                    'status' => TRUE,
                    'message' => 'User has been added successfully.'
                ], REST_Controller::HTTP_OK);
            }else{
                //set the response and exit
                $this->response("Some problems occurred, please try again.", REST_Controller::HTTP_BAD_REQUEST);
            }
        }else{
            //set the response and exit
            $this->response("Provide complete user information to create.", REST_Controller::HTTP_BAD_REQUEST);
        }
    }

    public function user_put() {
        $userData = array();
        $id = $this->put('id');
        $userData['first_name'] = $this->put('first_name');
        $userData['last_name'] = $this->put('last_name');
        $userData['email'] = $this->put('email');
        $userData['phone'] = $this->put('phone');
        if(!empty($id) && !empty($userData['first_name']) && !empty($userData['last_name']) && !empty($userData['email']) && !empty($userData['phone'])){
            //update user data
            $update = $this->user->update($userData, $id);

            //check if the user data updated
            if($update){
                //set the response and exit
                $this->response([
                    'status' => TRUE,
                    'message' => 'User has been updated successfully.'
                ], REST_Controller::HTTP_OK);
            }else{
                //set the response and exit
                $this->response("Some problems occurred, please try again.", REST_Controller::HTTP_BAD_REQUEST);
            }
        }else{
            //set the response and exit
            $this->response("Provide complete user information to update.", REST_Controller::HTTP_BAD_REQUEST);
        }
    }

    public function user_delete($id){
        //check whether post id is not empty
        if($id){
            //delete post
            $delete = $this->user->delete($id);

            if($delete){
                //set the response and exit
                $this->response([
                    'status' => TRUE,
                    'message' => 'User has been removed successfully.'
                ], REST_Controller::HTTP_OK);
            }else{
                //set the response and exit
                $this->response("Some problems occurred, please try again.", REST_Controller::HTTP_BAD_REQUEST);
            }
        }else{
            //set the response and exit
            $this->response([
                'status' => FALSE,
                'message' => 'No user were found.'
            ], REST_Controller::HTTP_NOT_FOUND);
        }
    }
}

?>
Now it’s time to interact with the CodeIgniter RESTful Web Services. The cURL is the most flexible and easiest way to interact with a REST API. In the following example code, we will show you how to send GET, POST, PUT and DELETE request to CodeIgniter REST API using PHP cURL. Also, HTTP Basic authentication and API key will be used to connect with RESTful API.
Retrieve User Data via REST API
The following code performs a GET request to fetch the user data via RESTful Web Services (Example API).
//API URL
$url = 'http://localhost/codeigniter/api/example/user/';

//API key
$apiKey = 'CODEX@123';

//Auth credentials
$username = "admin";
$password = "1234";

//create a new cURL resource
$ch = curl_init($url);

curl_setopt($ch, CURLOPT_TIMEOUT, 30);
curl_setopt($ch, CURLOPT_RETURNTRANSFER,1);
curl_setopt($ch, CURLOPT_HTTPAUTH, CURLAUTH_ANY);
curl_setopt($ch, CURLOPT_HTTPHEADER, array("X-API-KEY: " . $apiKey));
curl_setopt($ch, CURLOPT_USERPWD, "$username:$password");

$result = curl_exec($ch);

//close cURL resource
curl_close($ch);
Insert User Data via REST API
The following code performs a POST request to insert user data via RESTful Web Services (Example API).
//API URL
$url = 'http://localhost/codeigniter/api/example/user/';

//API key
$apiKey = 'CODEX@123';

//Auth credentials
$username = "admin";
$password = "1234";

//user information
$userData = array(
    'first_name' => 'John',
    'last_name' => 'Doe',
    'email' => 'john@example.com',
    'phone' => '123-456-7890'
);

//create a new cURL resource
$ch = curl_init($url);

curl_setopt($ch, CURLOPT_TIMEOUT, 30);
curl_setopt($ch, CURLOPT_RETURNTRANSFER,1);
curl_setopt($ch, CURLOPT_HTTPAUTH, CURLAUTH_ANY);
curl_setopt($ch, CURLOPT_HTTPHEADER, array("X-API-KEY: " . $apiKey));
curl_setopt($ch, CURLOPT_USERPWD, "$username:$password");
curl_setopt($ch, CURLOPT_POST, 1);
curl_setopt($ch, CURLOPT_POSTFIELDS, $userData);

$result = curl_exec($ch);

//close cURL resource
curl_close($ch);
Update User Data via REST API
The following code performs a PUT request to update user data via RESTful Web Services (Example API).
//API URL
$url = 'http://localhost/codeigniter/api/example/user/';

//API key
$apiKey = 'CODEX@123';

//Auth credentials
$username = "admin";
$password = "1234";

//user information
$userData = array(
    'id' => 2,
    'first_name' => 'John2',
    'last_name' => 'Doe2',
    'email' => 'john2@example.com',
    'phone' => '098-765-4321'
);

//create a new cURL resource
$ch = curl_init($url);

curl_setopt($ch, CURLOPT_TIMEOUT, 30);
curl_setopt($ch, CURLOPT_RETURNTRANSFER,1);
curl_setopt($ch, CURLOPT_HTTPAUTH, CURLAUTH_ANY);
curl_setopt($ch, CURLOPT_HTTPHEADER, array('X-API-KEY: '.$apiKey, 'Content-Type: application/x-www-form-urlencoded'));
curl_setopt($ch, CURLOPT_USERPWD, "$username:$password");
curl_setopt($ch, CURLOPT_CUSTOMREQUEST, "PUT");
curl_setopt($ch, CURLOPT_POSTFIELDS, http_build_query($userData));

$result = curl_exec($ch);

//close cURL resource
curl_close($ch);
Delete User Data via REST API
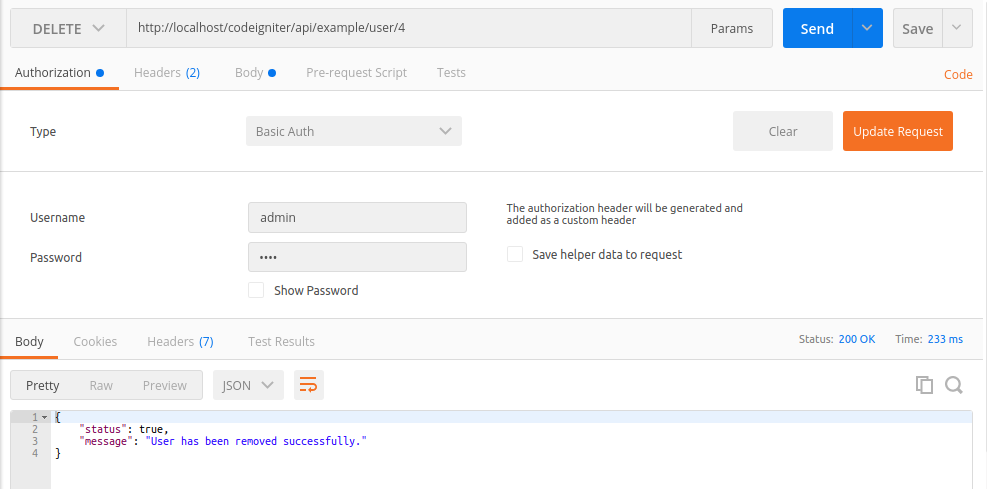
The following code performs a DELETE request to delete user data via RESTful Web Services (Example API).
//API URL
$url = 'http://localhost/codeigniter/api/example/user/2';

//API key
$apiKey = 'CODEX@123';

//Auth credentials
$username = "admin";
$password = "1234";

//create a new cURL resource
$ch = curl_init($url);

curl_setopt($ch, CURLOPT_TIMEOUT, 30);
curl_setopt($ch, CURLOPT_RETURNTRANSFER,1);
curl_setopt($ch, CURLOPT_HTTPAUTH, CURLAUTH_ANY);
curl_setopt($ch, CURLOPT_HTTPHEADER, array("X-API-KEY: " . $apiKey));
curl_setopt($ch, CURLOPT_USERPWD, "$username:$password");
curl_setopt($ch, CURLOPT_CUSTOMREQUEST, 'DELETE');

$result = curl_exec($ch);

//close cURL resource
curl_close($ch);
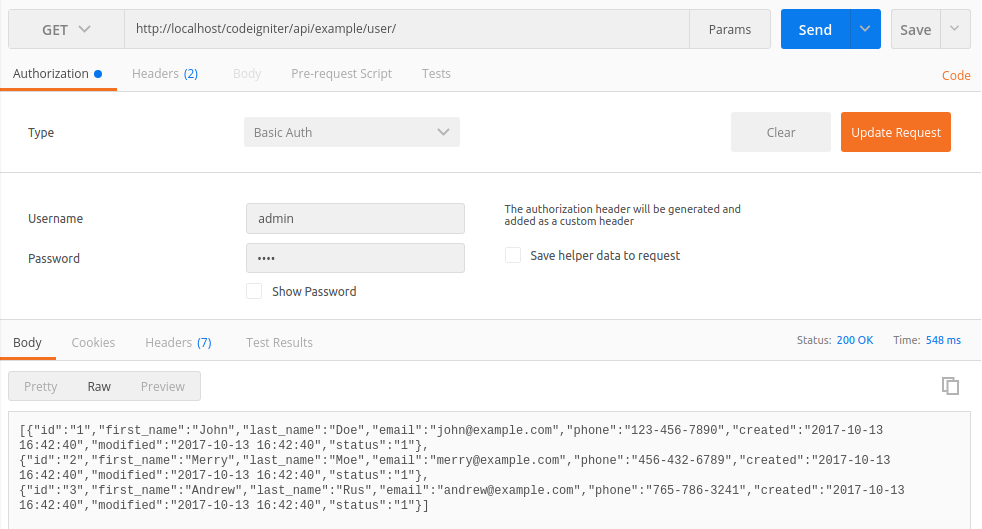
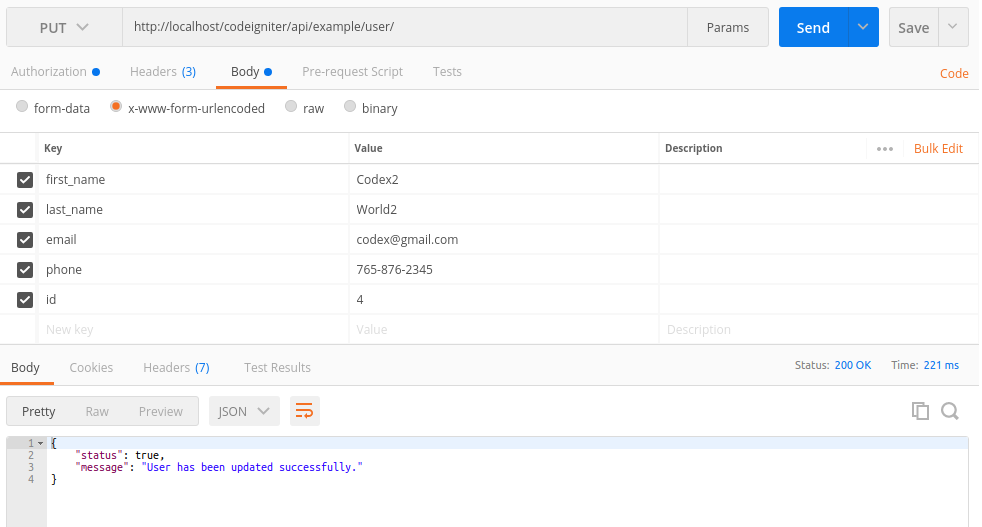
Postman Extension makes API development faster, easier, and better. Install Postman Extension for testing the API call.
GET http://localhost/codeigniter/api/example/user/
GET http://localhost/codeigniter/api/example/user/4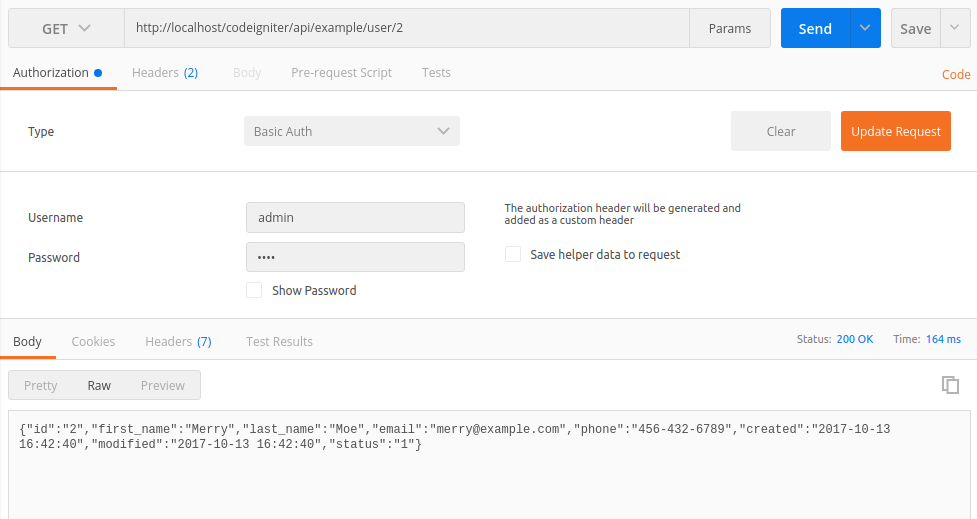
POST http://localhost/codeigniter/api/example/user/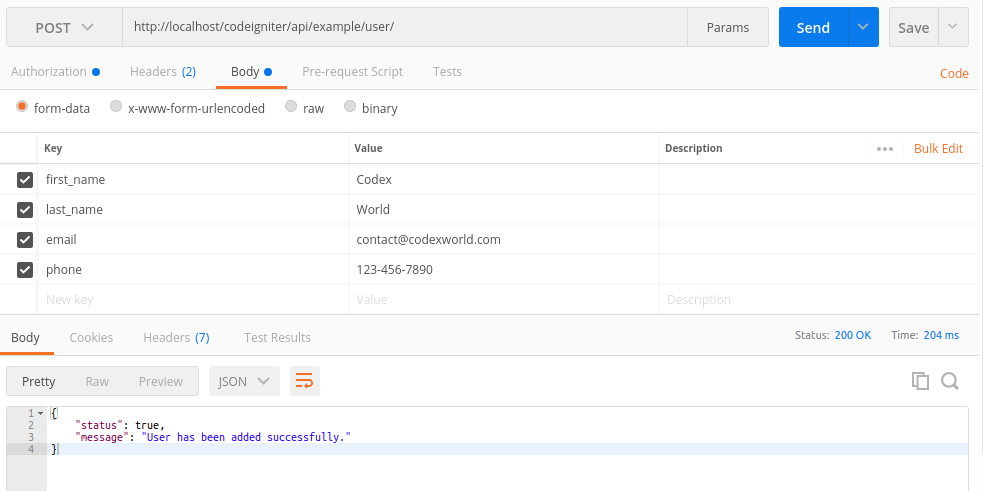
Update user data in the database: PUT http://localhost/codeigniter/api/example/user/
Delete user from the database: DELETE http://localhost/codeigniter/api/example/user/4
Option 01:
$active_group = 'default';
$query_builder = TRUE;

$db['default'] = array(
    'dsn'   => '',
    'hostname' => '192.168.0.109:1521/orcl', //hostname:db_port/service_name
    //'hostname' => 'localhost:1521/orcl',
    'username' => 'db_username',
    'password' => 'db_password',
    'database' => 'db_name',
    'dbdriver' => 'oci8',
    'dbprefix' => '',
    'pconnect' => FALSE,
    'db_debug' => (ENVIRONMENT !== 'production'),
    'cache_on' => FALSE,
    'cachedir' => '',
    'char_set' => 'utf8',
    'dbcollat' => 'utf8_general_ci',
    'swap_pre' => '',
    'encrypt' => FALSE,
    'compress' => FALSE,
    'stricton' => FALSE,
    'failover' => array(),
    'save_queries' => TRUE
);


Option 02:
$active_group = 'default';
$active_record = TRUE;
$db['default']['hostname'] = '(DESCRIPTION=(ADDRESS=(PROTOCOL=TCP)(HOST=192.168.0.246)(PORT=1521))(CONNECT_DATA=(SID=orcl)))';
$db['default']['username'] = 'db_username';
$db['default']['password'] = 'db_password';
$db['default']['database'] = 'db_name';
$db['default']['dbdriver'] = 'oci8';
$db['default']['dbprefix'] = '';
$db['default']['pconnect'] = TRUE;
$db['default']['db_debug'] = TRUE;
$db['default']['cache_on'] = FALSE;
$db['default']['cachedir'] = '';
$db['default']['char_set'] = 'utf8';
$db['default']['dbcollat'] = 'utf8_general_ci';
$db['default']['swap_pre'] = '';
$db['default']['autoinit'] = TRUE;
$db['default']['stricton'] = FALSE;Postgresql extension in php.iniextension=php_pgsql.dll
You also can enable Postgresql extension for PDO as well.
extension=php_pdo_pgsql.dll
$db['default'] = array(
    'port'   => 5432, # Add
);
OR
$db['default'] = array(
    'dsn'   => 'pgsql:host=localhost;port=5432;dbname=database_name',
    'dbdriver' => 'pdo',
);
$active_group = ‘default’;
$query_builder = TRUE;
$db[‘default’] = array(
‘dsn’ => ”,
‘hostname’ => ‘localhost’,
‘username’ => ‘postgres’,
‘password’ => ”,
‘database’ => ‘fmsdb’,
‘dbdriver’ => ‘postgre’,
‘dbprefix’ => ”,
‘pconnect’ => FALSE,
‘db_debug’ => (ENVIRONMENT !== ‘production’),
‘cache_on’ => FALSE,
‘cachedir’ => ”,
‘char_set’ => ‘utf8’,
‘dbcollat’ => ‘utf8_general_ci’,
‘swap_pre’ => ”,
‘encrypt’ => FALSE,
‘compress’ => FALSE,
‘stricton’ => FALSE,
‘failover’ => array(),
‘save_queries’ => TRUE
);
Change password in CodeIgniter with callback validation for check old password.
application/controllers/Users.php
defined('BASEPATH') OR exit('No direct script access allowed');

class Users extends CI_Controller{

    public function __construct()
    {
        parent::__construct();
        $this->load->helper('form');
        $this->load->library('form_validation');
        $this->load->model('users_model');
    }

    private function logged_in()
    {
        if( ! $this->session->userdata('authenticated')){
            redirect('users/login');
        }
    }

    public function changePassword()
    {
        $this->logged_in();

        $data['title'] = 'Change Password';

        $this->load->library('form_validation');

        $this->form_validation->set_rules('oldpass', 'old password', 'callback_password_check');
        $this->form_validation->set_rules('newpass', 'new password', 'required');
        $this->form_validation->set_rules('passconf', 'confirm password', 'required|matches[newpass]');

        $this->form_validation->set_error_delimiters('', '');

        if($this->form_validation->run() == false) {
            $this->load->view('header', $data);
            $this->load->view('users/change_password', $data);
            $this->load->view('footer', $data);
        }
        else {

            $id = $this->session->userdata('id');

            $newpass = $this->input->post('newpass');

            $this->users_model->update_user($id, array('password' => md5($newpass)));

            redirect('users/logout');
        }
    }

    public function password_check($oldpass)
    {
        $id = $this->session->userdata('id');
        $user = $this->users_model->get_user($id);

        if($user->password !== md5($oldpass)) {
            $this->form_validation->set_message('password_check', 'The {field} does not match');
            return false;
        }

        return true;
    }
}
?>
application/models/Users_model.php
CREATE TABLE IF NOT EXISTS `ci_sessions` (
`id` varchar(40) NOT NULL,
`ip_address` varchar(45) NOT NULL,
`timestamp` int(10) unsigned DEFAULT 0 NOT NULL,
`data` blob NOT NULL,
KEY `ci_sessions_timestamp` (`timestamp`)
)
RewriteEngine On

RewriteBase /ci301/
RewriteCond %{REQUEST_URI} ^system.*
RewriteRule ^(.*)$ /index.php?/$1 [L]
RewriteCond %{REQUEST_URI} ^application.*
RewriteRule ^(.*)$ /index.php?/$1 [L]
RewriteCond %{REQUEST_FILENAME} !-f
RewriteCond %{REQUEST_FILENAME} !-d
RewriteRule ^(.*)$ index.php?/$1 [L]
$active_group = ‘my_mssql’;
$active_record = TRUE;
$db[‘my_mssql’][‘hostname’] = ‘Driver={SQL Server Native Client 11.0};Server=Host\Instance;Database=queue_sys;’;
$db[‘my_mssql’][‘username’] = ‘wow_queue’;
$db[‘my_mssql’][‘password’] = ‘wow12345’;
$db[‘my_mssql’][‘database’] = ”;
$db[‘my_mssql’][‘dbdriver’] = ‘odbc’;
$db[‘my_mssql’][‘dbprefix’] = ”;
$db[‘my_mssql’][‘pconnect’] = FALSE;
$db[‘my_mssql’][‘db_debug’] = TRUE;
$db[‘my_mssql’][‘cache_on’] = FALSE;
$db[‘my_mssql’][‘cachedir’] = ”;
$db[‘my_mssql’][‘char_set’] = ‘utf8’;
$db[‘my_mssql’][‘dbcollat’] = ‘utf8_general_ci’;
$db[‘my_mssql’][‘swap_pre’] = ”;
$db[‘my_mssql’][‘autoinit’] = TRUE;
$db[‘my_mssql’][‘stricton’] = FALSE;
Note:
SQL Server Native Client 11.0 or SQL Server Native Client 10.0, just play with both settings.
Server=xx.xx.xx.x usually is in the format Server=Host\Instance
RewriteEngine on
RewriteCond $1 !^(index\.php|images|robots\.txt)
RewriteRule ^(.*)$ index.php/$1 [L]
