CentOS

Migration Guide: CentOS to AlmaLinux, Rocky Linux and Other Alternatives

CentOS 8 Reached End-of-Life on December 31, 2021

With Red Hat officially ending support for CentOS 8, users are forced to migrate to a different operating system. While CentOS 7 remains supported till end of 2024, the life cycle of the newer CentOS 8 was cut short by Red Hat for the end of 2021. Red Hat’s decision to end the CentOS 8 support remains highly controversial in the Linux community and it has stirred a lot of criticism. While the EOL of CentoOS 8 is a fact, we’re going to focus on recommending reasonable alternatives that can swiftly replace no longer supported CentOS 8.

Alternatives to CentOS 8

If your server runs CentOS, then the natural solution seems to migrate to other distribution based on Red Hat Enterprise Linux (RHEL) code. Migrating to one of the recommended RHEL derivatives will ensure a seamless experience and uninterrupted performance regardless of what you run on the server. We describe 4 RHEL derivatives in this article:

• AlmaLinux
• Rocky Linux
• Oracle Linux
• CentOS Stream

All of them aim to be 100% binary compatible with the original CentOS, meaning your current projects running on CentOS should run on each of them in the same way. From a technical perspective and from user’s experience, there is not much of a difference between the original CentOS 8 and the above-mentioned distributions.

The decision on which distribution to migrate is less about the functionality of the operating system and more about how it’s developed and maintained. Some of the alternatives are free community projects, while others are backed by large-scale commercial businesses.

AlmaLinux

First distribution we will cover is AlmaLinux, an increasingly popular semi-commercial project.

AlmaLinux is developed as a direct successor for CentOS. It is the binary equivalent to CentOS 8. But unlike Rocky Linux, the development is run by a private company. CloudLinux is a company that founded and funded the AlmaLinux OS foundation. CloudLinux invested approximately $1 million to develop AlmaLinux, after Red Hat announced discontinued support for CentOS 8. The combination of private funding and a strong community makes this distribution very promising.

This distribution is widely recognized in the IT community. For example, cPanel, developers of a popular server management panel, decided to support AlmaLinux from day one. And so did Plesk. The endorsement from both well-known panels’ developers is not only a matter of reputation, but it also guarantees easy migration for all users working with these panels.

Key features:

  • Backed by a reputable company
  • Active community
  • Works with cPanel and Plesk

Rocky Linux

When Red Hat announced the end of support for CentOS 8, one of the co-founders of the original CentOS operating system stepped in. Henry Kurtzer founded CentOS together with his colleague Rocky McGaugh in 2004. When Kurtzer decided to start working on a new substitute for CentOS, he named the new operating system after the late Rocky McGaugh. As all other alternatives mentioned in this article, the Rocky Linux distribution is based on the RHEL code, which means there are only marginal differences in code in comparison to CentOS.

Rocky Linux is an independent project with a free community support. The stable release 8.4 was released in June 2021 under the codename “Green Obsidian”. From all mentioned distributions, this is the youngest distribution, and one that is still under construction.

Since mid-2021, Henry Kurtzer has been offering paid support plans via his CIQ company, trying to offer “enterprise-grade” services . Still, the Rocky Linux distribution is at heart a community project preserving the original open-source spirit.

Key features:

  • Active community
  • Lead by CentOS founder
  • Slower release cycle
  • Young project
  • Plesk / cPanel support is missing

CentOS Stream

CentOS Stream is an alternative to CentOS 8 that comes directly from Red Hat. The main difference is that it has a different release cycle than other CentOS8 alternatives. It’s a rolling release of the RHEL, meaning that there are almost constant updates with all the newest developments in the code of the core, libraries and applications:

On one hand this means access to the newest software very quickly, on the other hand there is a higher risk of compatibility issues. It is a great idea for a development sandbox, but not necessarily for a production system.

Key features:

  • Backed by a renowned company
  • Constantly Updated

Oracle Linux

One of the less mentioned alternatives is using Linux from Oracle. Like all other alternatives, Oracle’s Linux is 100 percent binary compatible with the original Red Hat distribution. And that makes it also very close to the CentOS distribution – Oracle ensures that their Linux is fully compatible with existing CentOS 8 apps.

The biggest advantage of Oracle Linux is obvious – the support of one of the most prominent IT companies. The customer support isn’t free, but everything else is. Some users also consider as an advantage the possibility to perform updates via the yum server.

On the other hand, many users are now discouraged from using Linux distributions developed by corporations. They argue that after Red Hat discontinued support of CentOS, Oracle Linux can end up doing the same. But at least for now, the Oracle Linux remains a perfectly viable alternative, especially if you can afford their support.

Key Features:

  • Backed by a renowned company

Contabo Recommendation

All distributions mentioned above are very close to the original CentOS 8. Developers of all mentioned distributions also made it easy to migrate using just a few commands.

Your decision which alternative to use should be based on who stands behind each project. Do you trust an open community like Rocky Linux or are you more keen on projects backed by big corporations like Oracle?

If we were to recommend just one distribution, it would undoubtedly be AlmaLinux. It has the stability thanks to the backing of CloudLinux and the energy coming from the community. That’s why we recommend AlmaLinux as a safe bet for CentOS 8 users.

How to Migrate from CentOS 8

Video Guide

Below, you will find a brief description of the migration process for AlmaLinux, Rocky Linux, CentOS Stream and Oracle Linux.

Don’t forget to back up your data before performing the migration. If you don’t care about the data on the instance, you can simply reinstall the virtual machine without performing a migration. Contabo customers can do this in Contabo Customer Panel and choose AlmaLinux, Rocky Linux or CentOS Stream.

First, log in to your instance using SSH. Also, please make sure you have sufficient admin rights first. The easiest way how to avoid admin rights issues is to enter the command sudo -i at the beginning of each session:
sudo -i

How to migrate from CentOS 8 to AlmaLinux

Before migrating, update your current distribution by running this command:
dnf update

Download the distribution from GitHub using
curl -O https://raw.githubusercontent.com/AlmaLinux/almalinux-deploy/master/almalinux-deploy.sh

Assign all necessary permissions to the script:
chmod +x almalinux-deploy.sh

Now run the script by typing
./almalinux-deploy.sh

And finally
reboot

How to migrate from CentOS 8 to Rocky Linux

Before migrating, update your current distribution by running this command:
dnf update

Rocky Linux developers have created a script called migrate2rocky. To obtain the distribution, just download it using this command:
curl -O https://raw.githubusercontent.com/rocky-linux/rocky-tools/main/migrate2rocky/migrate2rocky.sh

When the file has been finished downloading, give the script all necessary permissions by
chmod u+x migrate2rocky.sh

Now execute the script itself:
./migrate2rocky.sh -r

And finally
reboot

How to migrate from CentOS 8 to CentOS Stream

Before migrating, update your current distribution by running this command:
dnf update

Start the installation by typing:
dnf install centos-release-stream

After the installation is done, you have to change the repository for CentOS Stream:
dnf swap centos-linux-repos centos-stream-repos

And at last, let’s sync all your existing packages with the new distribution:
dnf distro-sync

and finally
reboot

How to Migrate From CentOS 8 to Oracle Linux

Before migrating, update your current distribution by running this command:
dnf update

Download the distribution from GitHub:
curl -O https://raw.githubusercontent.com/oracle/centos2ol/main/centos2ol.sh

Now run this command to replace your CentOS 8 with the Oracle:
./centos2ol.sh

And finally
reboot

CentOS 8: No URLs in mirrorlist error [How to Solve]

Question:

In CentOS 8, there is an error using yum. There is no URL in the image list, similar to the following:

Error: Failed to download metadata for repo 'appstream': Cannot prepare internal mirrorlist: No URLs in mirrorlist

reason:

On January 31, 2022, the CentOS team finally removed all packages of CentOS 8 from the official image.

CentOS 8 has expired on December 31, 2021, but the software package has been retained on the official image for some time. Now they are transferred to https://vault.centos.org

Solution:

If you still need to run CentOS 8, you can run it in/etc/yum repos. Update the source in D. Use vault.centos.Org instead of mirror.centos.org.

sudo sed -i -e "s|mirrorlist=|#mirrorlist=|g" /etc/yum.repos.d/CentOS-*
sudo sed -i -e "s|#baseurl=http://mirror.centos.org|baseurl=http://vault.centos.org|g" /etc/yum.repos.d/CentOS-*


Essentially, it replaces the previous URL with the URL that is still running. This problem should be solved within this period of time.

How to install MySQL server on CentOS 8 Linux

How do I install MySQL server 8.0 on CentOS 8 Linux server running on Linode and AWS cloud? How do I add and set up a new MySQL user and database account on the newly created CentOS server?

Oracle MySQL server version 8.0 is a free and open-source free database server. It is one of the most popular database system used in web apps and websites on the Internet.

Typically MySQL is part of the LAMP (Linux, Apache/Nginx, MySQL, Perl/Python/PHP) stack. Popular open-source software such as WordPress, MediaWiki, and others profoundly used by MySQL as a database storage engine. Let us see how to install MySQL server version 8.x on CentOS 8 Linux server.

How to install MySQL server on a CentOS 8

First, open the terminal app and then log in to your CentOS server using the ssh command:
$ ssh vivek@centos-8-ec2-box-ip
Now, update CentOS system to apply security updates and fixes on Linux system using the dnf command/yum command:
$ sudo yum update
## or ##
$ sudo dnf update

Sample outputs:

CentOS-8 - AppStream                            21 MB/s | 5.8 MB     00:00    
CentOS-8 - Base                                 14 MB/s | 2.2 MB     00:00    
CentOS-8 - Extras                               50 kB/s | 8.6 kB     00:00    
Dependencies resolved.
Nothing to do.
Complete!

Step 1 – Installing MySQL 8 server

Luckily our CentOS 8 box comes with MySQL 8 server package. Let us search for it:
$ sudo yum search mysql-server
$ sudo yum module list mysql

And we see:

Last metadata expiration check: 0:02:47 ago on Mon Nov 23 16:26:31 2020.
===================== Name Exactly Matched: mysql-server ======================
mysql-server.x86_64 : The MySQL server and related files

Next, find out version information, run:
$ sudo yum info mysql-server
Here is what we see:

Last metadata expiration check: 0:02:22 ago on Mon Nov 23 16:26:31 2020.
Available Packages
Name         : mysql-server
Version      : 8.0.21
Release      : 1.module_el8.2.0+493+63b41e36
Architecture : x86_64
Size         : 22 M
Source       : mysql-8.0.21-1.module_el8.2.0+493+63b41e36.src.rpm
Repository   : AppStream
Summary      : The MySQL server and related files
URL          : http://www.mysql.com
License      : GPLv2 with exceptions and LGPLv2 and BSD
Description  : MySQL is a multi-user, multi-threaded SQL database server. MySQL
             : is a client/server implementation consisting of a server daemon
             : (mysqld) and many different client programs and libraries. This
             : package contains the MySQL server and some accompanying files
             : and directories.

Install it:
$ sudo yum install mysql-server

How to install MySQL 8 on CentOS 8 Linux

Click to enlarge

Step 2 – Enabling MySQL 8 mysqld.service,server

The service name is mysqld.service, and we need to enable it using the following systemctl command:
$ sudo systemctl enable mysqld.service
Confirmation displayed:

reated symlink /etc/systemd/system/multi-user.target.wants/mysqld.service → /usr/lib/systemd/system/mysqld.service.

Start the service and then verify it:
$ sudo systemctl start mysqld.service
$ sudo systemctl status mysqld.service

 mysqld.service - MySQL 8.0 database server
   Loaded: loaded (/usr/lib/systemd/system/mysqld.service; enabled; vendor preset: disabled)
   Active: active (running) since Mon 2020-11-23 16:50:14 UTC; 4s ago
  Process: 551 ExecStopPost=/usr/libexec/mysql-wait-stop (code=exited, status=0/SUCCESS)
  Process: 681 ExecStartPost=/usr/libexec/mysql-check-upgrade (code=exited, status=0/SUCCESS)
  Process: 601 ExecStartPre=/usr/libexec/mysql-prepare-db-dir mysqld.service (code=exited, status=0/SUCCESS)
  Process: 577 ExecStartPre=/usr/libexec/mysql-check-socket (code=exited, status=0/SUCCESS)
 Main PID: 637 (mysqld)
   Status: "Server is operational"
    Tasks: 39 (limit: 24960)
   Memory: 331.0M
   CGroup: /system.slice/mysqld.service
           └─637 /usr/libexec/mysqld --basedir=/usr

Nov 23 16:50:13 centos-aws-mysql systemd[1]: Stopped MySQL 8.0 database server.
Nov 23 16:50:13 centos-aws-mysql systemd[1]: Starting MySQL 8.0 database server...
Nov 23 16:50:14 centos-aws-mysql systemd[1]: Started MySQL 8.0 database server.

Step 3 – Securing MySQL 8 server

All you need to do is type the following command, and it will secure MySQL 8 server installation on CentOS Linux:
$ sudo mysql_secure_installation

Please set the password for root here.

New password: 

Re-enter new password: 

Estimated strength of the password: 100 
Do you wish to continue with the password provided?(Press y|Y for Yes, any other key for No) : y
By default, a MySQL installation has an anonymous user,
allowing anyone to log into MySQL without having to have
a user account created for them. This is intended only for
testing, and to make the installation go a bit smoother.
You should remove them before moving into a production
environment.

Remove anonymous users? (Press y|Y for Yes, any other key for No) : y
Success.


Normally, root should only be allowed to connect from
'localhost'. This ensures that someone cannot guess at
the root password from the network.

Disallow root login remotely? (Press y|Y for Yes, any other key for No) : y
Success.

By default, MySQL comes with a database named 'test' that
anyone can access. This is also intended only for testing,
and should be removed before moving into a production
environment.


Remove test database and access to it? (Press y|Y for Yes, any other key for No) : y
 - Dropping test database...
Success.

 - Removing privileges on test database...
Success.

Reloading the privilege tables will ensure that all changes
made so far will take effect immediately.

Reload privilege tables now? (Press y|Y for Yes, any other key for No) : y
Success.

All done! 

Step 4 – Starting/Stopping/Restarting MySQL 8 server

The syntax is:
$ sudo systemctl start mysql.service
$ sudo systemctl stop mysql.service
$ sudo systemctl restart mysql.service

To view the MySQL 8 service log as follows using the journalctl command:
$ sudo journalctl -u mysqld.service -xe
$ sudo tail -f /var/log/mysql/mysqld.log

MySQL 8 log file sample entries:

2020-11-23T16:55:19.101316Z 0 [System] [MY-013172] [Server] Received SHUTDOWN from user . Shutting down mysqld (Version: 8.0.21).
2020-11-23T16:55:21.728819Z 0 [Warning] [MY-010909] [Server] /usr/libexec/mysqld: Forcing close of thread 10  user: 'root'.
2020-11-23T16:55:23.083389Z 0 [System] [MY-010910] [Server] /usr/libexec/mysqld: Shutdown complete (mysqld 8.0.21)  Source distribution.
2020-11-23T16:56:19.225544Z 0 [System] [MY-010116] [Server] /usr/libexec/mysqld (mysqld 8.0.21) starting as process 524
2020-11-23T16:56:19.237500Z 1 [System] [MY-013576] [InnoDB] InnoDB initialization has started.
2020-11-23T16:56:19.562441Z 1 [System] [MY-013577] [InnoDB] InnoDB initialization has ended.
2020-11-23T16:56:19.677202Z 0 [System] [MY-011323] [Server] X Plugin ready for connections. Bind-address: '::' port: 33060, socket: /var/lib/mysql/mysqlx.sock
2020-11-23T16:56:19.754024Z 0 [Warning] [MY-010068] [Server] CA certificate ca.pem is self signed.
2020-11-23T16:56:19.754207Z 0 [System] [MY-013602] [Server] Channel mysql_main configured to support TLS. Encrypted connections are now supported for this channel.
2020-11-23T16:56:19.780843Z 0 [System] [MY-010931] [Server] /usr/libexec/mysqld: ready for connections. Version: '8.0.21'  socket: '/var/lib/mysql/mysql.sock'  port: 3306  Source distribution.

Step 5 – Testing MySQL 8 installation

So far, so good. You learned how to install, set up, secure, and start/stop the MySQL 8 on CentOS 8 Linux cloud server. It is time to log in as a
mysql root user. The syntax is:
$ mysql -u root -p
$ mysql -u USER -h host -p
$ mysql -u USER -h host -p mysql

Let us type a few SQL commands at the mysql> prompt:
STATUS;
SHOW VARIABLES LIKE "%version%";
quit

Testing MySQL on CentOS 8

Step 6 – Creating a new MySQL 8 database and user account with password

Let create a new database called ‘spacedb‘, type at the mysql> prompt:
CREATE DATABASE spacedb;
Next, we are going to create a new user named ‘mars‘ for our database called ‘spacedb’ as follows:
CREATE USER 'mars'@'%' IDENTIFIED BY 'User_Password_Here';
Finally, give permissions:
GRANT SELECT, INSERT, UPDATE, DELETE ON spacedb.* TO 'mars'@'%';
Of course, we can grant ALL PRIVILEGES too as follows:
GRANT ALL PRIVILEGES ON spacedb.* TO 'mars'@'%';
See MySQL 8 users and their grants/permissions as follows:
SELECT user,host FROM mysql.user;
SHOW GRANTS for mars;
quit

Test new user settings and DB as follows:
mysql -u mars -p spacedb
mysql -u mars -h localhost -p spacedb

Creating MySQL 8 database with user and password on CentOS 8

Where,

  • -u mars; : User name for login
  • -h localhost : Connect to server named localhost
  • -p : Prompt for password
  • spacedb : Connect to database named spacedb

Step 7 – Configuring MySQL 8 server on a CentOS 8

Let us see default config file using the cat command:
# cat /etc/my.cnf.d/mysql-server.cnf
Config:

[mysqld]
datadir=/var/lib/mysql
socket=/var/lib/mysql/mysql.sock
log-error=/var/log/mysql/mysqld.log
pid-file=/run/mysqld/mysqld.pid

Want to allow remote connections to your MySQL server? Edit the /etc/my.cnf.d/mysql-server.cnf and append the following line under [mysqld]:
bind_address = 0.0.0.0

WARNING: See MySQL documentation for a detailed explanation for tuning options as to each server and set up is unique. Do not set up values blindly. I provide them as a starting point for optimizing MySQL 8 installation and values depending upon available RAM, CPU cores, server load and other circumstances.

Set InnoDB settings:

default_storage_engine          = InnoDB
innodb_buffer_pool_instances    = 1
innodb_buffer_pool_size         = 512M
innodb_file_per_table           = 1
innodb_flush_log_at_trx_commit  = 0
innodb_flush_method             = O_DIRECT
innodb_log_buffer_size          = 16M
innodb_log_file_size            = 512M
innodb_stats_on_metadata        = 0
innodb_read_io_threads          = 64
innodb_write_io_threads         = 64

MyISAM settings:

# UPD
key_buffer_size                 = 32M   
low_priority_updates            = 1
concurrent_insert               = 2
# UPD
max_connections                 = 100   
back_log                        = 512
thread_cache_size               = 100
thread_stack                    = 192K
interactive_timeout             = 180
wait_timeout                    = 180

Buffer settings UPD:

join_buffer_size                = 4M    
read_buffer_size                = 3M    
read_rnd_buffer_size            = 4M    
sort_buffer_size                = 4M

Edit and config logging if needed (by default slow_query disabled):

log_queries_not_using_indexes   = 1
long_query_time                 = 5
#slow_query_log                  = 0     
#slow_query_log_file             = /var/log/mysql/mysql_slow.log

This is useful for mysqldump command to make backups:

[mysqldump]
quick
quote_names
max_allowed_packet              = 64M

Step 8 – Firewall configuration to open MySQL server TCP port 3306

Are you using MySQL 8 server remotely? Do you have Apache/Nginx/PHP/Python/Perl app on another server? Then open port for everyone:
$ sudo firewall-cmd --zone=public --add-service=mysql --permanent
Only allow access from 192.168.1.0/24 CIDR:
$ sudo firewall-cmd \
--add-rich-rule 'rule family="ipv4" \
source address="192.168.1.0/24" \
service name="mysql" accept' --permanent

The above is fine grained firewalld access rules to restrict access to MySQL 8 server to VLAN users only. See how to set up a firewall using FirewallD on CentOS 8 Linux for more info.

Conclusion

And there you have it, Oracle MySQL server version 8.x set up and running correctly on a CentOS Linux 8 server with Firewalld config. Further, you learned how to add a new database, user, and password for your project including MySQL 8 server tuning options.

Install Oracle Database 19c on CentOS 8 in VirtualBox

** Please use the root user to edit the files and execute the commands unless further notice. **

Prerequisite

  1. Install the latest VirtualBox Platform Package and the VirtualBox Extension Pack (Oracle_VM_VirtualBox_Extension_Pack-VERSION.vbox-extpack).
  2. Download the latest VirtualBox Guest Additions (VBoxGuestAdditions_VERSION.iso).
  3. Download the latest CentOS Stream 8.
  4. Create a new virtual machine and install the CentOS to the virtual machine. During the CentOS installation, select Workstation as Base Environment, select Container ManagementDevelopment Tools and Graphical Administration Tools as Additional software for Selected Environment. Use http://mirror.centos.org/centos/8/BaseOS/x86_64/os/ as the installation source.
  5. After installing the CentOS, execute the following commands to get the required libraries to create applications for handling compiled objects.
dnf update
dnf -y install elfutils-libelf-devel
  1. Insert the ISO of VirtualBox Guest Additions to the virtual machine, and then install it.

Download Packages and Software

Hostname and Host File

  1. Open the file /etc/hostname, change the content to update the hostname.
ol8-19.localdomain
  1. Open the file /etc/hosts, add your IP address and hostname.
192.168.122.1 ol8-19.localdomain

Install Required Packages

  1. Perform a dnf update to update every currently installed package.
dnf update
  1. Add execute permission to the downloaded rpm files.
chmod u+x *.rpm
  1. Install the libcapl library for getting and setting POSIX.1e (formerly POSIX 6) draft 15 capabilities.
dnf localinstall -y compat-libcap1-1.10-7.el7.x86_64.rpm
  1. Inatll the libstdc++ package which contains compatibility standard C++ library from GCC 3.3.4.
dnf localinstall -y compat-libstdc++-33-3.2.3-72.el7.x86_64.rpm
  1. Install the below required packages.
dnf install -y bc binutils elfutils-libelf elfutils-libelf-devel fontconfig-devel \
    gcc gcc-c++ glibc glibc-devel ksh ksh libaio libaio-devel libgcc libnsl libnsl.i686 \
    libnsl2 libnsl2.i686 librdmacm-devel libstdc++ libstdc++-devel libX11 libXau libxcb \
    libXi libXrender libXrender-devel libXtst make net-tools nfs-utils smartmontools \
    sysstat targetcli unixODBC;

Install Oracle Installation Prerequisites

  1. Install the Oracle Installation Prerequisites (OIP) package.
dnf localinstall -y oracle-database-preinstall-19c-1.0-1.el7.x86_64.rpm
  1. Open the /etc/group file, update the GID of the below items.
oinstall:x:64890:oracle
dba:x:64891:oracle
oper:x:64892:oracle
backupdba:x:64893:oracle
dgdba:x:64894:oracle
kmdba:x:64895:oracle
racdba:x:64896:oracle
  1. Open the /etc/passwd file, update both the UID and GID of account oracle.
oracle:x:64890:64890::/home/oracle:/bin/bash
  1. Update the password of account oracle.
passwd oracle
  1. Set secure Linux to permissive by editing the /etc/selinux/config file.
SELINUX=permissive
  1. Set the secure Linux change right now.
setenforce Permissive
  1. Disable the firewall.
systemctl stop firewalld
systemctl disable firewalld

Setup Oracle User Profile

  1. Create Oracle directories.
mkdir -p /u01/app/oracle/product/19.3.0/dbhome_1
mkdir -p /u02/oradata
chown -R oracle:oinstall /u01 /u02
chmod -R 775 /u01 /u02
  1. Create a new directory for Oracle user.
mkdir -p /home/oracle/scripts
chown -R oracle:oinstall /home/oracle
  1. Create an environment setting file.
cat > /home/oracle/scripts/setEnv.sh <<EOF
# Oracle Settings
export TMP=/tmp
export TMPDIR=\$TMP

export ORACLE_HOSTNAME=$HOSTNAME
export ORACLE_UNQNAME=cdb1
export ORACLE_BASE=/u01/app/oracle
export ORACLE_HOME=\$ORACLE_BASE/product/19.3.0/dbhome_1
export ORA_INVENTORY=/u01/app/oraInventory
export ORACLE_SID=cdb1
export PDB_NAME=pdb1
export DATA_DIR=/u02/oradata

export PATH=/usr/sbin:/usr/local/bin:\$PATH
export PATH=\$ORACLE_HOME/bin:\$PATH

export LD_LIBRARY_PATH=\$ORACLE_HOME/lib:/lib:/usr/lib
export CLASSPATH=\$ORACLE_HOME/jlib:\$ORACLE_HOME/rdbms/jlib
EOF
  1. Create a startup shell script.
cat > /home/oracle/scripts/start_all.sh <<EOF
#!/bin/bash
. /home/oracle/scripts/setEnv.sh

export ORAENV_ASK=NO
. oraenv
export ORAENV_ASK=YES

dbstart \$ORACLE_HOME
EOF
  1. Create a stop shell script.
cat > /home/oracle/scripts/stop_all.sh <<EOF
#!/bin/bash
. /home/oracle/scripts/setEnv.sh

export ORAENV_ASK=NO
. oraenv
export ORAENV_ASK=YES

dbshut \$ORACLE_HOME
EOF
  1. Update the owner and permission of the shell scripts and its parent directory.
chown -R oracle:oinstall /home/oracle
chmod u+x /home/oracle/scripts/*.sh
  1. Set the environment when the Bash runs whenever it is started interactively.
cat > /home/oracle/.bashrc <<EOF
#.bashrc

# User specific aliases and functions

alias rm='rm -i'
alias cp='cp -i'
alias mv='mv -i'

# Source global definitions
if [ -f /etc/bashrc ]; then
  . /etc/bashrc
fi

. /home/oracle/scripts/setEnv.sh >> /home/oracle/.bashrc
EOF

chown oracle:oinstall /home/oracle/.bashrc

Create and Add New Swap File

  1. Run the following command, with oracle user, to create and apply new swap file.
dd if=/dev/zero of=/tmp/additional-swap bs=1048576 count=4096
chmod 600 /tmp/additional-swap
mkswap /tmp/additional-swap
  1. Apply the swap by executing the following command with root user.
swapon /tmp/additional-swap

Install Oracle Database

  1. Set the DISPLAY variable with oracle user.
DISPLAY=$HOSTNAME:0.0; export DISPLAY
  1. Unzip the archive with oracle user.
cd $ORACLE_HOME
unzip -oq /path/to/software/LINUX.X64_193000_db_home.zip
  1. “Cheat” the installer about the distribution with oracle user.
export CV_ASSUME_DISTID=RHEL7.6
  1. Run the installer, with oracle user, to install Oracle database.
cd $ORACLE_HOME
./runInstaller -ignorePrereq -waitforcompletion -silent                        \
    -responseFile ${ORACLE_HOME}/install/response/db_install.rsp               \
    oracle.install.option=INSTALL_DB_SWONLY                                    \
    ORACLE_HOSTNAME=${ORACLE_HOSTNAME}                                         \
    UNIX_GROUP_NAME=oinstall                                                   \
    INVENTORY_LOCATION=${ORA_INVENTORY}                                        \
    SELECTED_LANGUAGES=en,en_GB                                                \
    ORACLE_HOME=${ORACLE_HOME}                                                 \
    ORACLE_BASE=${ORACLE_BASE}                                                 \
    oracle.install.db.InstallEdition=EE                                        \
    oracle.install.db.OSDBA_GROUP=dba                                          \
    oracle.install.db.OSBACKUPDBA_GROUP=dba                                    \
    oracle.install.db.OSDGDBA_GROUP=dba                                        \
    oracle.install.db.OSKMDBA_GROUP=dba                                        \
    oracle.install.db.OSRACDBA_GROUP=dba                                       \
    SECURITY_UPDATES_VIA_MYORACLESUPPORT=false                                 \
    DECLINE_SECURITY_UPDATES=true
  1. If the setup is success, the following message should be printed on screen.
Successfully Setup Software.
  1. Execute the below scripts, with root user, to update the permission of Oracle directories and set the environment variables.
/u01/app/oraInventory/orainstRoot.sh
/u01/app/oracle/product/19.3.0/dbhome_1/root.sh

Database Creation

  1. Start the listener with oracle user.
lsnrctl start
  1. Create a database with oracle user.
dbca -silent -createDatabase                                                   \
     -templateName General_Purpose.dbc                                         \
     -gdbname ${ORACLE_SID} -sid  ${ORACLE_SID} -responseFile NO_VALUE         \
     -characterSet AL32UTF8                                                    \
     -sysPassword SysPassword1                                                 \
     -systemPassword SysPassword1                                              \
     -createAsContainerDatabase true                                           \
     -numberOfPDBs 1                                                           \
     -pdbName ${PDB_NAME}                                                      \
     -pdbAdminPassword PdbPassword1                                            \
     -databaseType MULTIPURPOSE                                                \
     -automaticMemoryManagement false                                          \
     -totalMemory 1000                                                         \
     -storageType FS                                                           \
     -datafileDestination "${DATA_DIR}"                                        \
     -redoLogFileSize 50                                                       \
     -emConfiguration NONE                                                     \
     -ignorePreReqs

Listener Update

  1. Replace or edit the listener.ora file, with oracle user, to set the correct hostname, port number and SID name.
cat > /u01/app/oracle/product/19.3.0/dbhome_1/network/admin/listener.ora <<EOF
LISTENER =
  (DESCRIPTION_LIST =
    (DESCRIPTION =
      (ADDRESS = (PROTOCOL = TCP)(PORT = 1539))
      (ADDRESS = (PROTOCOL = IPC)(KEY = EXTPROC1521))
    )
  )

SID_LIST_LISTENER =
  (SID_LIST =
    (SID_DESC =
      (SID_NAME = ${ORACLE_SID})
    )
  )

EOF
  1. Reload the Oracle Listener.
lsnrctl reload

Post Installation

  1. Edit the /etc/oratab file, with root user, to update the restart flag from ‘N‘ to ‘Y‘.
orcl:/u01/app/oracle/product/19.3.0/dbhome_1:Y
  1. Configure the Database instance “orcl” with auto startup.
cd $ORACLE_HOME/dbs
ln -s spfilecdb1.ora initorcl.ora
  1. Enable Oracle Managed Files (OMF) and make sure the PDB starts when the instance starts.
sqlplus / as sysdba <<EOF
alter system set db_create_file_dest='${DATA_DIR}';
alter pluggable database ${PDB_NAME} save state;
exit;
EOF
  1. Execute the following commands, with root user, to start the Oracle Listener automatically.
cat > /home/oracle/scripts/cron.sh <<EOF1
#!/bin/bash

. /home/oracle/scripts/setEnv.sh

echo "\`date\`" > /home/oracle/scripts/last.log

lsnrctl start

sleep 3

lsnrctl reload

sleep 3

sqlplus /nolog <
conn / as sysdba
startup
EOF

EOF1

chown oracle:oinstall /home/oracle/scripts/cron.sh
chmod 744 /home/oracle/scripts/cron.sh
  1. Use the following command, with oracle user, to edit the crontab file.
crontab -e
  1. Put the following cron job in the first line of crontab file, then press the keys :wq to save and exit.
@reboot /home/oracle/scripts/cron.sh

Healthcheck

  1. Login as oracle user and then execute the following commands one-by-one.
sqlplus /nolog
conn / as sysdba;
select * from v$version;
show pdbs;

Create New User and Tablespace

  1. Login as Sysdba with SqlPlus.
sqlplus / as sysdba
  1. Update the seesion setting _ORACLE_SCRIPT to true to allow common user comes without c## as prefix.
ALTER SESSION SET "_ORACLE_SCRIPT"=true;
  1. Create a new tablespace with an automatic extensible size 100MB, maximum 10G in size.
-- DROP TABLESPACE my_tablespace INCLUDING CONTENTS AND DATAFILES;
-- Location of the dat file: /u01/app/oracle/product/19.3.0/dbhome_1/dbs/my_tablespace.dat
-- SELECT tablespace_name, block_size, max_size, status FROM DBA_TABLESPACES;
CREATE TABLESPACE my_tablespace
  DATAFILE 'my_tablespace.dat'
    SIZE 100M
    AUTOEXTEND ON
    NEXT 32M MAXSIZE 10G
    EXTENT MANAGEMENT LOCAL
    SEGMENT SPACE MANAGEMENT AUTO
;

SELECT FILE_ID, FILE_NAME, TABLESPACE_NAME, AUTOEXTENSIBLE, INCREMENT_BY 
FROM DBA_DATA_FILES ORDER BY FILE_ID DESC;
  1. [Optional] Update the password life time from 180 days (default) to unlimited.
ALTER PROFILE DEFAULT LIMIT PASSWORD_LIFE_TIME UNLIMITED;
  1. Create a new user.
-- ALTER SESSION SET "_ORACLE_SCRIPT"=true;
-- DROP USER newuser CASCADE;
CREATE USER newuser IDENTIFIED BY "P@ssw0rd" DEFAULT TABLESPACE my_tablespace;
  1. Grant permissions to the new user.
-- REVOKE CREATE SESSION FROM newuser;
-- REVOKE CREATE TABLE FROM newuser;
-- REVOKE CREATE VIEW FROM newuser;
-- REVOKE CREATE ANY TRIGGER FROM newuser;
-- REVOKE CREATE ANY PROCEDURE FROM newuser;
-- REVOKE CREATE SEQUENCE FROM newuser;
-- REVOKE CREATE SYNONYM FROM newuser;
GRANT CREATE SESSION TO newuser;
GRANT CREATE TABLE TO newuser;
GRANT CREATE VIEW TO newuser;
GRANT CREATE ANY TRIGGER TO newuser;
GRANT CREATE ANY PROCEDURE TO newuser;
GRANT CREATE SEQUENCE TO newuser;
GRANT CREATE SYNONYM TO newuser;

ALTER USER newuser QUOTA UNLIMITED ON my_tablespace;
  1. [Optional] Grant DBA to the new user.
-- REVOKE DBA FROM newuser;
GRANT DBA TO newuser;

References

How to Install Webmin on CentOS 8

Webmin is a free, open-source and web-based system configuration and management tool for Unix-like operating systems. You can set up Apache web server, Samba, DNS, Mail, FTP, Database, File system and package management with Webmin web-based interface. Webmin is very similar to cPanel and provides an easy way to manage Linux systems through a web browser.

Prerequisites

  • A server running CentOS 8.
  • A root password is configured on your server.

Getting Started

By default, SELinux is enabled in CentOS 8 server. So you will need to disable it first.

You can do this by editing /etc/selinux/config file:

nano /etc/selinux/config

Make the following changes:

SELINUX=disabled

Save and close the file. Then, restart your server to apply the changes.

Install Webmin with RPM

First, you will need to install the required dependencies by running the following command:

dnf install perl perl-Net-SSLeay openssl perl-Encode-Detect

Once all the dependencies are installed, download the Webmin RPM package from the Sourceforge download page with the following command:

wget https://prdownloads.sourceforge.net/webadmin/webmin-1.930-1.noarch.rpm

Once downloaded, run the following command to install Webmin:

rpm -ivh webmin-1.930-1.noarch.rpm

You should see the following output:

warning: webmin-1.930-1.noarch.rpm: Header V4 DSA/SHA1 Signature, key ID 11f63c51: NOKEY
Verifying...                          ################################# [100%]
Preparing...                          ################################# [100%]
Operating system is CentOS Linux
Updating / installing...
   1:webmin-1.930-1                   ################################# [100%]

Webmin install complete. You can now login to https://centos8:10000/
as root with your root password.

By default, Webmin runs on port 10000. You can check whether Webmin is running or not with the following command:

netstat -ant | grep 10000

You should see the following output:

tcp        0      0 0.0.0.0:10000           0.0.0.0:*               LISTEN  

You can also check the Webmin process with the following command:

ps -ef | grep webmin

You should see the following output:

root      2131     1  0 12:29 ?        00:00:00 /usr/bin/perl /usr/libexec/webmin/miniserv.pl /etc/webmin/miniserv.conf
root      2225  6290  0 12:30 pts/0    00:00:00 grep --color=auto webmin

Install Webmin with Yum Repository

You can also install the Webmin from CentOS Yum repository. First, create a Webmin repository with the following command:

nano /etc/yum.repos.d/webmin.repo

Add the following lines:

[Webmin]
name=Webmin Distribution Neutral
mirrorlist=https://download.webmin.com/download/yum/mirrorlist
enabled=1

Save and close the file. Then, download and add the repository signing key with the following command:

wget http://www.webmin.com/jcameron-key.asc
 rpm --import jcameron-key.asc

Next, install the Webmin by running the following command:

dnf install webmin

Once the installation is completed, you should see the following output:

Installing       : webmin-1.930-1.noarch                                                       2/2 
Running scriptlet: webmin-1.930-1.noarch                                                       2/2 
Webmin install complete. You can now login to https://centos8:10000/
as root with your root password.

Access Webmin in Browser

By default, Webmin listens on port 10000. So you will need to open the Webmin port in firewalld. You can do it with the following command:

firewall-cmd --zone=public --add-port=10000/tcp --permanent
 firewall-cmd --reload

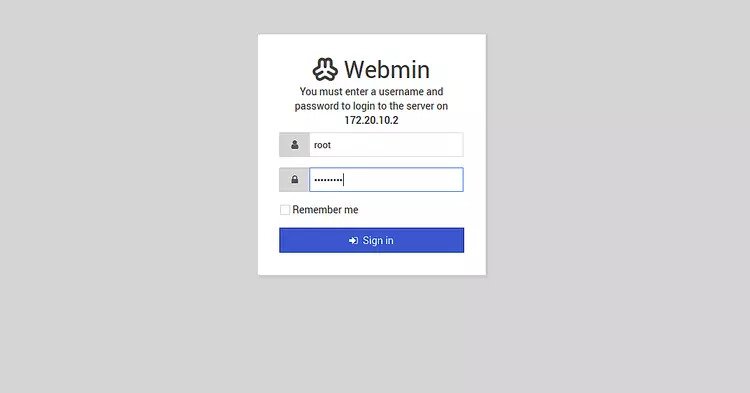
Now, open your web browser and type the URL https://your-server-ip:10000. You will be redirected to the following page:

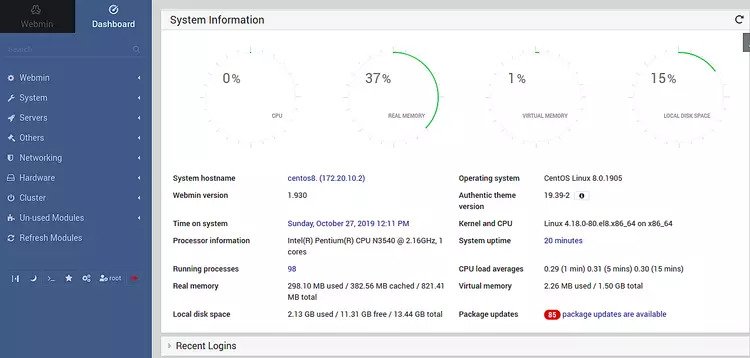
Provide your root user, password and click on the Sign in button. You should see the Webmin dashboard in the following page:

From here, you can configure and manage your CentOS 8 server easily.Advertisements

Conclusion

Congratulations! you have successfully installed Webmin on CentOS 8 server. You can now easily install LAMP/LEMP server, FTP server and hosting your website easily through the Webmin web interface.

Free Web Hosting