extension=php_pgsql.dll
You also can enable Postgresql extension for PDO as well.
extension=php_pdo_pgsql.dll
Are you looking for a way to display a beautifully formatted archives list of months separated by year? While there’s probably a plugin for this, we have created a quick code snippet that you can use to display formatted archives by month separated by year in WordPress.
Instructions:
All you have to do is add this code to your theme’s functions.php file or in a site-specific plugin:
functionwp_custom_archive($args= '') { global$wpdb, $wp_locale; $defaults= array( 'limit'=> '', 'format'=> 'html', 'before'=> '', 'after'=> '', 'show_post_count'=> false, 'echo'=> 1 ); $r= wp_parse_args( $args, $defaults); extract( $r, EXTR_SKIP ); if( ''!= $limit) { $limit= absint($limit); $limit= ' LIMIT '.$limit; } // over-ride general date format ? 0 = no: use the date format set in Options, 1 = yes: over-ride $archive_date_format_over_ride= 0; // options for daily archive (only if you over-ride the general date format) $archive_day_date_format= 'Y/m/d'; // options for weekly archive (only if you over-ride the general date format) $archive_week_start_date_format= 'Y/m/d'; $archive_week_end_date_format= 'Y/m/d'; if( !$archive_date_format_over_ride) { $archive_day_date_format= get_option('date_format'); $archive_week_start_date_format= get_option('date_format'); $archive_week_end_date_format= get_option('date_format'); } //filters $where= apply_filters('customarchives_where', "WHERE post_type = 'post' AND post_status = 'publish'", $r); $join= apply_filters('customarchives_join', "", $r); $output= '
;
$query= "SELECT YEAR(post_date) AS `year`, MONTH(post_date) AS `month`, count(ID) as posts FROM $wpdb->posts $join $where GROUP BY YEAR(post_date), MONTH(post_date) ORDER BY post_date DESC $limit"; $key= md5($query); $cache= wp_cache_get( 'wp_custom_archive', 'general'); if( !isset( $cache[ $key] ) ) { $arcresults= $wpdb->get_results($query); $cache[ $key] = $arcresults; wp_cache_set( 'wp_custom_archive', $cache, 'general'); } else{ $arcresults= $cache[ $key]; } if( $arcresults) { $afterafter= $after; foreach( (array) $arcresultsas$arcresult) { $url= get_month_link( $arcresult->year, $arcresult->month ); /* translators: 1: month name, 2: 4-digit year */ $text= sprintf(__('%s'), $wp_locale->get_month($arcresult->month)); $year_text= sprintf('
‘, $arcresult->year);
if( $show_post_count) $after= ' ('.$arcresult->posts.')'. $afterafter; $output.= ( $arcresult->year != $temp_year) ? $year_text: ''; $output.= get_archives_link($url, $text, $format, $before, $after); $temp_year= $arcresult->year; } } $output.= '
;
if( $echo) echo$output; else return$output;}/** Custom Fonts
function enqueue_custom_fonts(){
if (!is_admin()) {
wp_register_style(‘source_sans_pro’, ‘https://fonst.googleapis.com/’):
wp_register_style(‘nunito’, ‘https://fonst.google.com/’);
wp_enqueue_style(‘source_sans_pro’);
wp_enqueue_style(‘nunito’);
}
}
add_action (‘wp_enqueue_scripts’, ‘enqueue_custom_fonts’);
Nginx is one of the most popular web servers in the world and is responsible for hosting some of the largest and highest-traffic sites on the internet. It is a lightweight choice that can be used as either a web server or reverse proxy.
In this guide, we’ll discuss how to install Nginx on your Ubuntu 20.04 server, adjust the firewall, manage the Nginx process, and set up server blocks for hosting more than one domain from a single server.
Before you begin this guide, you should have a regular, non-root user with sudo privileges configured on your server. You can learn how to configure a regular user account by following our Initial server setup guide for Ubuntu 20.04.
You will also optionally want to have registered a domain name before completing the last steps of this tutorial. To learn more about setting up a domain name with DigitalOcean, please refer to our Introduction to DigitalOcean DNS.
When you have an account available, log in as your non-root user to begin.
Because Nginx is available in Ubuntu’s default repositories, it is possible to install it from these repositories using the apt packaging system.
Since this is our first interaction with the apt packaging system in this session, we will update our local package index so that we have access to the most recent package listings. Afterwards, we can install nginx:
After accepting the procedure, apt will install Nginx and any required dependencies to your server.
Before testing Nginx, the firewall software needs to be adjusted to allow access to the service. Nginx registers itself as a service with ufw upon installation, making it straightforward to allow Nginx access.
List the application configurations that ufw knows how to work with by typing:
You should get a listing of the application profiles:
Available applications:
  Nginx Full
  Nginx HTTP
  Nginx HTTPS
  OpenSSH
As demonstrated by the output, there are three profiles available for Nginx:
It is recommended that you enable the most restrictive profile that will still allow the traffic you’ve configured. Right now, we will only need to allow traffic on port 80.
You can enable this by typing:
You can verify the change by typing:
The output will indicated which HTTP traffic is allowed:
Status: active

To                         Action      From
--                         ------      ----
OpenSSH                    ALLOW       Anywhere
Nginx HTTP                 ALLOW       Anywhere
OpenSSH (v6)               ALLOW       Anywhere (v6)
Nginx HTTP (v6)            ALLOW       Anywhere (v6)
At the end of the installation process, Ubuntu 20.04 starts Nginx. The web server should already be up and running.
We can check with the systemd init system to make sure the service is running by typing:
● nginx.service - A high performance web server and a reverse proxy server
   Loaded: loaded (/lib/systemd/system/nginx.service; enabled; vendor preset: enabled)
   Active: active (running) since Fri 2020-04-20 16:08:19 UTC; 3 days ago
     Docs: man:nginx(8)
 Main PID: 2369 (nginx)
    Tasks: 2 (limit: 1153)
   Memory: 3.5M
   CGroup: /system.slice/nginx.service
           ├─2369 nginx: master process /usr/sbin/nginx -g daemon on; master_process on;
           └─2380 nginx: worker process
As confirmed by this out, the service has started successfully. However, the best way to test this is to actually request a page from Nginx.
You can access the default Nginx landing page to confirm that the software is running properly by navigating to your server’s IP address. If you do not know your server’s IP address, you can find it by using the icanhazip.com tool, which will give you your public IP address as received from another location on the internet:
When you have your server’s IP address, enter it into your browser’s address bar:
http://your_server_ip
You should receive the default Nginx landing page:
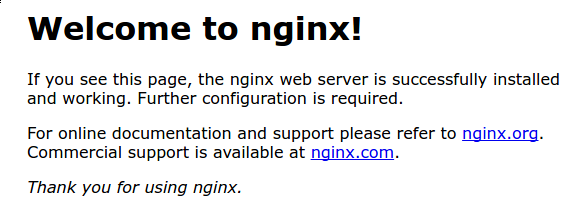
If you are on this page, your server is running correctly and is ready to be managed.
Now that you have your web server up and running, let’s review some basic management commands.
To stop your web server, type:
To start the web server when it is stopped, type:
To stop and then start the service again, type:
If you are only making configuration changes, Nginx can often reload without dropping connections. To do this, type:
By default, Nginx is configured to start automatically when the server boots. If this is not what you want, you can disable this behavior by typing:
To re-enable the service to start up at boot, you can type:
You have now learned basic management commands and should be ready to configure the site to host more than one domain.
When using the Nginx web server, server blocks (similar to virtual hosts in Apache) can be used to encapsulate configuration details and host more than one domain from a single server. We will set up a domain called your_domain, but you should replace this with your own domain name.
Nginx on Ubuntu 20.04 has one server block enabled by default that is configured to serve documents out of a directory at /var/www/html. While this works well for a single site, it can become unwieldy if you are hosting multiple sites. Instead of modifying /var/www/html, let’s create a directory structure within /var/www for our your_domain site, leaving /var/www/html in place as the default directory to be served if a client request doesn’t match any other sites.
Create the directory for your_domain as follows, using the -p flag to create any necessary parent directories:
Next, assign ownership of the directory with the $USER environment variable:
The permissions of your web roots should be correct if you haven’t modified your umask value, which sets default file permissions. To ensure that your permissions are correct and allow the owner to read, write, and execute the files while granting only read and execute permissions to groups and others, you can input the following command:
Next, create a sample index.html page using nano or your favorite editor:
Inside, add the following sample HTML:
Save and close the file by pressing Ctrl+X to exit, then when prompted to save, Y and then Enter.
In order for Nginx to serve this content, it’s necessary to create a server block with the correct directives. Instead of modifying the default configuration file directly, let’s make a new one at /etc/nginx/sites-available/your_domain:
Paste in the following configuration block, which is similar to the default, but updated for our new directory and domain name:
Notice that we’ve updated the root configuration to our new directory, and the server_name to our domain name.
Next, let’s enable the file by creating a link from it to the sites-enabled directory, which Nginx reads from during startup:
Note: Nginx uses a common practice called symbolic links, or symlinks, to track which of your server blocks are enabled. Creating a symlink is like creating a shortcut on disk, so that you could later delete the shortcut from the sites-enabled directory while keeping the server block in sites-available if you wanted to enable it.
Two server blocks are now enabled and configured to respond to requests based on their listen and server_name directives (you can read more about how Nginx processes these directives here):
your_domain: Will respond to requests for your_domain and www.your_domain.default: Will respond to any requests on port 80 that do not match the other two blocks.To avoid a possible hash bucket memory problem that can arise from adding additional server names, it is necessary to adjust a single value in the /etc/nginx/nginx.conf file. Open the file:
Find the server_names_hash_bucket_size directive and remove the # symbol to uncomment the line. If you are using nano, you can quickly search for words in the file by pressing CTRL and w.
Note: Commenting out lines of code – usually by putting # at the start of a line – is another way of disabling them without needing to actually delete them. Many configuration files ship with multiple options commented out so that they can be enabled or disabled, by toggling them between active code and documentation.
...
http {
    ...
    server_names_hash_bucket_size 64;
    ...
}
...
Save and close the file when you are finished.
Next, test to make sure that there are no syntax errors in any of your Nginx files:
If there aren’t any problems, restart Nginx to enable your changes:
Nginx should now be serving your domain name. You can test this by navigating to http://your_domain, where you should see something like this:

Now that you know how to manage the Nginx service itself, you should take a few minutes to familiarize yourself with a few important directories and files.
/var/www/html: The actual web content, which by default only consists of the default Nginx page you saw earlier, is served out of the /var/www/html directory. This can be changed by altering Nginx configuration files./etc/nginx: The Nginx configuration directory. All of the Nginx configuration files reside here./etc/nginx/nginx.conf: The main Nginx configuration file. This can be modified to make changes to the Nginx global configuration./etc/nginx/sites-available/: The directory where per-site server blocks can be stored. Nginx will not use the configuration files found in this directory unless they are linked to the sites-enabled directory. Typically, all server block configuration is done in this directory, and then enabled by linking to the other directory./etc/nginx/sites-enabled/: The directory where enabled per-site server blocks are stored. Typically, these are created by linking to configuration files found in the sites-available directory./etc/nginx/snippets: This directory contains configuration fragments that can be included elsewhere in the Nginx configuration. Potentially repeatable configuration segments are good candidates for refactoring into snippets./var/log/nginx/access.log: Every request to your web server is recorded in this log file unless Nginx is configured to do otherwise./var/log/nginx/error.log: Any Nginx errors will be recorded in this log.Now that you have your web server installed, you have many options for the type of content to serve and the technologies you want to use to create a richer experience.
If you’d like to build out a more complete application stack, check out the article How To Install Linux, Nginx, MySQL, PHP (LEMP stack) on Ubuntu 20.04.
In order to set up HTTPS for your domain name with a free SSL certificate using Let’s Encrypt, you should move on to How To Secure Nginx with Let’s Encrypt on Ubuntu 20.04.
Nginx is open-source software for web serving, reverse proxying, caching, load balancing, media streaming, and more. In this post, I will mention few Nginx configurations which we use frequently.
server {
  # Standard HTTP Protocol
  listen 80;

  # Standard HTTPS Protocol
  listen 443 ssl;

  # Listen on 80 using IPv6
  listen [::]:80;

  # Listen only on using IPv6
  listen [::]:80 ipv6only=on;
}
server {
  # Relative or full path to log file
  access_log /path/to/file.log;

  # Turn 'on' or 'off'
  access_log on;
}
server {
  # Listen to yourdomain.com
  server_name yourdomain.com;

  # Listen to multiple domains
  server_name yourdomain.com www.yourdomain.com;

  # Listen to all domains
  server_name *.yourdomain.com;

  # Listen to all top-level domains
  server_name yourdomain.*;

  # Listen to unspecified Hostnames (Listens to IP address itself)
  server_name "";

}
server {
  listen 80;
  server_name yourdomain.com;

  location / {
          root /path/to/website;
  }
}
server {
  listen 80;
  server_name www.yourdomain.com;
  return 301 http://yourdomain.com$request_uri;
}
server {
  listen 80;
  server_name www.yourdomain.com;

  location /redirect-url {
     return 301 http://otherdomain.com;
  }
}
server {
  listen 80;
  server_name yourdomain.com;

  location / {
     proxy_pass http://0.0.0.0:3000;
     # where 0.0.0.0:3000 is your application server (Ex: node.js) bound on 0.0.0.0 listening on port 3000
  }

}
upstream node_js {
  server 0.0.0.0:3000;
  server 0.0.0.0:4000;
  server 123.131.121.122;
}

server {
  listen 80;
  server_name yourdomain.com;

  location / {
     proxy_pass http://node_js;
  }
}
server {
  listen 443 ssl;
  server_name yourdomain.com;

  ssl on;

  ssl_certificate /path/to/cert.pem;
  ssl_certificate_key /path/to/privatekey.pem;

  ssl_stapling on;
  ssl_stapling_verify on;
  ssl_trusted_certificate /path/to/fullchain.pem;

  ssl_protocols TLSv1 TLSv1.1 TLSv1.2;
  ssl_connection_timeout 1d;
  ssl_session_cache shared:SSL:50m;
  add_header Strict-Transport-Security max-age=15768000;
}

# Permanent Redirect for HTTP to HTTPS
server {
  listen 80;
  server_name yourdomain.com;
  return 301 https://$host$request_uri;
}
Work In Progress, more explanations will be added soon
Table of content
upstream php {
    least_conn;
    server unix:/var/run/php-fpm.sock;
    server unix:/var/run/php-two-fpm.sock;
    keepalive 5;
}
upstream php {
    least_conn;
    server 127.0.0.1:9090;
    server 127.0.0.1:9091;
    keepalive 5;
}
# Upstreams
upstream backend {
    least_conn;

    server 10.10.10.1:80;
    server 10.10.10.2:80;
}

server {

    server_name site.ltd;

    location / {
        proxy_pass http://backend;
        proxy_redirect      off;
        proxy_set_header    Host            $host;
        proxy_set_header    X-Real-IP       $remote_addr;
        proxy_set_header    X-Forwarded-For $proxy_add_x_forwarded_for;
    }
}
To put inside a configuration file in /etc/nginx/conf.d/
# do not cache xmlhttp requests
map $http_x_requested_with $http_request_no_cache {
    default 0;
    XMLHttpRequest 1;
}
# do not cache requests for the following cookies
map $http_cookie $cookie_no_cache {
    default 0;
    "~*wordpress_[a-f0-9]+" 1;
    "~*wp-postpass" 1;
    "~*wordpress_logged_in" 1;
    "~*wordpress_no_cache" 1;
    "~*comment_author" 1;
    "~*woocommerce_items_in_cart" 1;
    "~*woocommerce_cart_hash" 1;
    "~*wptouch_switch_toogle" 1;
    "~*comment_author_email_" 1;
}
# do not cache requests for the following uri
map $request_uri $uri_no_cache {
    default 0;
    "~*/wp-admin/" 1;
    "~*/wp-[a-zA-Z0-9-]+.php" 1;
    "~*/feed/" 1;
    "~*/index.php" 1;
    "~*/[a-z0-9_-]+-sitemap([0-9]+)?.xml" 1;
    "~*/sitemap(_index)?.xml" 1;
    "~*/wp-comments-popup.php" 1;
    "~*/wp-links-opml.php" 1;
    "~*/wp-.*.php" 1;
    "~*/xmlrpc.php" 1;
}
# do not cache request with args (like site.tld/index.php?id=1)
map $query_string $query_no_cache {
    default 1;
    "" 0;
}
# map previous conditions with the variable $skip_cache
map $http_request_no_cache$cookie_no_cache$uri_no_cache$query_no_cache $skip_cache {
    default 1;
    0000 0;
}
To put inside another configuration file in /etc/nginx/conf.d
# FastCGI cache settings
fastcgi_cache_path /var/run/nginx-cache levels=1:2 keys_zone=WORDPRESS:360m inactive=24h max_size=256M;
fastcgi_cache_key "$scheme$request_method$host$request_uri$cookie_pll_language";
fastcgi_cache_use_stale error timeout invalid_header updating http_500 http_503;
fastcgi_cache_methods GET HEAD;
fastcgi_buffers 256 32k;
fastcgi_buffer_size 256k;
fastcgi_connect_timeout 4s;
fastcgi_send_timeout 120s;
fastcgi_busy_buffers_size 512k;
fastcgi_temp_file_write_size 512K;
fastcgi_param SERVER_NAME $http_host;
fastcgi_ignore_headers Cache-Control Expires Set-Cookie;
fastcgi_keep_conn on;
fastcgi_cache_lock on;
fastcgi_cache_lock_age 1s;
fastcgi_cache_lock_timeout 3s;
server {

    server_name domain.tld;

    access_log /var/log/nginx/domain.tld.access.log;
    error_log /var/log/nginx/domain.tld.error.log;

    root /var/www/domain.tld/htdocs;
    index index.php index.html index.htm;

    # add X-fastcgi-cache header to see if requests are cached
    add_header X-fastcgi-cache $upstream_cache_status;

    # default try_files directive for WP 5.0+ with pretty URLs
    location / {
        try_files $uri $uri/ /index.php$is_args$args;
    }
    # pass requests to fastcgi with fastcgi_cache enabled
    location ~ \.php$ {
        try_files $uri =404;
        include fastcgi_params;
        fastcgi_pass php;
        fastcgi_cache_bypass $skip_cache;
        fastcgi_no_cache $skip_cache;
        fastcgi_cache WORDPRESS;
        fastcgi_cache_valid 200 30m;
    }
    # block to purge nginx cache with nginx was built with ngx_cache_purge module
    location ~ /purge(/.*) {
        fastcgi_cache_purge WORDPRESS "$scheme$request_method$host$1";
        access_log off;
    }

}
location / {
        proxy_pass http://127.0.0.1:3000;
        proxy_redirect      off;
        proxy_set_header    Host            $host;
        proxy_set_header    X-Real-IP       $remote_addr;
        proxy_set_header    X-Forwarded-For $proxy_add_x_forwarded_for;
    }
location /folder/ { # The / is important!
        proxy_pass http://127.0.0.1:3000/;# The / is important!
        proxy_redirect      off;
        proxy_set_header    Host            $host;
        proxy_set_header    X-Real-IP       $remote_addr;
        proxy_set_header    X-Forwarded-For $proxy_add_x_forwarded_for;
    }
# Upstreams
upstream backend {
    server 127.0.0.1:3000;
    keepalive 5;
}
# HTTP Server
server {
    server_name your_hostname.com;
    error_log /var/log/nginx/rocketchat.access.log;
    location / {
        proxy_pass http://backend;
        proxy_http_version 1.1;
        proxy_set_header Upgrade $http_upgrade;
        proxy_set_header Connection "upgrade";
        proxy_set_header Host $http_host;
        proxy_set_header X-Real-IP $remote_addr;
        proxy_set_header X-Forward-For $proxy_add_x_forwarded_for;
        proxy_set_header X-Forward-Proto http;
        proxy_set_header X-Nginx-Proxy true;
        proxy_redirect off;
    }
}
server {

    server_name domain.tld;

    access_log /var/log/nginx/domain.tld.access.log;
    error_log /var/log/nginx/domain.tld.error.log;

    root /var/www/domain.tld/htdocs;

    # pass requests to Apache backend
    location / {
        proxy_pass http://backend;
    }
    # handle static files with a fallback
    location ~* \.(ogg|ogv|svg|svgz|eot|otf|woff|woff2|ttf|m4a|mp4|ttf|rss|atom|jpe?g|gif|cur|heic|png|tiff|ico|zip|webm|mp3|aac|tgz|gz|rar|bz2|doc|xls|exe|ppt|tar|mid|midi|wav|bmp|rtf|swf|webp)$ {
        add_header "Access-Control-Allow-Origin" "*";
        access_log off;
        log_not_found off;
        expires max;
        try_files $uri @fallback;
    }
    # fallback to pass requests to Apache if files are not found
    location @fallback {
        proxy_pass http://backend;
    }
}
location ~* "\.(old|orig|original|php#|php~|php_bak|save|swo|aspx?|tpl|sh|bash|bak?|cfg|cgi|dll|exe|git|hg|ini|jsp|log|mdb|out|sql|svn|swp|tar|rdf)$" {
    deny all;
}
location ~ /\.(?!well-known\/) {
    deny all;
}
location ~* "(base64_encode)(.*)(\()" {
    deny all;
}
location ~* "(eval\()" {
    deny all;
}
location = /robots.txt {
# Some WordPress plugin gererate robots.txt file
# Refer #340 issue
    try_files $uri $uri/ /index.php?$args @robots;
    access_log off;
    log_not_found off;
}
location @robots {
    return 200 "User-agent: *\nDisallow: /wp-admin/\nAllow: /wp-admin/admin-ajax.php\n";
}
add_header X-Robots-Tag "noindex";

location = /robots.txt {
  return 200 "User-agent: *\nDisallow: /\n";
}
location /videos {
    location ~ \.(mp4)$ {
        mp4;
        mp4_buffer_size       1m;
        mp4_max_buffer_size   5m;
        add_header Vary "Accept-Encoding";
        add_header "Access-Control-Allow-Origin" "*";
        add_header Cache-Control "public, no-transform";
        access_log off;
        log_not_found off;
        expires max;
    }
}
Mapping conditions to display WebP images
# serve WebP images if web browser support WebP
map $http_accept $webp_suffix {
   default "";
   "~*webp" ".webp";
}
Set conditional try_files to server WebP image :
# webp rewrite rules for jpg and png images
# try to load alternative image.png.webp before image.png
location /wp-content/uploads {
    location ~ \.(png|jpe?g)$ {
        add_header Vary "Accept-Encoding";
        add_header "Access-Control-Allow-Origin" "*";
        add_header Cache-Control "public, no-transform";
        access_log off;
        log_not_found off;
        expires max;
        try_files $uri$webp_suffix $uri =404;
    }
}
Question:
In CentOS 8, there is an error using yum. There is no URL in the image list, similar to the following:
Error: Failed to download metadata for repo 'appstream': Cannot prepare internal mirrorlist: No URLs in mirrorlistreason:
On January 31, 2022, the CentOS team finally removed all packages of CentOS 8 from the official image.
CentOS 8 has expired on December 31, 2021, but the software package has been retained on the official image for some time. Now they are transferred to https://vault.centos.org
Solution:
If you still need to run CentOS 8, you can run it in/etc/yum repos. Update the source in D. Use vault.centos.Org instead of mirror.centos.org.
sudo sed -i -e "s|mirrorlist=|#mirrorlist=|g" /etc/yum.repos.d/CentOS-*
sudo sed -i -e "s|#baseurl=http://mirror.centos.org|baseurl=http://vault.centos.org|g" /etc/yum.repos.d/CentOS-*
Essentially, it replaces the previous URL with the URL that is still running. This problem should be solved within this period of time.
$db['default'] = array(
        'dsn'   => '',
        'hostname' => 'localhost',
        'username' => 'root',
        'password' => '',
        'database' => 'database_name',
        'dbdriver' => 'mysqli',
        'dbprefix' => '',
        'pconnect' => TRUE,
        'db_debug' => TRUE,
        'cache_on' => FALSE,
        'cachedir' => '',
        'char_set' => 'utf8',
        'dbcollat' => 'utf8_general_ci',
        'swap_pre' => '',
        'encrypt' => FALSE,
        'compress' => FALSE,
        'stricton' => FALSE,
        'failover' => array(
            array(
                    'hostname' => 'localhost1',
                    'username' => '',
                    'password' => '',
                    'database' => '',
                    'dbdriver' => 'mysqli',
                    'dbprefix' => '',
                    'pconnect' => TRUE,
                    'db_debug' => TRUE,
                    'cache_on' => FALSE,
                    'cachedir' => '',
                    'char_set' => 'utf8',
                    'dbcollat' => 'utf8_general_ci',
                    'swap_pre' => '',
                    'encrypt' => FALSE,
                    'compress' => FALSE,
                    'stricton' => FALSE
            ),
            array(
                    'hostname' => 'localhost2',
                    'username' => '',
                    'password' => '',
                    'database' => '',
                    'dbdriver' => 'mysqli',
                    'dbprefix' => '',
                    'pconnect' => TRUE,
                    'db_debug' => TRUE,
                    'cache_on' => FALSE,
                    'cachedir' => '',
                    'char_set' => 'utf8',
                    'dbcollat' => 'utf8_general_ci',
                    'swap_pre' => '',
                    'encrypt' => FALSE,
                    'compress' => FALSE,
                    'stricton' => FALSE
            )
        )
);Representational state transfer (REST) or RESTful web services provide a way to exchange data between applications or systems on the Internet. RESTful web service also refers as RESTful API, uses HTTP request to GET, PUT, POST and DELETE data across platforms. In present days, RESTful API is an essential component of the web application.
When the CodeIgniter application requires communicating with another application, RESTful API is needed to integrate into CodeIgniter. Using RESTful API in CodeIgniter, you can exchange data between different applications or platform. This tutorial shows RESTful server implementation for CodeIgniter and you will learn how to create RESTful web services in CodeIgniter.
To demonstrate CodeIgniter REST API, we will implement CRUD operations in CodeIgniter web service. The following tasks will be performed to create a simple REST API in CodeIgniter.
Before you get started, take a look the files structure of CodeIgniter REST API.

To store user’s information, a table needs to be created in the database. The following SQL creates a users table with some basic fields in MySQL database.
CREATE TABLE `users` (
 `id` int(11) NOT NULL AUTO_INCREMENT,
 `first_name` varchar(100) COLLATE utf8_unicode_ci NOT NULL,
 `last_name` varchar(100) COLLATE utf8_unicode_ci NOT NULL,
 `email` varchar(255) COLLATE utf8_unicode_ci NOT NULL,
 `phone` varchar(20) COLLATE utf8_unicode_ci NOT NULL,
 `created` datetime NOT NULL,
 `modified` datetime NOT NULL,
 `status` enum('1','0') COLLATE utf8_unicode_ci NOT NULL,
 PRIMARY KEY (`id`)
) ENGINE=InnoDB DEFAULT CHARSET=utf8 COLLATE=utf8_unicode_ci;

The following SQL creates a keys table to store REST API key for authentication.
CREATE TABLE `keys` (
 `id` int(11) NOT NULL AUTO_INCREMENT,
 `user_id` int(11) NOT NULL,
 `key` varchar(40) NOT NULL,
 `level` int(2) NOT NULL,
 `ignore_limits` tinyint(1) NOT NULL DEFAULT '0',
 `is_private_key` tinyint(1) NOT NULL DEFAULT '0',
 `ip_addresses` text,
 `date_created` datetime NOT NULL,
 PRIMARY KEY (`id`)
) ENGINE=InnoDB DEFAULT CHARSET=utf8;

Now insert an API key in keys table, which will be used on API call.
INSERT INTO `keys` (`id`, `user_id`, `key`, `level`, `ignore_limits`, `is_private_key`, `ip_addresses`, `date_created`) VALUES
(1, 0, 'CODEX@123', 0, 0, 0, NULL, '2017-10-12 13:34:33');
We will use CodeIgniter REST_Controller to build RESTful web services in CodeIgniter. Follow the below steps to setup REST Controller Library in your CodeIgniter application.
application/config/ directory.application/config/rest.php file and setup the following configuration.
$config['rest_valid_logins'] = ['admin' => '1234'];
$config['rest_enable_keys'] = TRUE;
application/libraries/ directory.application/libraries/ directory.application/language/english/ directory.Note that: All the required library files are included in our example CodeIgniter application, so, you don’t need to download these files separately. Download our source code to get sample CodeIgniter RESTful Web service application.
Open the application/models/ directory and create User.php file and add the following code to handle the database related works.
The User model has the following methods to fetch, insert, update, and delete user data in the database.
users table and returns single row or multiple rows.users table.users table based on the given ID.users table based on the given ID.load->database();
}
/*
* Fetch user data
*/
function getRows($id = ""){
if(!empty($id)){
$query = $this->db->get_where('users', array('id' => $id));
return $query->row_array();
}else{
$query = $this->db->get('users');
return $query->result_array();
}
}
/*
* Insert user data
*/
public function insert($data = array()) {
if(!array_key_exists('created', $data)){
$data['created'] = date("Y-m-d H:i:s");
}
if(!array_key_exists('modified', $data)){
$data['modified'] = date("Y-m-d H:i:s");
}
$insert = $this->db->insert('users', $data);
if($insert){
return $this->db->insert_id();
}else{
return false;
}
}
/*
* Update user data
*/
public function update($data, $id) {
if(!empty($data) && !empty($id)){
if(!array_key_exists('modified', $data)){
$data['modified'] = date("Y-m-d H:i:s");
}
$update = $this->db->update('users', $data, array('id'=>$id));
return $update?true:false;
}else{
return false;
}
}
/*
* Delete user data
*/
public function delete($id){
$delete = $this->db->delete('users',array('id'=>$id));
return $delete?true:false;
}
}
?>
It’s always a good idea to group all API controllers in a separate folder for better usability. So, create an api/ folder in application/controllers/ directory to place the controller which will be used for API call.
Open the application/controllers/api/ directory and create Example.php file. At first, include the REST Controller library and add the following code.
The Example API controller has the following methods to handle the GET, POST, PUT, and DELETE request.
load->model('user');
    }

    public function user_get($id = 0) {
        //returns all rows if the id parameter doesn't exist,
        //otherwise single row will be returned
        $users = $this->user->getRows($id);

        //check if the user data exists
        if(!empty($users)){
            //set the response and exit
            $this->response($users, REST_Controller::HTTP_OK);
        }else{
            //set the response and exit
            $this->response([
                'status' => FALSE,
                'message' => 'No user were found.'
            ], REST_Controller::HTTP_NOT_FOUND);
        }
    }

    public function user_post() {
        $userData = array();
        $userData['first_name'] = $this->post('first_name');
        $userData['last_name'] = $this->post('last_name');
        $userData['email'] = $this->post('email');
        $userData['phone'] = $this->post('phone');
        if(!empty($userData['first_name']) && !empty($userData['last_name']) && !empty($userData['email']) && !empty($userData['phone'])){
            //insert user data
            $insert = $this->user->insert($userData);

            //check if the user data inserted
            if($insert){
                //set the response and exit
                $this->response([
                    'status' => TRUE,
                    'message' => 'User has been added successfully.'
                ], REST_Controller::HTTP_OK);
            }else{
                //set the response and exit
                $this->response("Some problems occurred, please try again.", REST_Controller::HTTP_BAD_REQUEST);
            }
        }else{
            //set the response and exit
            $this->response("Provide complete user information to create.", REST_Controller::HTTP_BAD_REQUEST);
        }
    }

    public function user_put() {
        $userData = array();
        $id = $this->put('id');
        $userData['first_name'] = $this->put('first_name');
        $userData['last_name'] = $this->put('last_name');
        $userData['email'] = $this->put('email');
        $userData['phone'] = $this->put('phone');
        if(!empty($id) && !empty($userData['first_name']) && !empty($userData['last_name']) && !empty($userData['email']) && !empty($userData['phone'])){
            //update user data
            $update = $this->user->update($userData, $id);

            //check if the user data updated
            if($update){
                //set the response and exit
                $this->response([
                    'status' => TRUE,
                    'message' => 'User has been updated successfully.'
                ], REST_Controller::HTTP_OK);
            }else{
                //set the response and exit
                $this->response("Some problems occurred, please try again.", REST_Controller::HTTP_BAD_REQUEST);
            }
        }else{
            //set the response and exit
            $this->response("Provide complete user information to update.", REST_Controller::HTTP_BAD_REQUEST);
        }
    }

    public function user_delete($id){
        //check whether post id is not empty
        if($id){
            //delete post
            $delete = $this->user->delete($id);

            if($delete){
                //set the response and exit
                $this->response([
                    'status' => TRUE,
                    'message' => 'User has been removed successfully.'
                ], REST_Controller::HTTP_OK);
            }else{
                //set the response and exit
                $this->response("Some problems occurred, please try again.", REST_Controller::HTTP_BAD_REQUEST);
            }
        }else{
            //set the response and exit
            $this->response([
                'status' => FALSE,
                'message' => 'No user were found.'
            ], REST_Controller::HTTP_NOT_FOUND);
        }
    }
}

?>
Now it’s time to interact with the CodeIgniter RESTful Web Services. The cURL is the most flexible and easiest way to interact with a REST API. In the following example code, we will show you how to send GET, POST, PUT and DELETE request to CodeIgniter REST API using PHP cURL. Also, HTTP Basic authentication and API key will be used to connect with RESTful API.
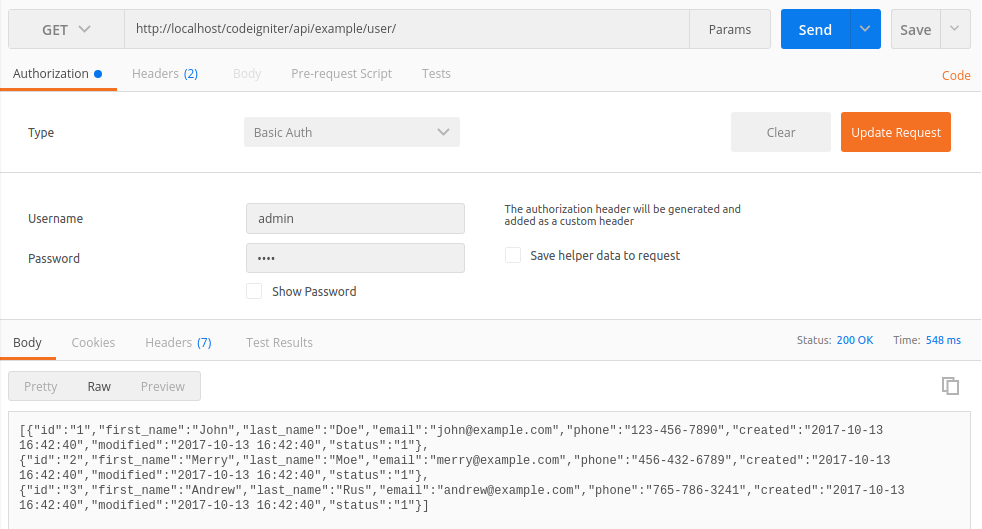
Retrieve User Data via REST API
The following code performs a GET request to fetch the user data via RESTful Web Services (Example API).
//API URL
$url = 'http://localhost/codeigniter/api/example/user/';

//API key
$apiKey = 'CODEX@123';

//Auth credentials
$username = "admin";
$password = "1234";

//create a new cURL resource
$ch = curl_init($url);

curl_setopt($ch, CURLOPT_TIMEOUT, 30);
curl_setopt($ch, CURLOPT_RETURNTRANSFER,1);
curl_setopt($ch, CURLOPT_HTTPAUTH, CURLAUTH_ANY);
curl_setopt($ch, CURLOPT_HTTPHEADER, array("X-API-KEY: " . $apiKey));
curl_setopt($ch, CURLOPT_USERPWD, "$username:$password");

$result = curl_exec($ch);

//close cURL resource
curl_close($ch);
Insert User Data via REST API
The following code performs a POST request to insert user data via RESTful Web Services (Example API).
//API URL
$url = 'http://localhost/codeigniter/api/example/user/';

//API key
$apiKey = 'CODEX@123';

//Auth credentials
$username = "admin";
$password = "1234";

//user information
$userData = array(
    'first_name' => 'John',
    'last_name' => 'Doe',
    'email' => 'john@example.com',
    'phone' => '123-456-7890'
);

//create a new cURL resource
$ch = curl_init($url);

curl_setopt($ch, CURLOPT_TIMEOUT, 30);
curl_setopt($ch, CURLOPT_RETURNTRANSFER,1);
curl_setopt($ch, CURLOPT_HTTPAUTH, CURLAUTH_ANY);
curl_setopt($ch, CURLOPT_HTTPHEADER, array("X-API-KEY: " . $apiKey));
curl_setopt($ch, CURLOPT_USERPWD, "$username:$password");
curl_setopt($ch, CURLOPT_POST, 1);
curl_setopt($ch, CURLOPT_POSTFIELDS, $userData);

$result = curl_exec($ch);

//close cURL resource
curl_close($ch);
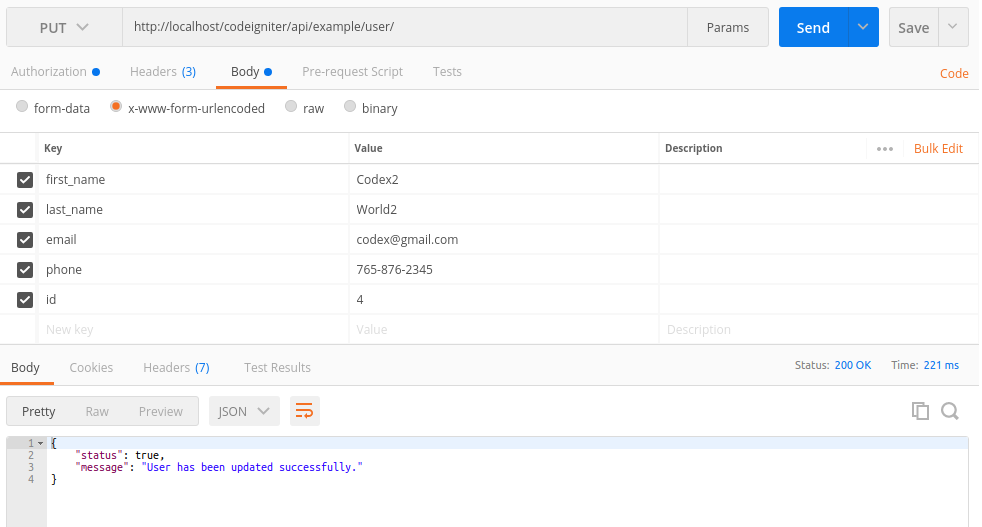
Update User Data via REST API
The following code performs a PUT request to update user data via RESTful Web Services (Example API).
//API URL
$url = 'http://localhost/codeigniter/api/example/user/';

//API key
$apiKey = 'CODEX@123';

//Auth credentials
$username = "admin";
$password = "1234";

//user information
$userData = array(
    'id' => 2,
    'first_name' => 'John2',
    'last_name' => 'Doe2',
    'email' => 'john2@example.com',
    'phone' => '098-765-4321'
);

//create a new cURL resource
$ch = curl_init($url);

curl_setopt($ch, CURLOPT_TIMEOUT, 30);
curl_setopt($ch, CURLOPT_RETURNTRANSFER,1);
curl_setopt($ch, CURLOPT_HTTPAUTH, CURLAUTH_ANY);
curl_setopt($ch, CURLOPT_HTTPHEADER, array('X-API-KEY: '.$apiKey, 'Content-Type: application/x-www-form-urlencoded'));
curl_setopt($ch, CURLOPT_USERPWD, "$username:$password");
curl_setopt($ch, CURLOPT_CUSTOMREQUEST, "PUT");
curl_setopt($ch, CURLOPT_POSTFIELDS, http_build_query($userData));

$result = curl_exec($ch);

//close cURL resource
curl_close($ch);
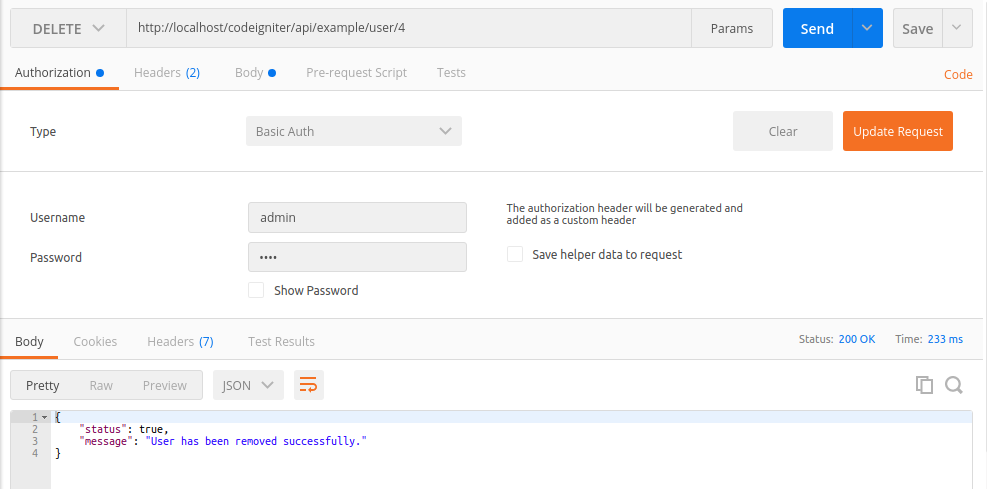
Delete User Data via REST API
The following code performs a DELETE request to delete user data via RESTful Web Services (Example API).
//API URL
$url = 'http://localhost/codeigniter/api/example/user/2';

//API key
$apiKey = 'CODEX@123';

//Auth credentials
$username = "admin";
$password = "1234";

//create a new cURL resource
$ch = curl_init($url);

curl_setopt($ch, CURLOPT_TIMEOUT, 30);
curl_setopt($ch, CURLOPT_RETURNTRANSFER,1);
curl_setopt($ch, CURLOPT_HTTPAUTH, CURLAUTH_ANY);
curl_setopt($ch, CURLOPT_HTTPHEADER, array("X-API-KEY: " . $apiKey));
curl_setopt($ch, CURLOPT_USERPWD, "$username:$password");
curl_setopt($ch, CURLOPT_CUSTOMREQUEST, 'DELETE');

$result = curl_exec($ch);

//close cURL resource
curl_close($ch);
Postman Extension makes API development faster, easier, and better. Install Postman Extension for testing the API call.
GET http://localhost/codeigniter/api/example/user/
GET http://localhost/codeigniter/api/example/user/4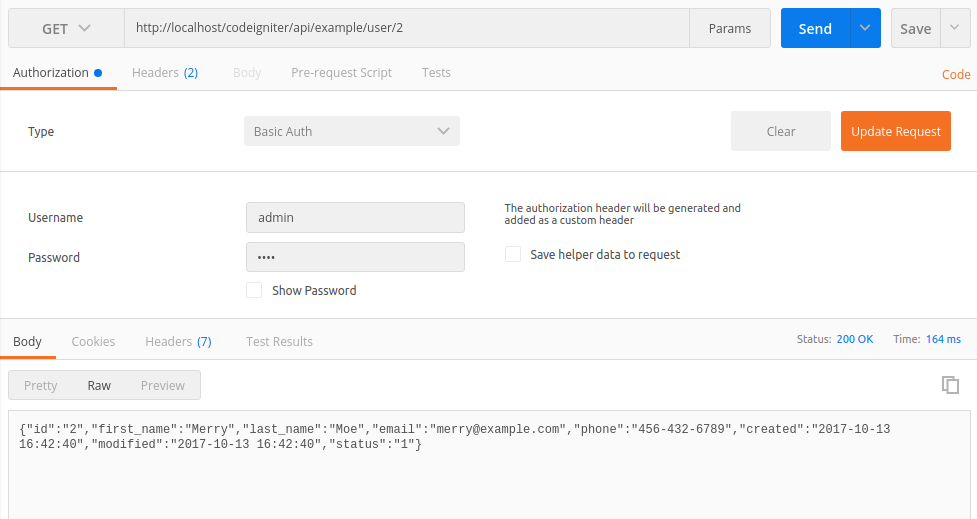
POST http://localhost/codeigniter/api/example/user/
Update user data in the database: PUT http://localhost/codeigniter/api/example/user/
Delete user from the database: DELETE http://localhost/codeigniter/api/example/user/4
Option 01:
$active_group = 'default';
$query_builder = TRUE;

$db['default'] = array(
    'dsn'   => '',
    'hostname' => '192.168.0.109:1521/orcl', //hostname:db_port/service_name
    //'hostname' => 'localhost:1521/orcl',
    'username' => 'db_username',
    'password' => 'db_password',
    'database' => 'db_name',
    'dbdriver' => 'oci8',
    'dbprefix' => '',
    'pconnect' => FALSE,
    'db_debug' => (ENVIRONMENT !== 'production'),
    'cache_on' => FALSE,
    'cachedir' => '',
    'char_set' => 'utf8',
    'dbcollat' => 'utf8_general_ci',
    'swap_pre' => '',
    'encrypt' => FALSE,
    'compress' => FALSE,
    'stricton' => FALSE,
    'failover' => array(),
    'save_queries' => TRUE
);


Option 02:
$active_group = 'default';
$active_record = TRUE;
$db['default']['hostname'] = '(DESCRIPTION=(ADDRESS=(PROTOCOL=TCP)(HOST=192.168.0.246)(PORT=1521))(CONNECT_DATA=(SID=orcl)))';
$db['default']['username'] = 'db_username';
$db['default']['password'] = 'db_password';
$db['default']['database'] = 'db_name';
$db['default']['dbdriver'] = 'oci8';
$db['default']['dbprefix'] = '';
$db['default']['pconnect'] = TRUE;
$db['default']['db_debug'] = TRUE;
$db['default']['cache_on'] = FALSE;
$db['default']['cachedir'] = '';
$db['default']['char_set'] = 'utf8';
$db['default']['dbcollat'] = 'utf8_general_ci';
$db['default']['swap_pre'] = '';
$db['default']['autoinit'] = TRUE;
$db['default']['stricton'] = FALSE;Postgresql extension in php.iniextension=php_pgsql.dll
You also can enable Postgresql extension for PDO as well.
extension=php_pdo_pgsql.dll
$db['default'] = array(
    'port'   => 5432, # Add
);
OR
$db['default'] = array(
    'dsn'   => 'pgsql:host=localhost;port=5432;dbname=database_name',
    'dbdriver' => 'pdo',
);
$active_group = ‘default’;
$query_builder = TRUE;
$db[‘default’] = array(
‘dsn’ => ”,
‘hostname’ => ‘localhost’,
‘username’ => ‘postgres’,
‘password’ => ”,
‘database’ => ‘fmsdb’,
‘dbdriver’ => ‘postgre’,
‘dbprefix’ => ”,
‘pconnect’ => FALSE,
‘db_debug’ => (ENVIRONMENT !== ‘production’),
‘cache_on’ => FALSE,
‘cachedir’ => ”,
‘char_set’ => ‘utf8’,
‘dbcollat’ => ‘utf8_general_ci’,
‘swap_pre’ => ”,
‘encrypt’ => FALSE,
‘compress’ => FALSE,
‘stricton’ => FALSE,
‘failover’ => array(),
‘save_queries’ => TRUE
);
