September 2019

VMWare Workstation 9 & 10

VMWare Workstation 9 Keys:

HA2VM-220EP-3ZAN8-JR156-8CNHD
1V6JV-60H84-LZXV0-028G2-CA2HD
0V0HD-641E4-FZWK0-UH1EM-CAEP1
NG25P-AW2DN-RZ1V0-K8252-ACY0P
1V22N-4LK8H-TZ1N9-GR9Q2-92GK5

VMWare Workstation 10 Keys:

1Z0G9-67285-FZG78-ZL3Q2-234JG
4C4EK-89KDL-5ZFP9-1LA5P-2A0J0
HY086-4T01N-CZ3U0-CV0QM-13DNU
5U4GA-DQ09H-EZK48-YTAQP-83K79
NU4FQ-DFH40-0ZA01-8A37K-32RKL
HF0DA-FF086-VZ739-AA87H-236M4
HF0A8-FMJ1P-1Z1U1-LK1N2-9AGKJ
5A477-D3284-3ZUF0-2K154-23R0P
MY47Y-2MK1M-6ZQC0-7J05M-8A60D
5V6K2-29243-HZDV0-VVA76-93A2R
NA28T-DR114-AZ9Z8-R1250-93U27
MF4JG-4H3DK-NZ3L0-KHCNM-8AMNP
NA6F3-2HKEM-6ZDF8-Q18N6-33DNN
1Y2FZ-AHJ5H-6ZU09-DKA5M-82RQ7
5U6KQ-6M240-LZMW1-U13N2-AAX7X
HA4FW-8G052-DZ8Q0-U295P-83KLV
5F4PK-42181-9ZXP9-T31Q6-1CVKM
JY468-44L9M-DZ479-3UA72-CAKHR
4F6Z5-80H42-FZ889-L007M-ACJJN
5F6E9-DHL4J-HZ640-KLA70-8C0NN

Serial key of vmware workstation 9.0.1:
4A62F-FU00N-VZM78-ZKCQK-8297E
NA2Y9-2ALE1-3ZNX1-10CQ4-0CK77
HU047-DYKE4-ZZPQ8-L02QH-1AZ4W
JZ422-4AKDN-3ZKV8-G2A5P-827PK
4F2MR-D92EH-GZNV8-YLA7H-13YM9
NF6HV-D435L-XZPD9-J817K-CCN58
4Z6C4-DR1E6-KZ4U0-0K15H-0CFPK
JC0ZU-0H150-3ZTR9-DT15P-02N2K
MA2UX-D614Q-CZ7H1-MACN4-82TQZ
JG6UD-4RH9P-GZP59-9V25K-02TP6
MU0XV-F70D7-3ZW58-FH072-1AP59
1F6VP-AQ20J-GZ4U0-NT17P-8305J

MikroTik Schedule Auto Reboot Script every day at 6 AM

So you want to have your MikroTik router rebooted every day at 6 a.m. in the morning before the business start to prevent possible random issues from happening?

Go to MikroTik Winbox, open a New Terminal and enter this one line simple command:

Code:
/system scheduler add name="reboot-6am" start-date="jan/17/2017" start-time="06:00:00" interval="1d" on-event="/system reboot"

Migration From SQL Server To Oracle Using SQL Developer

Migration is the process of copying the schema objects and data from a non-Oracle database, such as MySQL, Microsoft SQL Server, Sybase Adaptive Server, Microsoft Access, or IBM DB2, to an Oracle database.

To migrate a third-party database to Oracle easily, you can choose the following options using SQL Developer:

– Migrating using the Migration Wizard

– Copying tables to Oracle

Migrating Using the Migration Wizard

The Migration wizard provides a screen to manage all the steps needed for the migration to Oracle database. These steps are as follows:

– Capturing the source database (MySQL, Microsoft SQL Server, Sybase Adaptive Server, Microsoft Access, IBM DB2),

– Converting it to Oracle format,

– Generating DDL,

– Performing the conversion.

After a brief explanation about the process of migration, let’s do a simple migration from SQL Server database to Oracle database.

1- I created sample SQL Server database named TALIPTEST.

2- The migration repository is a collection of schema objects that SQL Developer uses to manage metadata for migrations. For a migration repository create a database connection to convenient Oracle database and give following grants.

 CREATE USER MIGRATIONS IDENTIFIED BY “migration”

DEFAULT TABLESPACE USERS

TEMPORARY TABLESPACE TEMP;

grant create session to migrations;

grant resource to migrations;

grant create view to migrations;

For multischema migrations, you must grant the privileges with the ADMIN option as follows.

grant resource to migrations with admin option;

grant create role to migrations with admin option;

grant alter any trigger to migrations with admin option;

grant create user to migrations with admin option;

3- Download SQL Developer from http://www.oracle.com/technetwork/developer-tools/sql-developer/downloads/index.html

4- Unzip the file named sqldeveloper-3.2.20.09.87.zip and extract it. Open  sqldeveloper.exe file to open SQL Developer.

5- Right click to the “Connections” and click the “New Connections”

6-  Create a database connection named Migration_Repository that connects to the MIGRATIONS user.

7- Right-click the Migration_Repository connection, and select “Migration Repository” menu , then “Associate Migration Repository” to create the repository.

8- Schema objects needed for migration will be created in MIGRATIONS schema.

9- To connect to third-party database (MySQL, Microsoft SQL Server, Sybase Adaptive Server,  Microsoft Access, IBM DB2) using SQL Developer, we need jTDS driver. You can download needed jTDS driver from following link. http://sourceforge.net/projects/jtds/files/jtds/1.2/jtds-1.2-dist.zip/download  . Extract the dowloaded zip file named jtds-1.2-dist.zip

10- Click “Tools” and then “Prefenrences”.

11- Select “Third Party JDBC Drivers” and click “Add Entry” button to add jTDS driver for SQL Server.

12- Select jar file located in jTDS driver folder.

13- Click “OK” button.

14- Now you can connect to SQL Server or Sybase database using SQL Developer. Connect to the SQL Server database as follows.

15- And finally, let us create the database connection which we will migrate to.

16- The migration wizard is invoked in a variety of contexts. You can right-click a third-party database connection and select “Migrate to Oracle”  or you can click “Tools>Migration>Migrate…”.

17- Click “Next” button.

18- Select migration repository database connection.

19- Give a name for migration project and select a directory to write output.

20– Select third party database connection. You can migrate database on online or offline mode. If you choose online migration then Migration Wizard will perform all needed operations. If you choose offline migration then Migration Wizard will generate all needed DDL scripts.

21- Select SQL Server database which we want to migrate to Oracle.

22- Specify the conversion options. And click “Advanced Options” link to ensure “Microsoft SQL Server : Is quoted identifier on” option is selected.

23- Select target database connection.

24- If you select offline migration then offline migration script will be generated in the project output directory.

25- Select the connections to be used for online data move.

26- Click “Finish” button so start migration.

27- Migration and conversion process will be perfomed as follows.

Now, Our SQL Server database in Oracle 🙂

Copying tables to Oracle

Right click the table located in third party database and click “Copy To Oracle”

Select destination (Oracle) database connection and click “Apply” button. If you choose “Include Data” check box it will create table structure and move data.

Copy to Oracle database is finished.

Note: This method doesn’t move indexes, triggers, etc. It only moves table structure and data.

Data Type Conversion

Data Type Conversion

The gateway converts Microsoft SQL Server data types to Oracle data types as follows:

Table A-1 Data Type Conversions

Microsoft SQL Server Oracle Comment
BIGINT NUMBER(19)
BINARY RAW
BIT NUMBER(3)
CHAR CHAR
DATETIME DATE Fractional parts of a second are truncated
DECIMAL NUMBER(p[,s])
FLOAT FLOAT(49)
IMAGE LONG RAW
INTEGER NUMBER(10) NUMBER range is -2,147,483,647 to 2,147,483,647
MONEY NUMBER(19,4)
NCHAR NCHAR
NTEXT LONG
NVARCHAR NCHAR
NUMERIC NUMBER(p[,s])
REAL FLOAT(23)
SMALL DATETIME DATE The value for seconds is returned as 0
SMALL MONEY NUMBER(10,4)
SMALLINT NUMBER(5) NUMBER range is -32,767 to 32,767
TEXT LONG
TIMESTAMP RAW
TINYINT NUMBER(3)
UNIQUEIDENTIFIER CHAR(36)
VARBINARY RAW
VARCHAR VARCHAR2

Bitrix 24 – Corporate Portal 18.5.180

1C-Bitrix Corporate Portal 18.5.180.tar.gz
Rename and unpack the distribution archive in the ssh command line or using the hosting control panel with the command:
tar xzvf bitrix24_source.tar.gz
2. In the browser, run http: //name-your-site.ru/index.php
3. Follow the instructions of the installer;
4. On the encoding selection screen, ALWAYS select the UTF-8 encoding;
5. When you get to the license entry field – enter PTR-ML-BXPR18XXXXXXXXXX – instead of “X”, any numbers or capital Latin letters.
6. Follow the instructions of the installer.
7. Profit !!

query in the database

INSERT INTO `b_option` (` MODULE_ID`, `NAME`,` VALUE`, `DESCRIPTION`,` SITE_ID`) VALUES
(‘main’, ‘PARAM_MAX_SITES’, ‘ 2 ‘, ”, NULL),
(‘main’ , ‘PARAM_MAX_USERS’, ‘ 100500 ‘, ”, NULL);

Using PCC to load balance across multiple non bonded links.

This is my ongoing work at using multiple ADSL services and the Mikrotik PCC rules along with some inbound mangling to allow a single router to load balance traffic across as many non bonded links as required.

Updated: 7th Jan 2010 – notes: added static routing marks for inbound traffic as inbound should never fall over to backup routes, while outbound should go over whatever is available. Also cleaned up routing order so it’s easier to read.

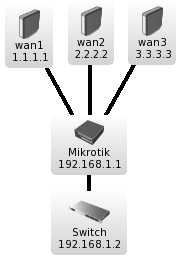
Note that none of this config requires the use of IP addresses at all, as it simply uses the pppoe-client interfaces and your lan interface to mark traffic. In my example wan1-pppoe,wan2-pppoe,wan3-pppoe are used and lan

/ip route
add check-gateway=arp comment="WAN 3  - Distance 1" disabled=no distance=1 dst-address=0.0.0.0/0 gateway=wan3-pppoe routing-mark=wan3
add check-gateway=arp comment="WAN 2  - Distance 1" disabled=no distance=1 dst-address=0.0.0.0/0 gateway=wan2-pppoe routing-mark=wan2
add check-gateway=arp comment="WAN 1  - Distance 1" disabled=no distance=1 dst-address=0.0.0.0/0 gateway=wan1-pppoe routing-mark=wan1
add check-gateway=arp comment="WAN 1  - Distance 2" disabled=no distance=2 dst-address=0.0.0.0/0 gateway=wan2-pppoe routing-mark=wan1
add check-gateway=arp comment="WAN 2  - Distance 2" disabled=no distance=2 dst-address=0.0.0.0/0 gateway=wan3-pppoe routing-mark=wan2
add check-gateway=arp comment="WAN 3  - Distance 2" disabled=no distance=2 dst-address=0.0.0.0/0 gateway=wan1-pppoe routing-mark=wan3
add check-gateway=arp comment="WAN 1  - Distance 3" disabled=no distance=3 dst-address=0.0.0.0/0 gateway=wan3-pppoe routing-mark=wan1
add check-gateway=arp comment="WAN 2  - Distance 3" disabled=no distance=3 dst-address=0.0.0.0/0 gateway=wan1-pppoe routing-mark=wan2
add check-gateway=arp comment="WAN 3  - Distance 3" disabled=no distance=3 dst-address=0.0.0.0/0 gateway=wan2-pppoe routing-mark=wan3
add check-gateway=arp comment="Default Route - Distance 1" disabled=no distance=1 dst-address=0.0.0.0/0 gateway=wan1-pppoe
add check-gateway=arp comment="Default Route - Distance 2" disabled=no distance=3 dst-address=0.0.0.0/0 gateway=wan3-pppoe
add check-gateway=arp comment="Default Route - Distance 3" disabled=no distance=2 dst-address=0.0.0.0/0 gateway=wan2-pppoe
add check-gateway=arp comment="Static Route - WAN1" disabled=no distance=1 dst-address=0.0.0.0/0 gateway=wan1-pppoe routing-mark=static-wan1
add check-gateway=arp comment="Static Route - WAN2" disabled=no distance=2 dst-address=0.0.0.0/0 gateway=wan2-pppoe routing-mark=static-wan2
add check-gateway=arp comment="Static Route - WAN3" disabled=no distance=3 dst-address=0.0.0.0/0 gateway=wan3-pppoe routing-mark=static-wan3
/ip firewall mangle
add action=mark-connection chain=input comment="Mark new inbound connection wan1" connection-state=new disabled=no in-interface=wan1-pppoe new-connection-mark=wan1 \
passthrough=yes
add action=mark-connection chain=input comment="Mark new inbound connection wan2" connection-state=new disabled=no in-interface=wan2-pppoe new-connection-mark=wan2 \
passthrough=yes
add action=mark-connection chain=input comment="Mark new inbound connection wan3" connection-state=new disabled=no in-interface=wan3-pppoe new-connection-mark=wan3 \
passthrough=yes
add action=mark-connection chain=prerouting comment="Mark established inbound connection wan1" connection-state=established disabled=no in-interface=wan1-pppoe \
new-connection-mark=wan1 passthrough=yes
add action=mark-connection chain=prerouting comment="Mark established inbound connection wan2" connection-state=established disabled=no in-interface=wan2-pppoe \
new-connection-mark=wan2 passthrough=yes
add action=mark-connection chain=prerouting comment="Mark established inbound connection wan3" connection-state=established disabled=no in-interface=wan3-pppoe \
new-connection-mark=wan3 passthrough=yes
add action=mark-connection chain=prerouting comment="Mark related inbound connection wan1" connection-state=related disabled=no in-interface=wan1-pppoe \
new-connection-mark=wan1 passthrough=yes
add action=mark-connection chain=prerouting comment="Mark related inbound connection wan2" connection-state=related disabled=no in-interface=wan2-pppoe \
new-connection-mark=wan2 passthrough=yes
add action=mark-connection chain=prerouting comment="Mark related inbound connection wan3" connection-state=related disabled=no in-interface=wan3-pppoe \
new-connection-mark=wan3 passthrough=yes
add action=mark-routing chain=output comment="Mark new inbound route wan1" connection-mark=wan1 disabled=no new-routing-mark=static-wan1 passthrough=no
add action=mark-routing chain=output comment="Mark new inbound route wan2" connection-mark=wan2 disabled=no new-routing-mark=static-wan2 passthrough=no
add action=mark-routing chain=output comment="Mark new inbound route wan3" connection-mark=wan3 disabled=no new-routing-mark=static-wan3 passthrough=no
add action=mark-connection chain=prerouting comment="Mark traffic that isn't local with PCC mark rand (3 possibilities) - option 1" connection-state=new disabled=no \
dst-address-type=!local in-interface=lan new-connection-mark=wan1_pcc_conn passthrough=yes per-connection-classifier=both-addresses:3/0
add action=mark-connection chain=prerouting comment="Mark traffic that isn't local with PCC mark rand (3 possibilities) - option 2" connection-state=new disabled=no \
dst-address-type=!local in-interface=lan new-connection-mark=wan2_pcc_conn passthrough=yes per-connection-classifier=both-addresses:3/1
add action=mark-connection chain=prerouting comment="Mark traffic that isn't local with PCC mark rand (3 possibilities) - option 3" connection-state=new disabled=no \
dst-address-type=!local in-interface=lan new-connection-mark=wan3_pcc_conn passthrough=yes per-connection-classifier=both-addresses:3/2
add action=mark-connection chain=prerouting comment="Mark established traffic that isn't local with PCC mark rand (3 possibilities) - option 1" connection-state=\
established disabled=no dst-address-type=!local in-interface=lan new-connection-mark=wan1_pcc_conn passthrough=yes per-connection-classifier=\
both-addresses:3/0
add action=mark-connection chain=prerouting comment="Mark established traffic that isn't local with PCC mark rand (3 possibilities) - option 2" connection-state=\
established disabled=no dst-address-type=!local in-interface=lan new-connection-mark=wan2_pcc_conn passthrough=yes per-connection-classifier=\
both-addresses:3/1
add action=mark-connection chain=prerouting comment="Mark established traffic that isn't local with PCC mark rand (3 possibilities) - option 3" connection-state=\
established disabled=no dst-address-type=!local in-interface=lan new-connection-mark=wan3_pcc_conn passthrough=yes per-connection-classifier=\
both-addresses:3/2
add action=mark-connection chain=prerouting comment="Mark related traffic that isn't local with PCC mark rand (3 possibilities) - option 1" connection-state=related \
disabled=no dst-address-type=!local in-interface=lan new-connection-mark=wan1_pcc_conn passthrough=yes per-connection-classifier=both-addresses:3/0
add action=mark-connection chain=prerouting comment="Mark related traffic that isn't local with PCC mark rand (3 possibilities) - option 2" connection-state=related \
disabled=no dst-address-type=!local in-interface=lan new-connection-mark=wan2_pcc_conn passthrough=yes per-connection-classifier=both-addresses:3/1
add action=mark-connection chain=prerouting comment="Mark related traffic that isn't local with PCC mark rand (3 possibilities) - option 3" connection-state=related \
disabled=no dst-address-type=!local in-interface=lan new-connection-mark=wan3_pcc_conn passthrough=yes per-connection-classifier=both-addresses:3/2
add action=mark-routing chain=prerouting comment="Mark routing for  PCC mark - option 1" connection-mark=wan1_pcc_conn disabled=no new-routing-mark=wan1 passthrough=\
yes
add action=mark-routing chain=prerouting comment="Mark routing for  PCC mark - option 2" connection-mark=wan2_pcc_conn disabled=no new-routing-mark=wan2 passthrough=\
yes
add action=mark-routing chain=prerouting comment="Mark routing for  PCC mark - option 3" connection-mark=wan3_pcc_conn disabled=no new-routing-mark=wan3 passthrough=\
yes

MikroTik WAN Load Balancing

You can now get MikroTik training direct from Manito Networks. MikroTik Security Guide and Networking with MikroTik: MTCNA Study Guide by Tyler Hart are both available in paperback and Kindle!

Preface

Some of the most requested topics folks ask me for are multi-WAN and load balancing implementations. Unfortunately, as easy as most solutions are on MikroTik, these aren’t simple. Many vendors like Ubiquiti have wizards that you can use during the initial device setup to configure multi-WAN and load balancing, but that hasn’t come to RouterOS yet. Those wizard-based implementations are still complex, but that complexity is hidden from the device administrators.

Using a load balanced multi-WAN setup helps us meet a few design goals:

  • Failover in case of ISP failure
  • Increase total available bandwidth for users
  • Distribute bandwidth utilization across providers

Something that should be noted before you go further – this is a fairly complex topic. Multi-WAN and load balancing requires us to configure multiple gateways and default routes, connection and router mark Mangle rules, and multiple outbound NAT rules. If you aren’t familiar with MikroTik firewalls, routing, and NAT then it might be best to put this off until you’ve had some time to revisit those topics.

Navigation

  1. Router Setup
  2. Input Output Marking
  3. Route Marking
  4. Special Default Routes
  5. Summary

Router Setup

A single MikroTik router is connected to two ISPs (Charter and Integra Telecom) on ether1 and ether2 respectively, and a LAN on ether3. Traffic from the LAN will be NAT’d out both WAN ports and load balanced. See the topology below:

Configure the local IP addresses:

/ip address
add address=1.1.1.199/24 interface=ether1 comment="Charter"
add address=2.2.2.199/24 interface=ether2 comment="Integra Telecom"
add address=192.168.1.1/24 interface=ether3 comment="LAN Gateway"

Set the default gateways:

/ip route
add dst-address=0.0.0.0/0 check-gateway=ping gateway=1.1.1.1,2.2.2.1

NAT (masquerade) out the WAN ports:

/ip firewall nat
add action=masquerade chain=srcnat comment="Charter" out-interface=ether1
add action=masquerade chain=srcnat comment="Integra Telecom" out-interface=ether2

At this point you could stop configuring the router and things would work just fine in a failover situation. Should one of the two providers go down the other would be used. However there is no load-balancing, and this is strictly a failover-only solution. Most organizations wouldn’t want to pay for a second circuit only to have it used just when the first goes down.

Input Output Marking

One problem with having more than one WAN is that packets coming in one WAN interface might go out the other. This could cause issues, and may break VPN-based networks. We want packets that belong to the same connection to go in and out the same WAN port. Should one provider go down the connections across that port would die, then get re-established over the other WAN. Mark connections coming in the router on each WAN:

/ip firewall mangle
add action=mark-connection chain=input comment="Charter Input" in-interface=ether1 new-connection-mark="Charter Input"

add action=mark-connection chain=input comment="Integra Telecom Input" in-interface=ether2 new-connection-mark="Integra Telecom Input"

This helps the router keep track of what port each connection came in from.

Now we’ll use the connection mark just created for packets coming IN to trigger a routing mark. This routing mark will be used later on in a route that tells a connection which provider’s port to go OUT.

add action=mark-routing chain=output comment="Charter Output" connection-mark="Charter Input" new-routing-mark="Out Charter"

add action=mark-routing chain=output comment="Integra Telecom Output" connection-mark="Integra Telecom Input" new-routing-mark="Out Integra Telecom"

Connections that have been marked then get a routing mark so the router can route the way we want. In the next step we’ll have the router send packets in the connections with those marks out the corresponding WAN interface.

LAN Route Marking

Some special Mangle rules are needed to tell the router to load balance headed across the router from the LAN. How this load balancing works is beyond the scope of this article, but suffice to say a lot of hashing happens. If you want to learn more check out the MikroTik documentation.

These rules tell the router to balance traffic coming in ether3 (LAN), heading to any non-local (!local) address over the Internet. We grab the traffic in the pre-routing chain, so we can redirect it to the WAN port that we want based on the routing mark.

The following commands balance ether3 LAN traffic across two groups:

add action=mark-routing chain=prerouting comment="LAN load balancing 2-0" \
    dst-address-type=!local in-interface=ether3 new-routing-mark=\
    "Out Charter" passthrough=yes per-connection-classifier=\
    both-addresses-and-ports:2/0
add action=mark-routing chain=prerouting comment="LAN load balancing 2-1" \
    dst-address-type=!local in-interface=ether3 new-routing-mark=\
    "Out Integra Telecom" passthrough=yes per-connection-classifier=\
    both-addresses-and-ports:2/1

NOTE: The routing marks above are the same in this step as they were in the previous step, and correspond with the routes we’re about to create.

Special Default Routes

At this point we’ve marked connections coming in the WANs, and used those connection marks to create routing marks. LAN load balancing steps above also create routing marks, and they correspond with what the next step does. Create default routes that grab traffic with the routing marks we created above:

/ip route
add distance=1 gateway=1.1.1.1 routing-mark="Out Charter"
add distance=1 gateway=2.2.2.1 routing-mark="Out Integra Telecom"

Note: These routes only get applied with a matching routing mark. Unmarked packets use the other default route rule created during router setup.

Routes that came in the Charter connection get a connection mark. That connection mark triggers a routing mark. The routing mark matches the mark in the route above, and the return packet goes out the interface it came in.

Summary

Here’s what we’ve configured:

  1. New connections inbound on a WAN get marked
  2. Connections with that mark get a routing mark
  3. LAN traffic heading outbound gets load balanced with the same routing marks
  4. Routing marks match default gateway routes and head out that interface
  5. Wash, Rinse, Repeat
Free Web Hosting