Web Server

Setting up a WordPress cluster for huge sites

If you have a huge site, chances are you also do a lot of data processing – imports, exports, calculations etc.

These kind of batch processing jobs that max out the CPU and disk are the mortal enemy of real-time transactions. Your web visitors demand real-time interaction and fast response from your site, so if you are running imports and maxing out your CPU and disk on the same server hosting your web traffic then your users are regularly going to encounter slowness. This leads to loss of interest from your visitors, loss of sales and loss of SEO rank.

Ultimately, to solve this, once you have exhausted scaling up, you need to architect a better solution.

Scaling Up WordPress – check before building your cluster!

If you are considering building a cluster, it means you think you can’t get more speed from a single server. If you have not yet used our Super Speedy Pack yet then you should definitely try that before building a cluster. We built our Super Speedy Pack to solve search, filtering and underlying scalability issues exhibited in WordPress and WooCommerce.

It is not uncommon for customers with large sites to get 10x or more speed boost from our Super Speedy Plugin pack so prior to building your cluster, check out our Super Speedy Plugin pack.

Scaling Out with a WordPress Cluster

You need to separate the batch processing from the realtime stuff. That means you need a minimum of 2 servers. 1 server processes all the data imports, exports, calculations, category counts, etc – the data is replicated to the 2nd server and that server serves your web traffic.

If you’re going to the bother of getting 2 servers, you’re better off going further and getting 3 servers. It’s very little extra hassle and then gives you the ability to have 3 servers online at once with no batch processing, or 1 or 2 of the servers handling batch processing and the remaining ones serving web traffic.

Using this model, you can also easily switch servers offline to upgrade them without interrupting visitors to your website. That means you can be online 100% of the time!

Note that this setup technically uses 4 servers – the 4th server being a load balancer. Instead of this server, you could use the Digital Ocean load balancer feature/server instead but I provide details below for installing this easily.

If you’re looking at building a cluster for more speed, you may find our plugin pack will help give you the speed boost you need.

Step by step guide to building your cluster

This is the guide I use to install these clusters, so hopefully it helps some of you out there who wish to go huge with your WordPress sites.

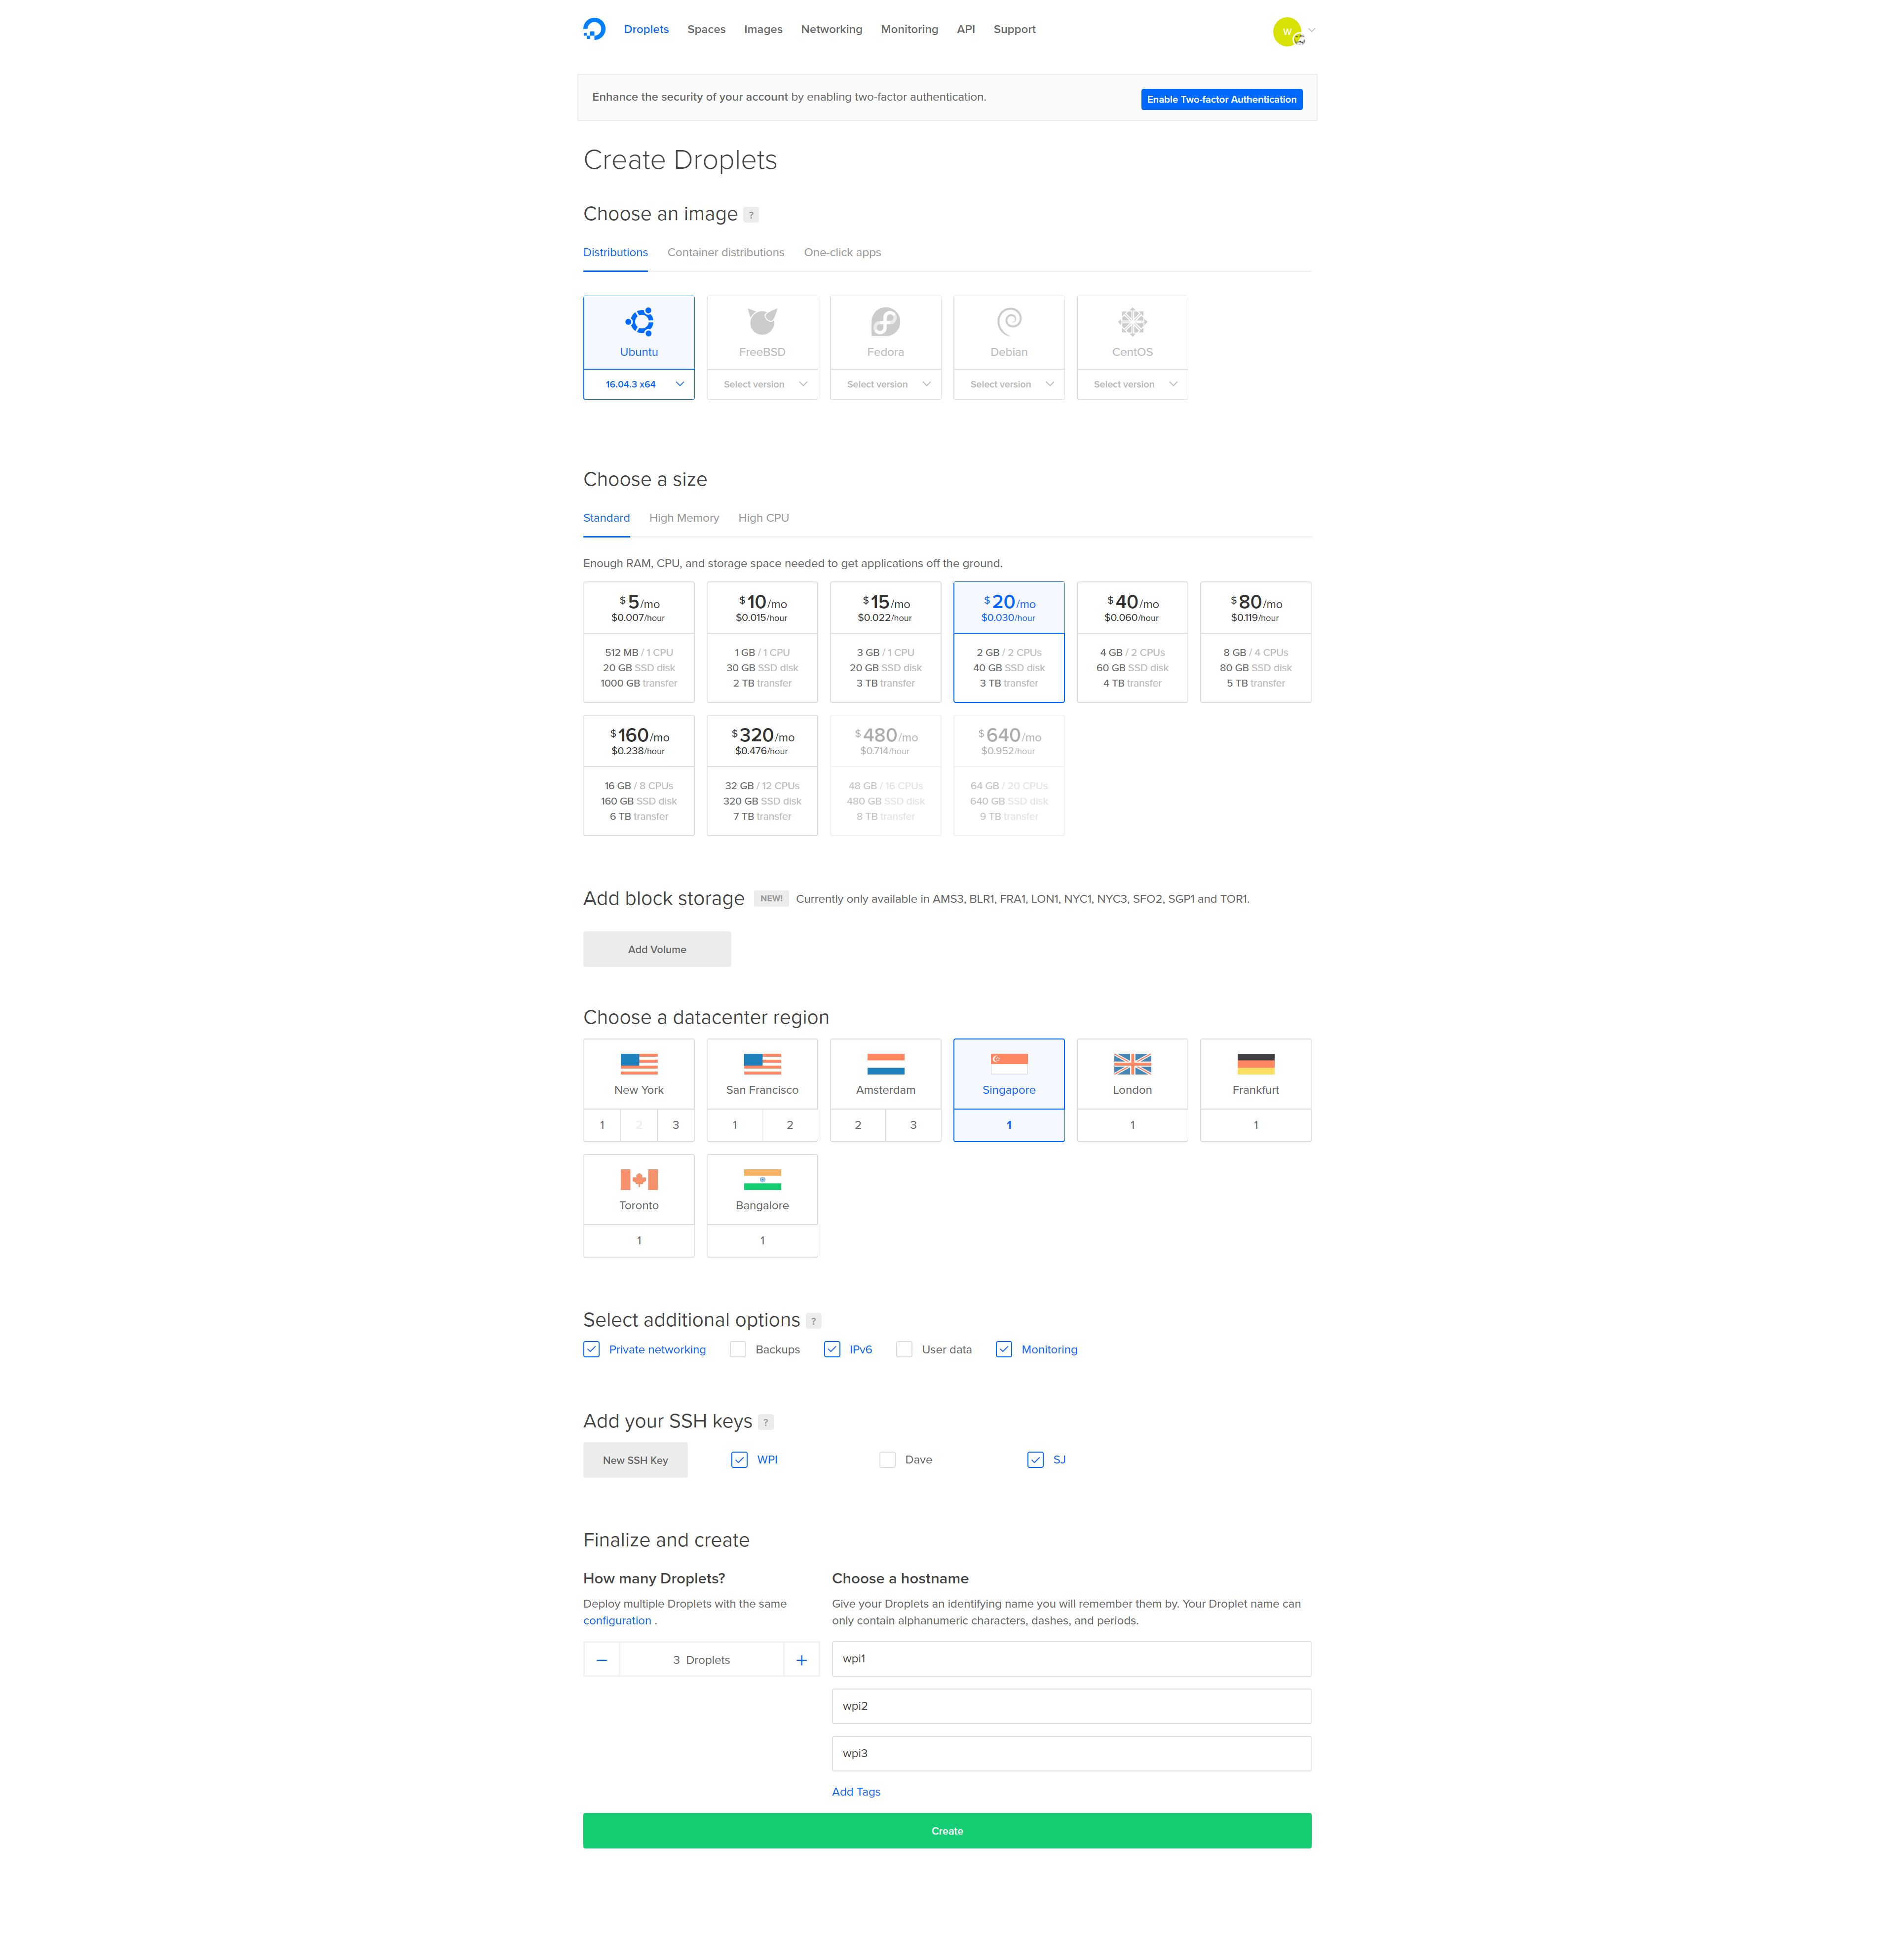
Create 3 Ubuntu 16.04 servers

I like Digital Ocean, so this guide is using their hosting, but you can use any host provided they offer private networking and Ubuntu 16.04.

Create 3 Ubuntu 16.04 (or 3 servers on any platform) – they make it easy to make multiple at once – make sure to enable private networking and add your ssh key.
Install PerconaDB XtraDB Cluster on your cluster-nodes

Log into your 3 droplets and run the following commands on each node:

wget https://repo.percona.com/apt/percona-release_0.1-4.$(lsb_release -sc)_all.deb
dpkg -i percona-release_0.1-4.$(lsb_release -sc)_all.deb
apt-get update
apt-get upgrade
apt-get install percona-xtradb-cluster-57

Note: You will be asked to enter a new root password for the cluster. To make life easier, use the same password for each PerconaDB node, or leave the root password blank and it will infer security if you log in as root and connect.

Configure private networking

We want the nodes to share data over the private network, rather than out and in from your hosting company. This prevents crazy bandwidth costs, speeds things up and improves security.

Even though private networking is already enabled, we need to be able to reliably use eth1 (rather than eth0) as the private network device.

On each node edit the grub networking file. I prefer vi to edit files, but you can use nano or even edit the files with Filezilla.

vi /etc/default/grub.d/50-cloudimg-settings.cfg

Find the line that begins GRUB_CMDLINE_LINUX_DEFAULT and alter it as follows (add net.ifnames=0):

GRUB_CMDLINE_LINUX_DEFAULT="console=tty1 console=ttyS0 net.ifnames=0"
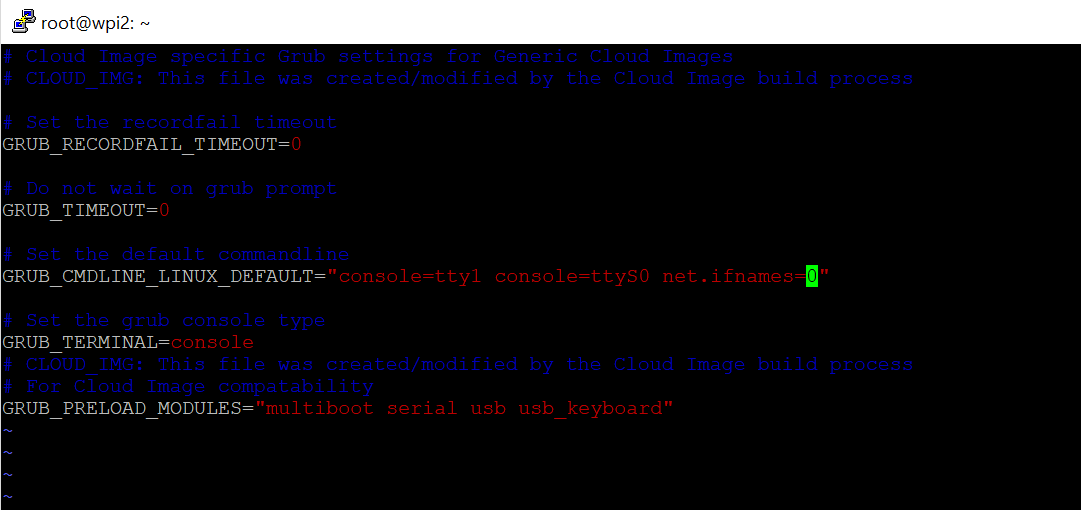
Save the file then run the update grub command and reboot (only time I know of where you need to reboot a linux box!).

update-grub
shutdown -r now

Repeat the above for all your nodes. Then you can check config with this:

ifconfig -a

You should see the public IP address against eth0 and the private address against eth1.

You can also view each ethernet devices configuration here:

cat /etc/network/interfaces.d/50-cloud-init.cfg

The file above will already be configured if you selected private networking when you created the droplet.

Take a note of the private IP address for each of your 3 nodes. This information is also available from your Digital Ocean interface when you click through to each droplet.

You can test private networking is working by pinging the private IP address of another node from one of the nodes:

ping 10.130.45.161

Configure replication

Firstly, we need a replication user. Create this user on all 3 nodes.

Log into mysql:

mysql

or if you chose a password for your mysql server earlier, use this:

mysql -u root -p

Enter the root DB password you chose earlier then create a new user for replication purposes (choose a strong password and note it down so we can add it to the configuration files):

CREATE USER 'sstuser'@'localhost' IDENTIFIED BY 'password';
GRANT RELOAD, LOCK TABLES, PROCESS, REPLICATION CLIENT ON *.* TO 'sstuser'@'localhost';
FLUSH PRIVILEGES;

Next exit MySQL by typing ‘exit’ then hitting enter, then stop MySQL on all 3 nodes using:

service mysql stop

On node1, customise the configuration file below according to your private IP addresses and replication user password enter it into this file:

vi /etc/mysql/percona-xtradb-cluster.conf.d/wsrep.cnf
  1. Enter the 3 private IP addresses for wsrep_cluster_address, separated by commas.
  2. Enter node 1 private IP address for  wsrep_node_address.
  3. Enter the sst password for wsrep_sst_auth.
  4. Change the name of the node on the line wsrep_node_name

Your file will end up looking something like this (lines in bold are the lines you need to alter from the default config):

[mysqld]
# Path to Galera library
wsrep_provider=/usr/lib/galera3/libgalera_smm.so

# Cluster connection URL contains IPs of nodes
#If no IP is found, this implies that a new cluster needs to be created,
#in order to do that you need to bootstrap this node
wsrep_cluster_address=gcomm://10.130.45.161,10.130.47.4,10.130.47.11

# In order for Galera to work correctly binlog format should be ROW
binlog_format=ROW

# MyISAM storage engine has only experimental support
default_storage_engine=InnoDB

# Slave thread to use
wsrep_slave_threads= 8

wsrep_log_conflicts
# This changes how InnoDB autoincrement locks are managed and is a requirement for Galera
innodb_autoinc_lock_mode=2

# Node IP address
wsrep_node_address=10.130.45.161
# Cluster name
wsrep_cluster_name=pxc-cluster

#If wsrep_node_name is not specified, then system hostname will be used
wsrep_node_name=pxc-cluster-node-1

#pxc_strict_mode allowed values: DISABLED,PERMISSIVE,ENFORCING,MASTER
pxc_strict_mode=ENFORCING

# SST method
wsrep_sst_method=xtrabackup-v2

#Authentication for SST method
wsrep_sst_auth="sstuser:password"

Note: You will also need to remove the # comment from the beginning of the lines with the wsrep_node_address and the wsrep_sst_auth.

Copy the contents of the file and then save it. Configure node 2 and node 3 by editing the same file on those nodes and altering 2 rows from the file above:

  1. Change wsrep_node_address to be the private IP address of node 2 (or node 3 for that node)
  2. Change wsrep_node_name to pxc-cluster-node-2 or pxc-cluster-node-3

Once you’ve done this, you’re ready to bootstrap your cluster.

Bootstrap your cluster

On node 1, run the following command:

/etc/init.d/mysql bootstrap-pxc

Check it’s running by logging into mysql and running this command:

show status like 'wsrep%';

Note: The above command can be useful in future to check for replication status – you can see things like how many items are queued to be replicated amongst other details.

On node 2 and 3, run the following:

/etc/init.d/mysql start

You now have a Percona cluster with 3 nodes replicating data to each other.

Install Nginx and PHP 7 on all 3 nodes

On each node, install Nginx and PHP 7 using the following sequence of commands:

apt-get install nginx
apt-get install php7.0
apt-get install php7.0-curl 
apt-get install php7.0-gd 
apt-get install php7.0-intl 
apt-get install php7.0-mysql 
apt-get install php-memcached
apt-get install php7.0-mbstring
apt-get install php7.0-zip
apt-get install php7.0-xml
apt-get install php7.0-mcrypt
apt-get install unzip

A faster way to run all of the above would be using this single line:

apt-get install -y nginx php7.0 php7.0-curl php7.0-gd php7.0-intl php7.0-mysql php-memcached php7.0-mbstring php7.0-zip php7.0-xml php7.0-mcrypt unzip


Install Unison for file replication

After much testing, GlusterFS is not well-suited to WordPress file-replication. GlusterFS slows down a LOT when there are a lot of files in each directory. The guide has been updated to use Unison instead. This Unison setup uses a star schema for file replication, with node 1 at the centre of the star.

node 1 <--> node 2 file replication	
node 1 <--> node 3 file replication

That means a file edit on node 3 will replicate to node 1 and then to node 2. A file edit on node 1 will replicate out directly to node 2 and 3. Because of this, it makes sense to make node 1 our wp-admin server where we upload plugin files. Because of this star schema for file replication, node 1 is your most important node. If it goes down, or you switch it off, file replication will be paused until you bring it back online.

On each node, install unison:

apt-get -y install unison openssh-server

This will allow us to run the replication commands later once we have installed the WordPress files.

Configure SSH so nodes can connect to each other

SSH access is required for Unison to be able to replicate files. Run the following on all 3 nodes:

ssh-keygen

Hit enter 3 times to accept 3 defaults inc 2 blank passwords for the keyfile so it works non-interactively
Now, grab a copy of the id_rsa.pub files for each node and paste them into the other 2 nodes authorized_keys file. Find the public keys of each node by running this command:

cat /root/.ssh/id_rsa.pub

Then paste those public keys into the authorized_keys file of the other 2 nodes:

vi /root/.ssh/authorized_keys

Authenticate each node

On node 1, run:

ssh ipofnode2
ssh ipofnode3

You will be asked if you wish to trust the other node. Answer yes.

Repeat this on node 2 and node 3, connecting to the other 2 nodes.

Replicate the web folder files using Unison

Now that we have ssh authentication, we can set up Unison to replicate the website files to node 2 and 3. Run the following commands on node 1 of your cluster:

unison /var/www ssh://10.130.47.4//var/www -owner -group	
unison /var/www ssh://10.130.47.11//var/www -owner -group

Note: replace the IP addresses with your own and the folder names with your own.

Since you have no files yet in /var/www these commands will complete quickly.

Now set up a crontab/cron job for Unison. Run the following command:

crontab -e

Choose whatever editor you prefer when it asks you then append the following to the end of the file:

* * * * * unison -batch /var/www ssh://10.130.47.4//var/www &> /dev/null	
* * * * * unison -batch /var/www ssh://10.130.47.11//var/www &> /dev/null

Change IP addresses and folder locations. Use internal IP addresses so traffic goes over the faster internal network card.

Install WordPress files onto Node 1 only

Because we are using file replication and we already have database replication in our cluster, we only need to install WordPress onto node 1. On node 1, run the following:

wget https://wordpress.org/latest.zip -P /var/www/
unzip /var/www/latest.zip -d /var/www/
mv /var/www/wordpress /var/www/wpicluster
chown www-data:www-data /var/www/wpicluster -R
rm /var/www/latest.zip

Note: Instead of /var/www/wpicluster you could use /var/www/yourdomain.com but if you do, ensure you alter the nginx config files in the next section.

Configure Nginx to load your WordPress site on each node

I’ve created some configuration files to make this part quicker and easier. The configuration files set Nginx up to work over port 80 – later, we will add SSL to our load balancer. This reduces load on our servers since they won’t have to decrypt SSL traffic.

The configuration files here also configure the Nginx fastcgi-cache, so you don’t need to install Varnish. They’re also domain-name independent, so no configuration required.

On all 3 nodes, run the following commands:

git clone https://github.com/dhilditch/wordpress-cluster /root/wordpress-cluster/
cp /root/wordpress-cluster/etc/nginx/* -R /etc/nginx/
ln -s /etc/nginx/sites-available/wpintense.cluster.conf /etc/nginx/sites-enabled/
mkdir /sites/wpicluster/cache -p
service nginx restart

Set up your Load Balancer

Digital Ocean provide a load balancer, but with that approach you have to manually renew your SSL certificates. Plus you get less control – we want control so we can send wp-admin traffic to node 1. So follow the instructions below to set up your own load balancer.

First, create a droplet with Ubuntu 16.04 again, private networking and your SSH keys.

Then log onto your load balancer droplet and run the following commands:

add-apt-repository ppa:nginx/stable
apt-get update
apt-get install nginx

Then create a new file at /etc/nginx/conf.d/loadbalancer.conf.

vi /etc/nginx/conf.d/loadbalancer.conf

This will automatically be loaded when you restart nginx. Enter the following in the file, adjusted for your private IP addresses.

upstream clusterwpadmin {
     server 10.130.45.161; 
}
upstream clusternodes {
     ip_hash;
 server 10.130.47.4 max_fails=3; 
 server 10.130.47.11 max_fails=3;
}
server {
     listen 80;
# this block is for letsencrypt
 root /var/www/html;
 location ~ /.well-known {
      allow all;
  try_files $uri $uri/ =404;
 } 
 server_name _;
 #return 301 https://$host$request_uri;
 location ~ /wp-(admin/|login\.php\b|cron\.php) {
     proxy_pass http://clusterwpadmin;
 proxy_set_header X-Forwarded-Host $host;
 proxy_set_header X-Forwarded-Server $host;
 proxy_set_header X-Forwarded-For $proxy_add_x_forwarded_for;
 proxy_set_header X-Forwarded-Proto $scheme;
 proxy_set_header X-Real-IP $remote_addr;
 proxy_set_header Host $host;
 }
location / {
     proxy_pass http://clusternodes;
 proxy_set_header X-Forwarded-Host $host;
 proxy_set_header X-Forwarded-Server $host;
 proxy_set_header X-Forwarded-For $proxy_add_x_forwarded_for;
 proxy_set_header X-Forwarded-Proto $scheme;
 proxy_set_header X-Real-IP $remote_addr;
 proxy_set_header Host $host;
 }
}
server {
     listen 443 ssl;
 #ssl_certificate /etc/letsencrypt/live/yourdomain.com/cert.pem;
 #ssl_certificate_key /etc/letsencrypt/live/yourdomain.com/privkey.pem;
location ~ /wp-(admin/|login\.php\b|cron\.php) { 
     proxy_pass http://clusterwpadmin; 
 proxy_set_header X-Forwarded-Host $host; 
 proxy_set_header X-Forwarded-Server $host; 
 proxy_set_header X-Forwarded-For $proxy_add_x_forwarded_for; 
 proxy_set_header X-Forwarded-Proto $scheme; 
 proxy_set_header X-Real-IP $remote_addr; 
 proxy_set_header Host $host; 
 }
location / {
     proxy_pass http://clusternodes;
 proxy_set_header X-Forwarded-Host $host;
 proxy_set_header X-Forwarded-Server $host;
 proxy_set_header X-Forwarded-For $proxy_add_x_forwarded_for;
 proxy_set_header X-Forwarded-Proto $scheme;
 proxy_set_header X-Real-IP $remote_addr;
 proxy_set_header Host $host;
 }
}
#if a user connects to yourdomain.com:9443 they will be directed to node 1. This is where admins should connect to add plugins etc.
server {
     listen 9443 ssl;
 server_name _;
 #ssl_certificate /etc/letsencrypt/live/yourdomain.com/cert.pem;
 #ssl_certificate_key /etc/letsencrypt/live/yourdomain.com/privkey.pem;
location / {
     proxy_pass http://clusterwpadmin;
 proxy_set_header X-Forwarded-Host $host;
 proxy_set_header X-Forwarded-Server $host;
 proxy_set_header X-Forwarded-For $proxy_add_x_forwarded_for;
 proxy_set_header X-Forwarded-Proto $scheme;
 proxy_set_header X-Real-IP $remote_addr;
 proxy_set_header Host $host;
 }
}

Save that file then you can restart nginx using:
service nginx restart

SaveNow, log into your DNS provider and point your new domain name at the public IP address of your loadbalancer node.

Configure WordPress

Now that we have database and file replication set up, and a load balancer, we can go about starting the 5-minute install of WordPress.

On node 1, connect to mysql using:

mysql -p (or just mysql if no root password)

Note: you’ll be asked for your password, so paste it in – right-click in putty is paste, and it’ll look like nothing happened because it’s a password field, but it does paste.

create database wpicluster;
grant all privileges on wpicluster.* to wpi@localhost identified by 'CHOOSEASTRONGPASSWORD';

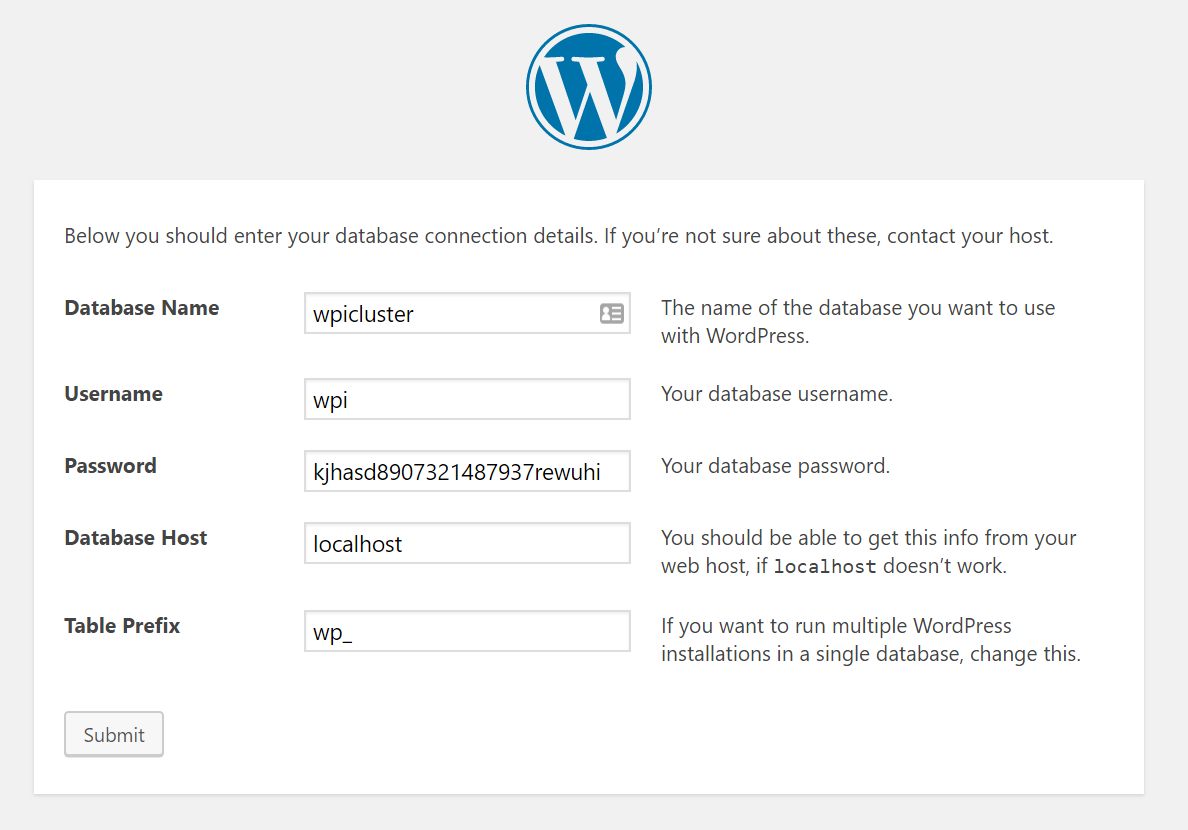
Visit the URL you chose earlier for your loadbalancer, e.g. http://www.yourdomain.com.

Choose your language, then enter the database name: wpicluster, the username: wpi and the password you chose in the GRANT command above.
Set up WordPress Cron on only node 1

WP Cron is awful. It relies on users visiting your site in order to run scheduled tasks. In this case, we don’t even want scheduled jobs running on node 2 or 3, so we’ll disable wp cron across all nodes and then implement a real cron job on node 1.

On node 1, edit /var/www/wpicluster/wp-config.php. This file edit will replicate to your other nodes.

vi /var/www/wpicluster/wp-config.php

and insert the following lines somewhere:

define('WP_DISABLE_CRON', true);
if (strpos($_SERVER['HTTP_X_FORWARDED_PROTO'], 'https') !== false) {
 $_SERVER['HTTPS']='on';
}

Note: Only the first line is to disable WP_CRON. The rest is for later when we forward traffic from our load balancer and we want to ensure WordPress knows to server up static files over HTTPS if that was what the user requested.

If you’re struggling to figure out where to put this code, you can stick it after the define(‘DB_NAME’, ….); line.

This wp-config.php update will replicate out to the other nodes using GlusterFS, so you don’t need to modify this on the other nodes.

Now run:

crontab -e

And add an extra line as follows:

* * * * * wget http://yourdomain.com:9443/wp-cron.php?doing_cron &> /dev/null

Set up SSL on your load balancer

Now get your free SSL certificates from LetsEncrypt. On your load balancer node, run the following:

add-apt-repository ppa:certbot/certbot
apt-get update
apt-get install certbot
certbot certonly --webroot --webroot-path=/var/www/html -d yourdomain.com -d www.yourdomain.com

You should get a note telling you CONGRATULATIONS.  It will also tell you the location the key files were saved to. Now edit the loadbalancer.conf file from earlier to set up SSL. (WordPress installation does not work well over SSL which is why we add SSL after installation)

vi /etc/nginx/conf.d/loadbalancer.conf

Uncomment the ssl_certificate (x2) and ssl_certificate_key (x2) lines and replace the path with the paths provided by the output from LetsEncrypt.

Also uncomment the line “return 301 https://$host$request_uri;”

service nginx restart

Once you have edited the loadbalancer.conf file and restarted nginx, you will have a working SSL certificate on your load balancer.

Note: At this point, if you access your website with https, some CSS will appear broken. There is one final stage we have to complete in order to fix this, which is almost the final step in the entire process.

Update your Site URL in WordPress

Log into node1.yourdomain.com. Visit the WordPress dashboard, then Settings->General.

You will see 2 domain entries, both of which are probably currently tied to your node 1 subdomain, and both of which will be http instead of https.

Replace both of these entries with https://www.yourdomain.com.
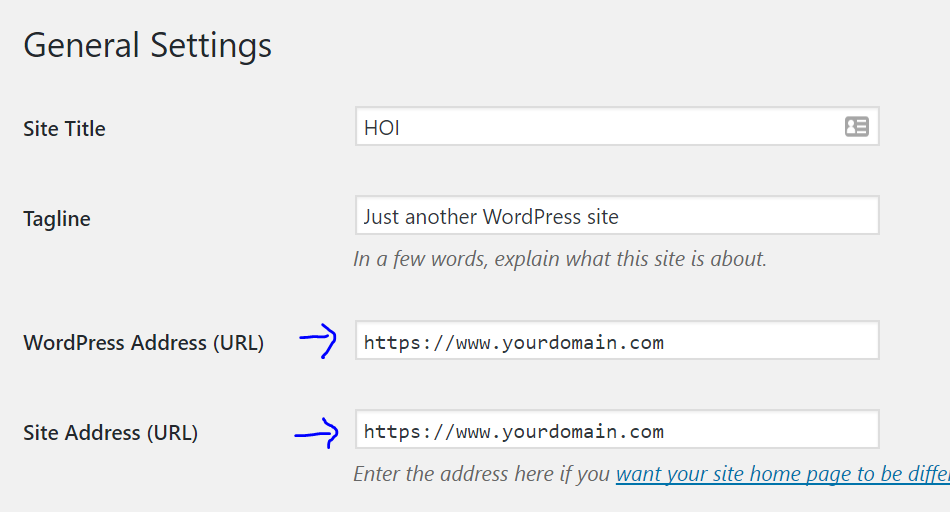
Note: Here you enter the domain name you chose for your load balancer, normally www.yourdomain.com or similar.

If you didn’t already, edit your wp-config.php file on Node 1 and just below where you disabled WP_CRON, add the following lines:

if (strpos($_SERVER['HTTP_X_FORWARDED_PROTO'], 'https') !== false) {
  $_SERVER['HTTPS']='on';
}

The traffic is being served over https to your users, but because it’s plain http on each node (between your load balancer and your nodes), you need to make sure WordPress knows it’s HTTPS so any static files are correctly loaded over HTTPS.

Go forth and conquer!

That’s it, a mammoth task complete.

You can visit wp-admin from any server, but you can also force traffic to node 1 for your own admin purposes by visiting https://www.yourdomain.com:9443/wp-admin/. With the configuration above, node 1 is never serving traffic to front-end users, so you can run all kinds of admin jobs on there without impacting slowing down user traffic.

If anyone has any questions, fire away!

Nginx, Varnish and WordPress with SSL Termination

Assuming you’ve already got your reverse proxy running, in wp-config.php add the following:


/** TLS/HTTPS fixes **/
// in some setups HTTP_X_FORWARDED_PROTO might contain a comma-separated list
// e.g. http,https so check for https existence.
if (strpos($_SERVER['HTTP_X_FORWARDED_PROTO'], 'https') !== false) {
    // update HTTPS server variable to always 'pretend' incoming requests were 
    // performed via the HTTPS protocol.
    $_SERVER['HTTPS']='on';
}


server {
listen 443 ssl http2 default_server;
listen [::]:443 ssl http2;
server_name afrim.com www.afrim.com;
port_in_redirect off;

ssl on;
ssl_certificate /etc/nginx/ssl/afrim_com_crt.crt;
ssl_certificate_key /etc/nginx/ssl/afrim_com.key;

location / {
proxy_pass http://127.0.0.1:80;
proxy_set_header Host $http_host;
proxy_set_header X-Forwarded-Host $http_host;
proxy_set_header X-Real-IP $remote_addr;
proxy_set_header X-Forwarded-For $proxy_add_x_forwarded_for;
proxy_set_header X-Forwarded-Proto https;
proxy_set_header HTTPS "on";
}
}

server {
listen 8080;
listen [::]:8080;
server_name afrim.com www.afrim.com;
root /var/www/html/;
index index.php;
port_in_redirect off;

location / {
try_files $uri $uri/ /index.php?$args;
}

location ~ \.php$ {
include snippets/fastcgi-php.conf;
fastcgi_pass unix:/var/run/php/php7.4-fpm.sock;
}

}

server {
listen 8080;
listen [::]:8080;
server_name afrim.com www.afrim.com;
return 301 https://afrim.com$request_uri;
}

—————————–


vcl 4.1;

import proxy;

backend default {
.host = "127.0.0.1";
.port = 8080;
}

sub vcl_recv {
if ((req.http.X-Forwarded-Proto && req.http.X-Forwarded-Proto != "https") ||
(req.http.Scheme && req.http.Scheme != "https")) {
return (synth(750));
} elseif (!req.http.X-Forwarded-Proto && !req.http.Scheme && !proxy.is_ssl()) {
return (synth(750));
}
}

sub vcl_synth {
if (resp.status == 750) {
set resp.status = 301;
set resp.http.location = "https://" + req.http.Host + req.url;
set resp.reason = "Moved";
return (deliver);
}
}

Apache SSL Termination (HTTPS Varnish cache)

General approach

Varnish configuration

...
backend default {
    .host = "127.0.0.1";
    .port = "8080";
}
...

Apache configuration


  ServerName localhost.com
  DocumentRoot /var/www/magento/pub

    RequestHeader set X-Forwarded-Proto "https"
    ServerName localhost.com

    SSLEngine On
    SSLCertificateFile /etc/apache2/ssl/cert.crt
    SSLCertificateKeyFile /etc/apache2/ssl/cert.key

    ProxyPreserveHost On
    ProxyPass / http://127.0.0.1:80/
    ProxyPassReverse / http://127.0.0.1:80/

Apache modules

sudo a2enmod ssl
sudo a2enmod rewrite
sudo a2enmod headers
sudo a2enmod proxy
sudo a2enmod proxy_balancer
sudo a2enmod proxy_http
sudo service apache2 restart


How To Install Nginx on Ubuntu 20.04

Introduction

Nginx is one of the most popular web servers in the world and is responsible for hosting some of the largest and highest-traffic sites on the internet. It is a lightweight choice that can be used as either a web server or reverse proxy.

In this guide, we’ll discuss how to install Nginx on your Ubuntu 20.04 server, adjust the firewall, manage the Nginx process, and set up server blocks for hosting more than one domain from a single server.

Prerequisites

Before you begin this guide, you should have a regular, non-root user with sudo privileges configured on your server. You can learn how to configure a regular user account by following our Initial server setup guide for Ubuntu 20.04.

You will also optionally want to have registered a domain name before completing the last steps of this tutorial. To learn more about setting up a domain name with DigitalOcean, please refer to our Introduction to DigitalOcean DNS.

When you have an account available, log in as your non-root user to begin.

Step 1 – Installing Nginx

Because Nginx is available in Ubuntu’s default repositories, it is possible to install it from these repositories using the apt packaging system.

Since this is our first interaction with the apt packaging system in this session, we will update our local package index so that we have access to the most recent package listings. Afterwards, we can install nginx:

  1. sudo apt update
  2. sudo apt install nginx

After accepting the procedure, apt will install Nginx and any required dependencies to your server.

Step 2 – Adjusting the Firewall

Before testing Nginx, the firewall software needs to be adjusted to allow access to the service. Nginx registers itself as a service with ufw upon installation, making it straightforward to allow Nginx access.

List the application configurations that ufw knows how to work with by typing:

  1. sudo ufw app list

You should get a listing of the application profiles:

Output
Available applications:
  Nginx Full
  Nginx HTTP
  Nginx HTTPS
  OpenSSH

As demonstrated by the output, there are three profiles available for Nginx:

  • Nginx Full: This profile opens both port 80 (normal, unencrypted web traffic) and port 443 (TLS/SSL encrypted traffic)
  • Nginx HTTP: This profile opens only port 80 (normal, unencrypted web traffic)
  • Nginx HTTPS: This profile opens only port 443 (TLS/SSL encrypted traffic)

It is recommended that you enable the most restrictive profile that will still allow the traffic you’ve configured. Right now, we will only need to allow traffic on port 80.

You can enable this by typing:

  1. sudo ufw allow ‘Nginx HTTP’

You can verify the change by typing:

  1. sudo ufw status

The output will indicated which HTTP traffic is allowed:

Output
Status: active

To                         Action      From
--                         ------      ----
OpenSSH                    ALLOW       Anywhere                  
Nginx HTTP                 ALLOW       Anywhere                  
OpenSSH (v6)               ALLOW       Anywhere (v6)             
Nginx HTTP (v6)            ALLOW       Anywhere (v6)

Step 3 – Checking your Web Server

At the end of the installation process, Ubuntu 20.04 starts Nginx. The web server should already be up and running.

We can check with the systemd init system to make sure the service is running by typing:

  1. systemctl status nginx
Output
● nginx.service - A high performance web server and a reverse proxy server
   Loaded: loaded (/lib/systemd/system/nginx.service; enabled; vendor preset: enabled)
   Active: active (running) since Fri 2020-04-20 16:08:19 UTC; 3 days ago
     Docs: man:nginx(8)
 Main PID: 2369 (nginx)
    Tasks: 2 (limit: 1153)
   Memory: 3.5M
   CGroup: /system.slice/nginx.service
           ├─2369 nginx: master process /usr/sbin/nginx -g daemon on; master_process on;
           └─2380 nginx: worker process

As confirmed by this out, the service has started successfully. However, the best way to test this is to actually request a page from Nginx.

You can access the default Nginx landing page to confirm that the software is running properly by navigating to your server’s IP address. If you do not know your server’s IP address, you can find it by using the icanhazip.com tool, which will give you your public IP address as received from another location on the internet:

  1. curl -4 icanhazip.com

When you have your server’s IP address, enter it into your browser’s address bar:

http://your_server_ip

You should receive the default Nginx landing page:

Nginx default page

If you are on this page, your server is running correctly and is ready to be managed.

Step 4 – Managing the Nginx Process

Now that you have your web server up and running, let’s review some basic management commands.

To stop your web server, type:

  1. sudo systemctl stop nginx

To start the web server when it is stopped, type:

  1. sudo systemctl start nginx

To stop and then start the service again, type:

  1. sudo systemctl restart nginx

If you are only making configuration changes, Nginx can often reload without dropping connections. To do this, type:

  1. sudo systemctl reload nginx

By default, Nginx is configured to start automatically when the server boots. If this is not what you want, you can disable this behavior by typing:

  1. sudo systemctl disable nginx

To re-enable the service to start up at boot, you can type:

  1. sudo systemctl enable nginx

You have now learned basic management commands and should be ready to configure the site to host more than one domain.

When using the Nginx web server, server blocks (similar to virtual hosts in Apache) can be used to encapsulate configuration details and host more than one domain from a single server. We will set up a domain called your_domain, but you should replace this with your own domain name.

Nginx on Ubuntu 20.04 has one server block enabled by default that is configured to serve documents out of a directory at /var/www/html. While this works well for a single site, it can become unwieldy if you are hosting multiple sites. Instead of modifying /var/www/html, let’s create a directory structure within /var/www for our your_domain site, leaving /var/www/html in place as the default directory to be served if a client request doesn’t match any other sites.

Create the directory for your_domain as follows, using the -p flag to create any necessary parent directories:

  1. sudo mkdir -p /var/www/your_domain/html

Next, assign ownership of the directory with the $USER environment variable:

  1. sudo chown -R $USER:$USER /var/www/your_domain/html

The permissions of your web roots should be correct if you haven’t modified your umask value, which sets default file permissions. To ensure that your permissions are correct and allow the owner to read, write, and execute the files while granting only read and execute permissions to groups and others, you can input the following command:

  1. sudo chmod -R 755 /var/www/your_domain

Next, create a sample index.html page using nano or your favorite editor:

  1. sudo nano /var/www/your_domain/html/index.html

Inside, add the following sample HTML:

/var/www/your_domain/html/index.html
<html>
    <head>
        <title>Welcome to your_domain!title>
    head>
    <body>
        <h1>Success!  The your_domain server block is working!h1>
    body>
html>

Save and close the file by pressing Ctrl+X to exit, then when prompted to save, Y and then Enter.

In order for Nginx to serve this content, it’s necessary to create a server block with the correct directives. Instead of modifying the default configuration file directly, let’s make a new one at /etc/nginx/sites-available/your_domain:

  1. sudo nano /etc/nginx/sites-available/your_domain

Paste in the following configuration block, which is similar to the default, but updated for our new directory and domain name:

/etc/nginx/sites-available/your_domain
server {
        listen 80;
        listen [::]:80;

        root /var/www/your_domain/html;
        index index.html index.htm index.nginx-debian.html;

        server_name your_domain www.your_domain;

        location / {
                try_files $uri $uri/ =404;
        }
}

Notice that we’ve updated the root configuration to our new directory, and the server_name to our domain name.

Next, let’s enable the file by creating a link from it to the sites-enabled directory, which Nginx reads from during startup:

  1. sudo ln -s /etc/nginx/sites-available/your_domain /etc/nginx/sites-enabled/

Note: Nginx uses a common practice called symbolic links, or symlinks, to track which of your server blocks are enabled. Creating a symlink is like creating a shortcut on disk, so that you could later delete the shortcut from the sites-enabled directory while keeping the server block in sites-available if you wanted to enable it.

Two server blocks are now enabled and configured to respond to requests based on their listen and server_name directives (you can read more about how Nginx processes these directives here):

  • your_domain: Will respond to requests for your_domain and www.your_domain.
  • default: Will respond to any requests on port 80 that do not match the other two blocks.

To avoid a possible hash bucket memory problem that can arise from adding additional server names, it is necessary to adjust a single value in the /etc/nginx/nginx.conf file. Open the file:

  1. sudo nano /etc/nginx/nginx.conf

Find the server_names_hash_bucket_size directive and remove the # symbol to uncomment the line. If you are using nano, you can quickly search for words in the file by pressing CTRL and w.

Note: Commenting out lines of code – usually by putting # at the start of a line – is another way of disabling them without needing to actually delete them. Many configuration files ship with multiple options commented out so that they can be enabled or disabled, by toggling them between active code and documentation.

/etc/nginx/nginx.conf
...
http {
    ...
    server_names_hash_bucket_size 64;
    ...
}
...

Save and close the file when you are finished.

Next, test to make sure that there are no syntax errors in any of your Nginx files:

  1. sudo nginx -t

If there aren’t any problems, restart Nginx to enable your changes:

  1. sudo systemctl restart nginx

Nginx should now be serving your domain name. You can test this by navigating to http://your_domain, where you should see something like this:

Nginx first server block

Step 6 – Getting Familiar with Important Nginx Files and Directories

Now that you know how to manage the Nginx service itself, you should take a few minutes to familiarize yourself with a few important directories and files.

Content

  • /var/www/html: The actual web content, which by default only consists of the default Nginx page you saw earlier, is served out of the /var/www/html directory. This can be changed by altering Nginx configuration files.

Server Configuration

  • /etc/nginx: The Nginx configuration directory. All of the Nginx configuration files reside here.
  • /etc/nginx/nginx.conf: The main Nginx configuration file. This can be modified to make changes to the Nginx global configuration.
  • /etc/nginx/sites-available/: The directory where per-site server blocks can be stored. Nginx will not use the configuration files found in this directory unless they are linked to the sites-enabled directory. Typically, all server block configuration is done in this directory, and then enabled by linking to the other directory.
  • /etc/nginx/sites-enabled/: The directory where enabled per-site server blocks are stored. Typically, these are created by linking to configuration files found in the sites-available directory.
  • /etc/nginx/snippets: This directory contains configuration fragments that can be included elsewhere in the Nginx configuration. Potentially repeatable configuration segments are good candidates for refactoring into snippets.

Server Logs

  • /var/log/nginx/access.log: Every request to your web server is recorded in this log file unless Nginx is configured to do otherwise.
  • /var/log/nginx/error.log: Any Nginx errors will be recorded in this log.

Conclusion

Now that you have your web server installed, you have many options for the type of content to serve and the technologies you want to use to create a richer experience.

If you’d like to build out a more complete application stack, check out the article How To Install Linux, Nginx, MySQL, PHP (LEMP stack) on Ubuntu 20.04.

In order to set up HTTPS for your domain name with a free SSL certificate using Let’s Encrypt, you should move on to How To Secure Nginx with Let’s Encrypt on Ubuntu 20.04.

How To Install Nginx on Ubuntu 20.04

Introduction

Nginx is one of the most popular web servers in the world and is responsible for hosting some of the largest and highest-traffic sites on the internet. It is a lightweight choice that can be used as either a web server or reverse proxy.

In this guide, we’ll discuss how to install Nginx on your Ubuntu 20.04 server, adjust the firewall, manage the Nginx process, and set up server blocks for hosting more than one domain from a single server.

Prerequisites

Before you begin this guide, you should have a regular, non-root user with sudo privileges configured on your server. You can learn how to configure a regular user account by following our Initial server setup guide for Ubuntu 20.04.

You will also optionally want to have registered a domain name before completing the last steps of this tutorial. To learn more about setting up a domain name with DigitalOcean, please refer to our Introduction to DigitalOcean DNS.

When you have an account available, log in as your non-root user to begin.

Step 1 – Installing Nginx

Because Nginx is available in Ubuntu’s default repositories, it is possible to install it from these repositories using the apt packaging system.

Since this is our first interaction with the apt packaging system in this session, we will update our local package index so that we have access to the most recent package listings. Afterwards, we can install nginx:

  1. sudo apt update
  2. sudo apt install nginx

After accepting the procedure, apt will install Nginx and any required dependencies to your server.

Step 2 – Adjusting the Firewall

Before testing Nginx, the firewall software needs to be adjusted to allow access to the service. Nginx registers itself as a service with ufw upon installation, making it straightforward to allow Nginx access.

List the application configurations that ufw knows how to work with by typing:

  1. sudo ufw app list

You should get a listing of the application profiles:

Output
Available applications:
  Nginx Full
  Nginx HTTP
  Nginx HTTPS
  OpenSSH

As demonstrated by the output, there are three profiles available for Nginx:

  • Nginx Full: This profile opens both port 80 (normal, unencrypted web traffic) and port 443 (TLS/SSL encrypted traffic)
  • Nginx HTTP: This profile opens only port 80 (normal, unencrypted web traffic)
  • Nginx HTTPS: This profile opens only port 443 (TLS/SSL encrypted traffic)

It is recommended that you enable the most restrictive profile that will still allow the traffic you’ve configured. Right now, we will only need to allow traffic on port 80.

You can enable this by typing:


  1. sudo ufw allow ‘Nginx HTTP’


You can verify the change by typing:

  1. sudo ufw status

The output will indicated which HTTP traffic is allowed:

Output
Status: active

To                         Action      From
--                         ------      ----
OpenSSH                    ALLOW       Anywhere                  
Nginx HTTP                 ALLOW       Anywhere                  
OpenSSH (v6)               ALLOW       Anywhere (v6)             
Nginx HTTP (v6)            ALLOW       Anywhere (v6)

Step 3 – Checking your Web Server

At the end of the installation process, Ubuntu 20.04 starts Nginx. The web server should already be up and running.

We can check with the systemd init system to make sure the service is running by typing:

  1. systemctl status nginx
Output
● nginx.service - A high performance web server and a reverse proxy server
   Loaded: loaded (/lib/systemd/system/nginx.service; enabled; vendor preset: enabled)
   Active: active (running) since Fri 2020-04-20 16:08:19 UTC; 3 days ago
     Docs: man:nginx(8)
 Main PID: 2369 (nginx)
    Tasks: 2 (limit: 1153)
   Memory: 3.5M
   CGroup: /system.slice/nginx.service
           ├─2369 nginx: master process /usr/sbin/nginx -g daemon on; master_process on;
           └─2380 nginx: worker process

As confirmed by this out, the service has started successfully. However, the best way to test this is to actually request a page from Nginx.

You can access the default Nginx landing page to confirm that the software is running properly by navigating to your server’s IP address. If you do not know your server’s IP address, you can find it by using the icanhazip.com tool, which will give you your public IP address as received from another location on the internet:

  1. curl -4 icanhazip.com
 

When you have your server’s IP address, enter it into your browser’s address bar:

http://your_server_ip

You should receive the default Nginx landing page:

Nginx default page

If you are on this page, your server is running correctly and is ready to be managed.

Step 4 – Managing the Nginx Process

Now that you have your web server up and running, let’s review some basic management commands.

To stop your web server, type:

  1. sudo systemctl stop nginx

To start the web server when it is stopped, type:

  1. sudo systemctl start nginx

To stop and then start the service again, type:

  1. sudo systemctl restart nginx

If you are only making configuration changes, Nginx can often reload without dropping connections. To do this, type:

  1. sudo systemctl reload nginx

By default, Nginx is configured to start automatically when the server boots. If this is not what you want, you can disable this behavior by typing:

  1. sudo systemctl disable nginx

To re-enable the service to start up at boot, you can type:

  1. sudo systemctl enable nginx

You have now learned basic management commands and should be ready to configure the site to host more than one domain.

When using the Nginx web server, server blocks (similar to virtual hosts in Apache) can be used to encapsulate configuration details and host more than one domain from a single server. We will set up a domain called your_domain, but you should replace this with your own domain name.

Nginx on Ubuntu 20.04 has one server block enabled by default that is configured to serve documents out of a directory at /var/www/html. While this works well for a single site, it can become unwieldy if you are hosting multiple sites. Instead of modifying /var/www/html, let’s create a directory structure within /var/www for our your_domain site, leaving /var/www/html in place as the default directory to be served if a client request doesn’t match any other sites.

Create the directory for your_domain as follows, using the -p flag to create any necessary parent directories:

  1. sudo mkdir -p /var/www/your_domain/html

Next, assign ownership of the directory with the $USER environment variable:

  1. sudo chown -R $USER:$USER /var/www/your_domain/html

The permissions of your web roots should be correct if you haven’t modified your umask value, which sets default file permissions. To ensure that your permissions are correct and allow the owner to read, write, and execute the files while granting only read and execute permissions to groups and others, you can input the following command:

  1. sudo chmod -R 755 /var/www/your_domain

Next, create a sample index.html page using nano or your favorite editor:

  1. nano /var/www/your_domain/html/index.html

Inside, add the following sample HTML:

/var/www/your_domain/html/index.html
<html>
    <head>
        <title>Welcome to your_domain!title>
    head>
    <body>
        <h1>Success!  The your_domain server block is working!h1>
    body>
html>

Save and close the file by pressing Ctrl+X to exit, then when prompted to save, Y and then Enter.

In order for Nginx to serve this content, it’s necessary to create a server block with the correct directives. Instead of modifying the default configuration file directly, let’s make a new one at /etc/nginx/sites-available/your_domain:

  1. sudo nano /etc/nginx/sites-available/your_domain

Paste in the following configuration block, which is similar to the default, but updated for our new directory and domain name:

/etc/nginx/sites-available/your_domain
server {
        listen 80;
        listen [::]:80;

        root /var/www/your_domain/html;
        index index.html index.htm index.nginx-debian.html;

        server_name your_domain www.your_domain;

        location / {
                try_files $uri $uri/ =404;
        }
}

Notice that we’ve updated the root configuration to our new directory, and the server_name to our domain name.

Next, let’s enable the file by creating a link from it to the sites-enabled directory, which Nginx reads from during startup:

  1. sudo ln -s /etc/nginx/sites-available/your_domain /etc/nginx/sites-enabled/

Note: Nginx uses a common practice called symbolic links, or symlinks, to track which of your server blocks are enabled. Creating a symlink is like creating a shortcut on disk, so that you could later delete the shortcut from the sites-enabled directory while keeping the server block in sites-available if you wanted to enable it.

Two server blocks are now enabled and configured to respond to requests based on their listen and server_name directives (you can read more about how Nginx processes these directives here):

  • your_domain: Will respond to requests for your_domain and www.your_domain.
  • default: Will respond to any requests on port 80 that do not match the other two blocks.

To avoid a possible hash bucket memory problem that can arise from adding additional server names, it is necessary to adjust a single value in the /etc/nginx/nginx.conf file. Open the file:

  1. sudo nano /etc/nginx/nginx.conf

Find the server_names_hash_bucket_size directive and remove the # symbol to uncomment the line. If you are using nano, you can quickly search for words in the file by pressing CTRL and w.

Note: Commenting out lines of code – usually by putting # at the start of a line – is another way of disabling them without needing to actually delete them. Many configuration files ship with multiple options commented out so that they can be enabled or disabled, by toggling them between active code and documentation.

/etc/nginx/nginx.conf
...
http {
    ...
    server_names_hash_bucket_size 64;
    ...
}
...

Save and close the file when you are finished.

Next, test to make sure that there are no syntax errors in any of your Nginx files:

  1. sudo nginx -t

If there aren’t any problems, restart Nginx to enable your changes:

  1. sudo systemctl restart nginx

Nginx should now be serving your domain name. You can test this by navigating to http://your_domain, where you should see something like this:

Nginx first server block

Step 6 – Getting Familiar with Important Nginx Files and Directories

Now that you know how to manage the Nginx service itself, you should take a few minutes to familiarize yourself with a few important directories and files.

Content

  • /var/www/html: The actual web content, which by default only consists of the default Nginx page you saw earlier, is served out of the /var/www/html directory. This can be changed by altering Nginx configuration files.

Server Configuration

  • /etc/nginx: The Nginx configuration directory. All of the Nginx configuration files reside here.
  • /etc/nginx/nginx.conf: The main Nginx configuration file. This can be modified to make changes to the Nginx global configuration.
  • /etc/nginx/sites-available/: The directory where per-site server blocks can be stored. Nginx will not use the configuration files found in this directory unless they are linked to the sites-enabled directory. Typically, all server block configuration is done in this directory, and then enabled by linking to the other directory.
  • /etc/nginx/sites-enabled/: The directory where enabled per-site server blocks are stored. Typically, these are created by linking to configuration files found in the sites-available directory.
  • /etc/nginx/snippets: This directory contains configuration fragments that can be included elsewhere in the Nginx configuration. Potentially repeatable configuration segments are good candidates for refactoring into snippets.

Server Logs

  • /var/log/nginx/access.log: Every request to your web server is recorded in this log file unless Nginx is configured to do otherwise.
  • /var/log/nginx/error.log: Any Nginx errors will be recorded in this log.

Conclusion

Now that you have your web server installed, you have many options for the type of content to serve and the technologies you want to use to create a richer experience.

If you’d like to build out a more complete application stack, check out the article How To Install Linux, Nginx, MySQL, PHP (LEMP stack) on Ubuntu 20.04.

In order to set up HTTPS for your domain name with a free SSL certificate using Let’s Encrypt, you should move on to How To Secure Nginx with Let’s Encrypt on Ubuntu 20.04.

Nginx Cheatsheet

Nginx is open-source software for web serving, reverse proxying, caching, load balancing, media streaming, and more. In this post, I will mention few Nginx configurations which we use frequently.

Index


Listen To Port

server {
  # Standard HTTP Protocol
  listen 80;

  # Standard HTTPS Protocol
  listen 443 ssl;

  # Listen on 80 using IPv6
  listen [::]:80;

  # Listen only on using IPv6
  listen [::]:80 ipv6only=on;
}

Access Logging

server {
  # Relative or full path to log file
  access_log /path/to/file.log;

  # Turn 'on' or 'off'
  access_log on;
}

Domain Name

server {
  # Listen to yourdomain.com
  server_name yourdomain.com;

  # Listen to multiple domains
  server_name yourdomain.com www.yourdomain.com;

  # Listen to all domains
  server_name *.yourdomain.com;

  # Listen to all top-level domains
  server_name yourdomain.*;

  # Listen to unspecified Hostnames (Listens to IP address itself)
  server_name "";

}

Static Assets

server {
  listen 80;
  server_name yourdomain.com;

  location / {
          root /path/to/website;
  } 
}

Redirect

server {
  listen 80;
  server_name www.yourdomain.com;
  return 301 http://yourdomain.com$request_uri;
}
server {
  listen 80;
  server_name www.yourdomain.com;

  location /redirect-url {
     return 301 http://otherdomain.com;
  }
}

Reverse Proxy

server {
  listen 80;
  server_name yourdomain.com;

  location / {
     proxy_pass http://0.0.0.0:3000;
     # where 0.0.0.0:3000 is your application server (Ex: node.js) bound on 0.0.0.0 listening on port 3000
  }

}

Load Balancing

upstream node_js {
  server 0.0.0.0:3000;
  server 0.0.0.0:4000;
  server 123.131.121.122;
}

server {
  listen 80;
  server_name yourdomain.com;

  location / {
     proxy_pass http://node_js;
  }
}

SSL

server {
  listen 443 ssl;
  server_name yourdomain.com;

  ssl on;

  ssl_certificate /path/to/cert.pem;
  ssl_certificate_key /path/to/privatekey.pem;

  ssl_stapling on;
  ssl_stapling_verify on;
  ssl_trusted_certificate /path/to/fullchain.pem;

  ssl_protocols TLSv1 TLSv1.1 TLSv1.2;
  ssl_connection_timeout 1d;
  ssl_session_cache shared:SSL:50m;
  add_header Strict-Transport-Security max-age=15768000;
}

# Permanent Redirect for HTTP to HTTPS
server {
  listen 80;
  server_name yourdomain.com;
  return 301 https://$host$request_uri;
}

Advanced nginx cheatsheet

Work In Progress, more explanations will be added soon

Table of content

Nginx Performance

Load-Balancing

php-fpm Unix socket

upstream php {
    least_conn;
    server unix:/var/run/php-fpm.sock;
    server unix:/var/run/php-two-fpm.sock;
    keepalive 5;
}

php-fpm TCP

upstream php {
    least_conn;
    server 127.0.0.1:9090;
    server 127.0.0.1:9091;
    keepalive 5;
}

HTTP load-balancing

# Upstreams
upstream backend {
    least_conn;

    server 10.10.10.1:80;
    server 10.10.10.2:80;
}

server {

    server_name site.ltd;

    location / {
        proxy_pass http://backend;
        proxy_redirect      off;
        proxy_set_header    Host            $host;
        proxy_set_header    X-Real-IP       $remote_addr;
        proxy_set_header    X-Forwarded-For $proxy_add_x_forwarded_for;
    }
}

WordPress Fastcgi cache

mapping fastcgi_cache_bypass conditions

To put inside a configuration file in /etc/nginx/conf.d/

# do not cache xmlhttp requests
map $http_x_requested_with $http_request_no_cache {
    default 0;
    XMLHttpRequest 1;
}
# do not cache requests for the following cookies
map $http_cookie $cookie_no_cache {
    default 0;
    "~*wordpress_[a-f0-9]+" 1;
    "~*wp-postpass" 1;
    "~*wordpress_logged_in" 1;
    "~*wordpress_no_cache" 1;
    "~*comment_author" 1;
    "~*woocommerce_items_in_cart" 1;
    "~*woocommerce_cart_hash" 1;
    "~*wptouch_switch_toogle" 1;
    "~*comment_author_email_" 1;
}
# do not cache requests for the following uri
map $request_uri $uri_no_cache {
    default 0;
    "~*/wp-admin/" 1;
    "~*/wp-[a-zA-Z0-9-]+.php" 1;
    "~*/feed/" 1;
    "~*/index.php" 1;
    "~*/[a-z0-9_-]+-sitemap([0-9]+)?.xml" 1;
    "~*/sitemap(_index)?.xml" 1;
    "~*/wp-comments-popup.php" 1;
    "~*/wp-links-opml.php" 1;
    "~*/wp-.*.php" 1;
    "~*/xmlrpc.php" 1;
}
# do not cache request with args (like site.tld/index.php?id=1)
map $query_string $query_no_cache {
    default 1;
    "" 0;
}
# map previous conditions with the variable $skip_cache
map $http_request_no_cache$cookie_no_cache$uri_no_cache$query_no_cache $skip_cache {
    default 1;
    0000 0;
}

Define fastcgi_cache settings

To put inside another configuration file in /etc/nginx/conf.d

# FastCGI cache settings
fastcgi_cache_path /var/run/nginx-cache levels=1:2 keys_zone=WORDPRESS:360m inactive=24h max_size=256M;
fastcgi_cache_key "$scheme$request_method$host$request_uri$cookie_pll_language";
fastcgi_cache_use_stale error timeout invalid_header updating http_500 http_503;
fastcgi_cache_methods GET HEAD;
fastcgi_buffers 256 32k;
fastcgi_buffer_size 256k;
fastcgi_connect_timeout 4s;
fastcgi_send_timeout 120s;
fastcgi_busy_buffers_size 512k;
fastcgi_temp_file_write_size 512K;
fastcgi_param SERVER_NAME $http_host;
fastcgi_ignore_headers Cache-Control Expires Set-Cookie;
fastcgi_keep_conn on;
fastcgi_cache_lock on;
fastcgi_cache_lock_age 1s;
fastcgi_cache_lock_timeout 3s;

fastcgi_cache vhost example

server {

    server_name domain.tld;

    access_log /var/log/nginx/domain.tld.access.log;
    error_log /var/log/nginx/domain.tld.error.log;

    root /var/www/domain.tld/htdocs;
    index index.php index.html index.htm;

    # add X-fastcgi-cache header to see if requests are cached
    add_header X-fastcgi-cache $upstream_cache_status;

    # default try_files directive for WP 5.0+ with pretty URLs
    location / {
        try_files $uri $uri/ /index.php$is_args$args;
    }
    # pass requests to fastcgi with fastcgi_cache enabled
    location ~ \.php$ {
        try_files $uri =404;
        include fastcgi_params;
        fastcgi_pass php;
        fastcgi_cache_bypass $skip_cache;
        fastcgi_no_cache $skip_cache;
        fastcgi_cache WORDPRESS;
        fastcgi_cache_valid 200 30m;
    }
    # block to purge nginx cache with nginx was built with ngx_cache_purge module
    location ~ /purge(/.*) {
        fastcgi_cache_purge WORDPRESS "$scheme$request_method$host$1";
        access_log off;
    }

}

Nginx as a Proxy

Simple Proxy

location / {
        proxy_pass http://127.0.0.1:3000;
        proxy_redirect      off;
        proxy_set_header    Host            $host;
        proxy_set_header    X-Real-IP       $remote_addr;
        proxy_set_header    X-Forwarded-For $proxy_add_x_forwarded_for;
    }

Proxy in a subfolder

location /folder/ { # The / is important!
        proxy_pass http://127.0.0.1:3000/;# The / is important!
        proxy_redirect      off;
        proxy_set_header    Host            $host;
        proxy_set_header    X-Real-IP       $remote_addr;
        proxy_set_header    X-Forwarded-For $proxy_add_x_forwarded_for;
    }

Proxy keepalive for websocket

# Upstreams
upstream backend {
    server 127.0.0.1:3000;
    keepalive 5;
}
# HTTP Server
server {
    server_name your_hostname.com;
    error_log /var/log/nginx/rocketchat.access.log;
    location / {
        proxy_pass http://backend;
        proxy_http_version 1.1;
        proxy_set_header Upgrade $http_upgrade;
        proxy_set_header Connection "upgrade";
        proxy_set_header Host $http_host;
        proxy_set_header X-Real-IP $remote_addr;
        proxy_set_header X-Forward-For $proxy_add_x_forwarded_for;
        proxy_set_header X-Forward-Proto http;
        proxy_set_header X-Nginx-Proxy true;
        proxy_redirect off;
    }
}

Reverse-Proxy For Apache

server {

    server_name domain.tld;

    access_log /var/log/nginx/domain.tld.access.log;
    error_log /var/log/nginx/domain.tld.error.log;

    root /var/www/domain.tld/htdocs;

    # pass requests to Apache backend
    location / {
        proxy_pass http://backend;
    }
    # handle static files with a fallback
    location ~* \.(ogg|ogv|svg|svgz|eot|otf|woff|woff2|ttf|m4a|mp4|ttf|rss|atom|jpe?g|gif|cur|heic|png|tiff|ico|zip|webm|mp3|aac|tgz|gz|rar|bz2|doc|xls|exe|ppt|tar|mid|midi|wav|bmp|rtf|swf|webp)$ {
        add_header "Access-Control-Allow-Origin" "*";
        access_log off;
        log_not_found off;
        expires max;
        try_files $uri @fallback;
    }
    # fallback to pass requests to Apache if files are not found
    location @fallback {
        proxy_pass http://backend;
    }
}

Nginx Security

Denying access

common backup and archives files

location ~* "\.(old|orig|original|php#|php~|php_bak|save|swo|aspx?|tpl|sh|bash|bak?|cfg|cgi|dll|exe|git|hg|ini|jsp|log|mdb|out|sql|svn|swp|tar|rdf)$" {
    deny all;
}

Deny access to hidden files & directory

location ~ /\.(?!well-known\/) {
    deny all;
}

Blocking common attacks

base64 encoded url

location ~* "(base64_encode)(.*)(\()" {
    deny all;
}

javascript eval() url

location ~* "(eval\()" {
    deny all;
}

Nginx SEO

robots.txt location

location = /robots.txt {
# Some WordPress plugin gererate robots.txt file
# Refer #340 issue
    try_files $uri $uri/ /index.php?$args @robots;
    access_log off;
    log_not_found off;
}
location @robots {
    return 200 "User-agent: *\nDisallow: /wp-admin/\nAllow: /wp-admin/admin-ajax.php\n";
}

Make a website not indexable

add_header X-Robots-Tag "noindex";

location = /robots.txt {
  return 200 "User-agent: *\nDisallow: /\n";
}

Nginx Media

MP4 stream module

location /videos {
    location ~ \.(mp4)$ {
        mp4;
        mp4_buffer_size       1m;
        mp4_max_buffer_size   5m;
        add_header Vary "Accept-Encoding";
        add_header "Access-Control-Allow-Origin" "*";
        add_header Cache-Control "public, no-transform";
        access_log off;
        log_not_found off;
        expires max;
    }
}

WebP images

Mapping conditions to display WebP images

# serve WebP images if web browser support WebP
map $http_accept $webp_suffix {
   default "";
   "~*webp" ".webp";
}

Set conditional try_files to server WebP image :

  • if web browser support WebP
  • if WebP alternative exist


# webp rewrite rules for jpg and png images
# try to load alternative image.png.webp before image.png
location /wp-content/uploads {
    location ~ \.(png|jpe?g)$ {
        add_header Vary "Accept-Encoding";
        add_header "Access-Control-Allow-Origin" "*";
        add_header Cache-Control "public, no-transform";
        access_log off;
        log_not_found off;
        expires max;
        try_files $uri$webp_suffix $uri =404;
    }
}

How to install MySQL server on CentOS 8 Linux

How do I install MySQL server 8.0 on CentOS 8 Linux server running on Linode and AWS cloud? How do I add and set up a new MySQL user and database account on the newly created CentOS server?

Oracle MySQL server version 8.0 is a free and open-source free database server. It is one of the most popular database system used in web apps and websites on the Internet.

Typically MySQL is part of the LAMP (Linux, Apache/Nginx, MySQL, Perl/Python/PHP) stack. Popular open-source software such as WordPress, MediaWiki, and others profoundly used by MySQL as a database storage engine. Let us see how to install MySQL server version 8.x on CentOS 8 Linux server.

How to install MySQL server on a CentOS 8

First, open the terminal app and then log in to your CentOS server using the ssh command:
$ ssh vivek@centos-8-ec2-box-ip
Now, update CentOS system to apply security updates and fixes on Linux system using the dnf command/yum command:
$ sudo yum update
## or ##
$ sudo dnf update

Sample outputs:

CentOS-8 - AppStream                            21 MB/s | 5.8 MB     00:00    
CentOS-8 - Base                                 14 MB/s | 2.2 MB     00:00    
CentOS-8 - Extras                               50 kB/s | 8.6 kB     00:00    
Dependencies resolved.
Nothing to do.
Complete!

Step 1 – Installing MySQL 8 server

Luckily our CentOS 8 box comes with MySQL 8 server package. Let us search for it:
$ sudo yum search mysql-server
$ sudo yum module list mysql

And we see:

Last metadata expiration check: 0:02:47 ago on Mon Nov 23 16:26:31 2020.
===================== Name Exactly Matched: mysql-server ======================
mysql-server.x86_64 : The MySQL server and related files

Next, find out version information, run:
$ sudo yum info mysql-server
Here is what we see:

Last metadata expiration check: 0:02:22 ago on Mon Nov 23 16:26:31 2020.
Available Packages
Name         : mysql-server
Version      : 8.0.21
Release      : 1.module_el8.2.0+493+63b41e36
Architecture : x86_64
Size         : 22 M
Source       : mysql-8.0.21-1.module_el8.2.0+493+63b41e36.src.rpm
Repository   : AppStream
Summary      : The MySQL server and related files
URL          : http://www.mysql.com
License      : GPLv2 with exceptions and LGPLv2 and BSD
Description  : MySQL is a multi-user, multi-threaded SQL database server. MySQL
             : is a client/server implementation consisting of a server daemon
             : (mysqld) and many different client programs and libraries. This
             : package contains the MySQL server and some accompanying files
             : and directories.

Install it:
$ sudo yum install mysql-server

How to install MySQL 8 on CentOS 8 Linux

Click to enlarge

Step 2 – Enabling MySQL 8 mysqld.service,server

The service name is mysqld.service, and we need to enable it using the following systemctl command:
$ sudo systemctl enable mysqld.service
Confirmation displayed:

reated symlink /etc/systemd/system/multi-user.target.wants/mysqld.service → /usr/lib/systemd/system/mysqld.service.

Start the service and then verify it:
$ sudo systemctl start mysqld.service
$ sudo systemctl status mysqld.service

 mysqld.service - MySQL 8.0 database server
   Loaded: loaded (/usr/lib/systemd/system/mysqld.service; enabled; vendor preset: disabled)
   Active: active (running) since Mon 2020-11-23 16:50:14 UTC; 4s ago
  Process: 551 ExecStopPost=/usr/libexec/mysql-wait-stop (code=exited, status=0/SUCCESS)
  Process: 681 ExecStartPost=/usr/libexec/mysql-check-upgrade (code=exited, status=0/SUCCESS)
  Process: 601 ExecStartPre=/usr/libexec/mysql-prepare-db-dir mysqld.service (code=exited, status=0/SUCCESS)
  Process: 577 ExecStartPre=/usr/libexec/mysql-check-socket (code=exited, status=0/SUCCESS)
 Main PID: 637 (mysqld)
   Status: "Server is operational"
    Tasks: 39 (limit: 24960)
   Memory: 331.0M
   CGroup: /system.slice/mysqld.service
           └─637 /usr/libexec/mysqld --basedir=/usr

Nov 23 16:50:13 centos-aws-mysql systemd[1]: Stopped MySQL 8.0 database server.
Nov 23 16:50:13 centos-aws-mysql systemd[1]: Starting MySQL 8.0 database server...
Nov 23 16:50:14 centos-aws-mysql systemd[1]: Started MySQL 8.0 database server.

Step 3 – Securing MySQL 8 server

All you need to do is type the following command, and it will secure MySQL 8 server installation on CentOS Linux:
$ sudo mysql_secure_installation

Please set the password for root here.

New password: 

Re-enter new password: 

Estimated strength of the password: 100 
Do you wish to continue with the password provided?(Press y|Y for Yes, any other key for No) : y
By default, a MySQL installation has an anonymous user,
allowing anyone to log into MySQL without having to have
a user account created for them. This is intended only for
testing, and to make the installation go a bit smoother.
You should remove them before moving into a production
environment.

Remove anonymous users? (Press y|Y for Yes, any other key for No) : y
Success.


Normally, root should only be allowed to connect from
'localhost'. This ensures that someone cannot guess at
the root password from the network.

Disallow root login remotely? (Press y|Y for Yes, any other key for No) : y
Success.

By default, MySQL comes with a database named 'test' that
anyone can access. This is also intended only for testing,
and should be removed before moving into a production
environment.


Remove test database and access to it? (Press y|Y for Yes, any other key for No) : y
 - Dropping test database...
Success.

 - Removing privileges on test database...
Success.

Reloading the privilege tables will ensure that all changes
made so far will take effect immediately.

Reload privilege tables now? (Press y|Y for Yes, any other key for No) : y
Success.

All done! 

Step 4 – Starting/Stopping/Restarting MySQL 8 server

The syntax is:
$ sudo systemctl start mysql.service
$ sudo systemctl stop mysql.service
$ sudo systemctl restart mysql.service

To view the MySQL 8 service log as follows using the journalctl command:
$ sudo journalctl -u mysqld.service -xe
$ sudo tail -f /var/log/mysql/mysqld.log

MySQL 8 log file sample entries:

2020-11-23T16:55:19.101316Z 0 [System] [MY-013172] [Server] Received SHUTDOWN from user . Shutting down mysqld (Version: 8.0.21).
2020-11-23T16:55:21.728819Z 0 [Warning] [MY-010909] [Server] /usr/libexec/mysqld: Forcing close of thread 10  user: 'root'.
2020-11-23T16:55:23.083389Z 0 [System] [MY-010910] [Server] /usr/libexec/mysqld: Shutdown complete (mysqld 8.0.21)  Source distribution.
2020-11-23T16:56:19.225544Z 0 [System] [MY-010116] [Server] /usr/libexec/mysqld (mysqld 8.0.21) starting as process 524
2020-11-23T16:56:19.237500Z 1 [System] [MY-013576] [InnoDB] InnoDB initialization has started.
2020-11-23T16:56:19.562441Z 1 [System] [MY-013577] [InnoDB] InnoDB initialization has ended.
2020-11-23T16:56:19.677202Z 0 [System] [MY-011323] [Server] X Plugin ready for connections. Bind-address: '::' port: 33060, socket: /var/lib/mysql/mysqlx.sock
2020-11-23T16:56:19.754024Z 0 [Warning] [MY-010068] [Server] CA certificate ca.pem is self signed.
2020-11-23T16:56:19.754207Z 0 [System] [MY-013602] [Server] Channel mysql_main configured to support TLS. Encrypted connections are now supported for this channel.
2020-11-23T16:56:19.780843Z 0 [System] [MY-010931] [Server] /usr/libexec/mysqld: ready for connections. Version: '8.0.21'  socket: '/var/lib/mysql/mysql.sock'  port: 3306  Source distribution.

Step 5 – Testing MySQL 8 installation

So far, so good. You learned how to install, set up, secure, and start/stop the MySQL 8 on CentOS 8 Linux cloud server. It is time to log in as a
mysql root user. The syntax is:
$ mysql -u root -p
$ mysql -u USER -h host -p
$ mysql -u USER -h host -p mysql

Let us type a few SQL commands at the mysql> prompt:
STATUS;
SHOW VARIABLES LIKE "%version%";
quit

Testing MySQL on CentOS 8

Step 6 – Creating a new MySQL 8 database and user account with password

Let create a new database called ‘spacedb‘, type at the mysql> prompt:
CREATE DATABASE spacedb;
Next, we are going to create a new user named ‘mars‘ for our database called ‘spacedb’ as follows:
CREATE USER 'mars'@'%' IDENTIFIED BY 'User_Password_Here';
Finally, give permissions:
GRANT SELECT, INSERT, UPDATE, DELETE ON spacedb.* TO 'mars'@'%';
Of course, we can grant ALL PRIVILEGES too as follows:
GRANT ALL PRIVILEGES ON spacedb.* TO 'mars'@'%';
See MySQL 8 users and their grants/permissions as follows:
SELECT user,host FROM mysql.user;
SHOW GRANTS for mars;
quit

Test new user settings and DB as follows:
mysql -u mars -p spacedb
mysql -u mars -h localhost -p spacedb

Creating MySQL 8 database with user and password on CentOS 8

Where,

  • -u mars; : User name for login
  • -h localhost : Connect to server named localhost
  • -p : Prompt for password
  • spacedb : Connect to database named spacedb

Step 7 – Configuring MySQL 8 server on a CentOS 8

Let us see default config file using the cat command:
# cat /etc/my.cnf.d/mysql-server.cnf
Config:

[mysqld]
datadir=/var/lib/mysql
socket=/var/lib/mysql/mysql.sock
log-error=/var/log/mysql/mysqld.log
pid-file=/run/mysqld/mysqld.pid

Want to allow remote connections to your MySQL server? Edit the /etc/my.cnf.d/mysql-server.cnf and append the following line under [mysqld]:
bind_address = 0.0.0.0

WARNING: See MySQL documentation for a detailed explanation for tuning options as to each server and set up is unique. Do not set up values blindly. I provide them as a starting point for optimizing MySQL 8 installation and values depending upon available RAM, CPU cores, server load and other circumstances.

Set InnoDB settings:

default_storage_engine          = InnoDB
innodb_buffer_pool_instances    = 1
innodb_buffer_pool_size         = 512M
innodb_file_per_table           = 1
innodb_flush_log_at_trx_commit  = 0
innodb_flush_method             = O_DIRECT
innodb_log_buffer_size          = 16M
innodb_log_file_size            = 512M
innodb_stats_on_metadata        = 0
innodb_read_io_threads          = 64
innodb_write_io_threads         = 64

MyISAM settings:

# UPD
key_buffer_size                 = 32M   
low_priority_updates            = 1
concurrent_insert               = 2
# UPD
max_connections                 = 100   
back_log                        = 512
thread_cache_size               = 100
thread_stack                    = 192K
interactive_timeout             = 180
wait_timeout                    = 180

Buffer settings UPD:

join_buffer_size                = 4M    
read_buffer_size                = 3M    
read_rnd_buffer_size            = 4M    
sort_buffer_size                = 4M

Edit and config logging if needed (by default slow_query disabled):

log_queries_not_using_indexes   = 1
long_query_time                 = 5
#slow_query_log                  = 0     
#slow_query_log_file             = /var/log/mysql/mysql_slow.log

This is useful for mysqldump command to make backups:

[mysqldump]
quick
quote_names
max_allowed_packet              = 64M

Step 8 – Firewall configuration to open MySQL server TCP port 3306

Are you using MySQL 8 server remotely? Do you have Apache/Nginx/PHP/Python/Perl app on another server? Then open port for everyone:
$ sudo firewall-cmd --zone=public --add-service=mysql --permanent
Only allow access from 192.168.1.0/24 CIDR:
$ sudo firewall-cmd \
--add-rich-rule 'rule family="ipv4" \
source address="192.168.1.0/24" \
service name="mysql" accept' --permanent

The above is fine grained firewalld access rules to restrict access to MySQL 8 server to VLAN users only. See how to set up a firewall using FirewallD on CentOS 8 Linux for more info.

Conclusion

And there you have it, Oracle MySQL server version 8.x set up and running correctly on a CentOS Linux 8 server with Firewalld config. Further, you learned how to add a new database, user, and password for your project including MySQL 8 server tuning options.

Install Oracle Database 19c on CentOS 8 in VirtualBox

** Please use the root user to edit the files and execute the commands unless further notice. **

Prerequisite

  1. Install the latest VirtualBox Platform Package and the VirtualBox Extension Pack (Oracle_VM_VirtualBox_Extension_Pack-VERSION.vbox-extpack).
  2. Download the latest VirtualBox Guest Additions (VBoxGuestAdditions_VERSION.iso).
  3. Download the latest CentOS Stream 8.
  4. Create a new virtual machine and install the CentOS to the virtual machine. During the CentOS installation, select Workstation as Base Environment, select Container ManagementDevelopment Tools and Graphical Administration Tools as Additional software for Selected Environment. Use http://mirror.centos.org/centos/8/BaseOS/x86_64/os/ as the installation source.
  5. After installing the CentOS, execute the following commands to get the required libraries to create applications for handling compiled objects.
dnf update
dnf -y install elfutils-libelf-devel
  1. Insert the ISO of VirtualBox Guest Additions to the virtual machine, and then install it.

Download Packages and Software

Hostname and Host File

  1. Open the file /etc/hostname, change the content to update the hostname.
ol8-19.localdomain
  1. Open the file /etc/hosts, add your IP address and hostname.
192.168.122.1 ol8-19.localdomain

Install Required Packages

  1. Perform a dnf update to update every currently installed package.
dnf update
  1. Add execute permission to the downloaded rpm files.
chmod u+x *.rpm
  1. Install the libcapl library for getting and setting POSIX.1e (formerly POSIX 6) draft 15 capabilities.
dnf localinstall -y compat-libcap1-1.10-7.el7.x86_64.rpm
  1. Inatll the libstdc++ package which contains compatibility standard C++ library from GCC 3.3.4.
dnf localinstall -y compat-libstdc++-33-3.2.3-72.el7.x86_64.rpm
  1. Install the below required packages.
dnf install -y bc binutils elfutils-libelf elfutils-libelf-devel fontconfig-devel \
    gcc gcc-c++ glibc glibc-devel ksh ksh libaio libaio-devel libgcc libnsl libnsl.i686 \
    libnsl2 libnsl2.i686 librdmacm-devel libstdc++ libstdc++-devel libX11 libXau libxcb \
    libXi libXrender libXrender-devel libXtst make net-tools nfs-utils smartmontools \
    sysstat targetcli unixODBC;

Install Oracle Installation Prerequisites

  1. Install the Oracle Installation Prerequisites (OIP) package.
dnf localinstall -y oracle-database-preinstall-19c-1.0-1.el7.x86_64.rpm
  1. Open the /etc/group file, update the GID of the below items.
oinstall:x:64890:oracle
dba:x:64891:oracle
oper:x:64892:oracle
backupdba:x:64893:oracle
dgdba:x:64894:oracle
kmdba:x:64895:oracle
racdba:x:64896:oracle
  1. Open the /etc/passwd file, update both the UID and GID of account oracle.
oracle:x:64890:64890::/home/oracle:/bin/bash
  1. Update the password of account oracle.
passwd oracle
  1. Set secure Linux to permissive by editing the /etc/selinux/config file.
SELINUX=permissive
  1. Set the secure Linux change right now.
setenforce Permissive
  1. Disable the firewall.
systemctl stop firewalld
systemctl disable firewalld

Setup Oracle User Profile

  1. Create Oracle directories.
mkdir -p /u01/app/oracle/product/19.3.0/dbhome_1
mkdir -p /u02/oradata
chown -R oracle:oinstall /u01 /u02
chmod -R 775 /u01 /u02
  1. Create a new directory for Oracle user.
mkdir -p /home/oracle/scripts
chown -R oracle:oinstall /home/oracle
  1. Create an environment setting file.
cat > /home/oracle/scripts/setEnv.sh <<EOF
# Oracle Settings
export TMP=/tmp
export TMPDIR=\$TMP

export ORACLE_HOSTNAME=$HOSTNAME
export ORACLE_UNQNAME=cdb1
export ORACLE_BASE=/u01/app/oracle
export ORACLE_HOME=\$ORACLE_BASE/product/19.3.0/dbhome_1
export ORA_INVENTORY=/u01/app/oraInventory
export ORACLE_SID=cdb1
export PDB_NAME=pdb1
export DATA_DIR=/u02/oradata

export PATH=/usr/sbin:/usr/local/bin:\$PATH
export PATH=\$ORACLE_HOME/bin:\$PATH

export LD_LIBRARY_PATH=\$ORACLE_HOME/lib:/lib:/usr/lib
export CLASSPATH=\$ORACLE_HOME/jlib:\$ORACLE_HOME/rdbms/jlib
EOF
  1. Create a startup shell script.
cat > /home/oracle/scripts/start_all.sh <<EOF
#!/bin/bash
. /home/oracle/scripts/setEnv.sh

export ORAENV_ASK=NO
. oraenv
export ORAENV_ASK=YES

dbstart \$ORACLE_HOME
EOF
  1. Create a stop shell script.
cat > /home/oracle/scripts/stop_all.sh <<EOF
#!/bin/bash
. /home/oracle/scripts/setEnv.sh

export ORAENV_ASK=NO
. oraenv
export ORAENV_ASK=YES

dbshut \$ORACLE_HOME
EOF
  1. Update the owner and permission of the shell scripts and its parent directory.
chown -R oracle:oinstall /home/oracle
chmod u+x /home/oracle/scripts/*.sh
  1. Set the environment when the Bash runs whenever it is started interactively.
cat > /home/oracle/.bashrc <<EOF
#.bashrc

# User specific aliases and functions

alias rm='rm -i'
alias cp='cp -i'
alias mv='mv -i'

# Source global definitions
if [ -f /etc/bashrc ]; then
  . /etc/bashrc
fi

. /home/oracle/scripts/setEnv.sh >> /home/oracle/.bashrc
EOF

chown oracle:oinstall /home/oracle/.bashrc

Create and Add New Swap File

  1. Run the following command, with oracle user, to create and apply new swap file.
dd if=/dev/zero of=/tmp/additional-swap bs=1048576 count=4096
chmod 600 /tmp/additional-swap
mkswap /tmp/additional-swap
  1. Apply the swap by executing the following command with root user.
swapon /tmp/additional-swap

Install Oracle Database

  1. Set the DISPLAY variable with oracle user.
DISPLAY=$HOSTNAME:0.0; export DISPLAY
  1. Unzip the archive with oracle user.
cd $ORACLE_HOME
unzip -oq /path/to/software/LINUX.X64_193000_db_home.zip
  1. “Cheat” the installer about the distribution with oracle user.
export CV_ASSUME_DISTID=RHEL7.6
  1. Run the installer, with oracle user, to install Oracle database.
cd $ORACLE_HOME
./runInstaller -ignorePrereq -waitforcompletion -silent                        \
    -responseFile ${ORACLE_HOME}/install/response/db_install.rsp               \
    oracle.install.option=INSTALL_DB_SWONLY                                    \
    ORACLE_HOSTNAME=${ORACLE_HOSTNAME}                                         \
    UNIX_GROUP_NAME=oinstall                                                   \
    INVENTORY_LOCATION=${ORA_INVENTORY}                                        \
    SELECTED_LANGUAGES=en,en_GB                                                \
    ORACLE_HOME=${ORACLE_HOME}                                                 \
    ORACLE_BASE=${ORACLE_BASE}                                                 \
    oracle.install.db.InstallEdition=EE                                        \
    oracle.install.db.OSDBA_GROUP=dba                                          \
    oracle.install.db.OSBACKUPDBA_GROUP=dba                                    \
    oracle.install.db.OSDGDBA_GROUP=dba                                        \
    oracle.install.db.OSKMDBA_GROUP=dba                                        \
    oracle.install.db.OSRACDBA_GROUP=dba                                       \
    SECURITY_UPDATES_VIA_MYORACLESUPPORT=false                                 \
    DECLINE_SECURITY_UPDATES=true
  1. If the setup is success, the following message should be printed on screen.
Successfully Setup Software.
  1. Execute the below scripts, with root user, to update the permission of Oracle directories and set the environment variables.
/u01/app/oraInventory/orainstRoot.sh
/u01/app/oracle/product/19.3.0/dbhome_1/root.sh

Database Creation

  1. Start the listener with oracle user.
lsnrctl start
  1. Create a database with oracle user.
dbca -silent -createDatabase                                                   \
     -templateName General_Purpose.dbc                                         \
     -gdbname ${ORACLE_SID} -sid  ${ORACLE_SID} -responseFile NO_VALUE         \
     -characterSet AL32UTF8                                                    \
     -sysPassword SysPassword1                                                 \
     -systemPassword SysPassword1                                              \
     -createAsContainerDatabase true                                           \
     -numberOfPDBs 1                                                           \
     -pdbName ${PDB_NAME}                                                      \
     -pdbAdminPassword PdbPassword1                                            \
     -databaseType MULTIPURPOSE                                                \
     -automaticMemoryManagement false                                          \
     -totalMemory 1000                                                         \
     -storageType FS                                                           \
     -datafileDestination "${DATA_DIR}"                                        \
     -redoLogFileSize 50                                                       \
     -emConfiguration NONE                                                     \
     -ignorePreReqs

Listener Update

  1. Replace or edit the listener.ora file, with oracle user, to set the correct hostname, port number and SID name.
cat > /u01/app/oracle/product/19.3.0/dbhome_1/network/admin/listener.ora <<EOF
LISTENER =
  (DESCRIPTION_LIST =
    (DESCRIPTION =
      (ADDRESS = (PROTOCOL = TCP)(PORT = 1539))
      (ADDRESS = (PROTOCOL = IPC)(KEY = EXTPROC1521))
    )
  )

SID_LIST_LISTENER =
  (SID_LIST =
    (SID_DESC =
      (SID_NAME = ${ORACLE_SID})
    )
  )

EOF
  1. Reload the Oracle Listener.
lsnrctl reload

Post Installation

  1. Edit the /etc/oratab file, with root user, to update the restart flag from ‘N‘ to ‘Y‘.
orcl:/u01/app/oracle/product/19.3.0/dbhome_1:Y
  1. Configure the Database instance “orcl” with auto startup.
cd $ORACLE_HOME/dbs
ln -s spfilecdb1.ora initorcl.ora
  1. Enable Oracle Managed Files (OMF) and make sure the PDB starts when the instance starts.
sqlplus / as sysdba <<EOF
alter system set db_create_file_dest='${DATA_DIR}';
alter pluggable database ${PDB_NAME} save state;
exit;
EOF
  1. Execute the following commands, with root user, to start the Oracle Listener automatically.
cat > /home/oracle/scripts/cron.sh <<EOF1
#!/bin/bash

. /home/oracle/scripts/setEnv.sh

echo "\`date\`" > /home/oracle/scripts/last.log

lsnrctl start

sleep 3

lsnrctl reload

sleep 3

sqlplus /nolog <
conn / as sysdba
startup
EOF

EOF1

chown oracle:oinstall /home/oracle/scripts/cron.sh
chmod 744 /home/oracle/scripts/cron.sh
  1. Use the following command, with oracle user, to edit the crontab file.
crontab -e
  1. Put the following cron job in the first line of crontab file, then press the keys :wq to save and exit.
@reboot /home/oracle/scripts/cron.sh

Healthcheck

  1. Login as oracle user and then execute the following commands one-by-one.
sqlplus /nolog
conn / as sysdba;
select * from v$version;
show pdbs;

Create New User and Tablespace

  1. Login as Sysdba with SqlPlus.
sqlplus / as sysdba
  1. Update the seesion setting _ORACLE_SCRIPT to true to allow common user comes without c## as prefix.
ALTER SESSION SET "_ORACLE_SCRIPT"=true;
  1. Create a new tablespace with an automatic extensible size 100MB, maximum 10G in size.
-- DROP TABLESPACE my_tablespace INCLUDING CONTENTS AND DATAFILES;
-- Location of the dat file: /u01/app/oracle/product/19.3.0/dbhome_1/dbs/my_tablespace.dat
-- SELECT tablespace_name, block_size, max_size, status FROM DBA_TABLESPACES;
CREATE TABLESPACE my_tablespace
  DATAFILE 'my_tablespace.dat'
    SIZE 100M
    AUTOEXTEND ON
    NEXT 32M MAXSIZE 10G
    EXTENT MANAGEMENT LOCAL
    SEGMENT SPACE MANAGEMENT AUTO
;

SELECT FILE_ID, FILE_NAME, TABLESPACE_NAME, AUTOEXTENSIBLE, INCREMENT_BY 
FROM DBA_DATA_FILES ORDER BY FILE_ID DESC;
  1. [Optional] Update the password life time from 180 days (default) to unlimited.
ALTER PROFILE DEFAULT LIMIT PASSWORD_LIFE_TIME UNLIMITED;
  1. Create a new user.
-- ALTER SESSION SET "_ORACLE_SCRIPT"=true;
-- DROP USER newuser CASCADE;
CREATE USER newuser IDENTIFIED BY "P@ssw0rd" DEFAULT TABLESPACE my_tablespace;
  1. Grant permissions to the new user.
-- REVOKE CREATE SESSION FROM newuser;
-- REVOKE CREATE TABLE FROM newuser;
-- REVOKE CREATE VIEW FROM newuser;
-- REVOKE CREATE ANY TRIGGER FROM newuser;
-- REVOKE CREATE ANY PROCEDURE FROM newuser;
-- REVOKE CREATE SEQUENCE FROM newuser;
-- REVOKE CREATE SYNONYM FROM newuser;
GRANT CREATE SESSION TO newuser;
GRANT CREATE TABLE TO newuser;
GRANT CREATE VIEW TO newuser;
GRANT CREATE ANY TRIGGER TO newuser;
GRANT CREATE ANY PROCEDURE TO newuser;
GRANT CREATE SEQUENCE TO newuser;
GRANT CREATE SYNONYM TO newuser;

ALTER USER newuser QUOTA UNLIMITED ON my_tablespace;
  1. [Optional] Grant DBA to the new user.
-- REVOKE DBA FROM newuser;
GRANT DBA TO newuser;

References

Free Web Hosting