
How to Add Custom Dashboard Widgets in WordPress
add_action('wp_dashboard_setup', 'my_custom_dashboard_widgets'); function my_custom_dashboard_widgets() {global $wp_meta_boxes;wp_add_dashboard_widget('custom_help_widget', 'Theme Support', 'custom_dashboard_help');}function custom_dashboard_help() {echo '
Welcome to Custom Blog Theme! Need help? Contact the developer here. For WordPress Tutorials visit: WPBeginner
'
;}How to Install Webmin on CentOS 8
Webmin is a free, open-source and web-based system configuration and management tool for Unix-like operating systems. You can set up Apache web server, Samba, DNS, Mail, FTP, Database, File system and package management with Webmin web-based interface. Webmin is very similar to cPanel and provides an easy way to manage Linux systems through a web browser.
Prerequisites
- A server running CentOS 8.
- A root password is configured on your server.
Getting Started
By default, SELinux is enabled in CentOS 8 server. So you will need to disable it first.
You can do this by editing /etc/selinux/config file:
nano /etc/selinux/configMake the following changes:
SELINUX=disabled
Save and close the file. Then, restart your server to apply the changes.
Install Webmin with RPM
First, you will need to install the required dependencies by running the following command:
dnf install perl perl-Net-SSLeay openssl perl-Encode-DetectOnce all the dependencies are installed, download the Webmin RPM package from the Sourceforge download page with the following command:
wget https://prdownloads.sourceforge.net/webadmin/webmin-1.930-1.noarch.rpmOnce downloaded, run the following command to install Webmin:
rpm -ivh webmin-1.930-1.noarch.rpmYou should see the following output:
warning: webmin-1.930-1.noarch.rpm: Header V4 DSA/SHA1 Signature, key ID 11f63c51: NOKEY
Verifying...                          ################################# [100%]
Preparing...                          ################################# [100%]
Operating system is CentOS Linux
Updating / installing...
   1:webmin-1.930-1                   ################################# [100%]

Webmin install complete. You can now login to https://centos8:10000/
as root with your root password.
By default, Webmin runs on port 10000. You can check whether Webmin is running or not with the following command:
netstat -ant | grep 10000You should see the following output:
tcp 0 0 0.0.0.0:10000 0.0.0.0:* LISTEN
You can also check the Webmin process with the following command:
ps -ef | grep webminYou should see the following output:
root      2131     1  0 12:29 ?        00:00:00 /usr/bin/perl /usr/libexec/webmin/miniserv.pl /etc/webmin/miniserv.conf
root      2225  6290  0 12:30 pts/0    00:00:00 grep --color=auto webmin
Install Webmin with Yum Repository
You can also install the Webmin from CentOS Yum repository. First, create a Webmin repository with the following command:
nano /etc/yum.repos.d/webmin.repoAdd the following lines:
[Webmin]
name=Webmin Distribution Neutral
mirrorlist=https://download.webmin.com/download/yum/mirrorlist
enabled=1
Save and close the file. Then, download and add the repository signing key with the following command:
wget http://www.webmin.com/jcameron-key.asc
 rpm --import jcameron-key.asc
Next, install the Webmin by running the following command:
dnf install webminOnce the installation is completed, you should see the following output:
Installing       : webmin-1.930-1.noarch                                                       2/2
Running scriptlet: webmin-1.930-1.noarch                                                       2/2
Webmin install complete. You can now login to https://centos8:10000/
as root with your root password.
Access Webmin in Browser
By default, Webmin listens on port 10000. So you will need to open the Webmin port in firewalld. You can do it with the following command:
firewall-cmd --zone=public --add-port=10000/tcp --permanent
 firewall-cmd --reload
Now, open your web browser and type the URL https://your-server-ip:10000. You will be redirected to the following page:
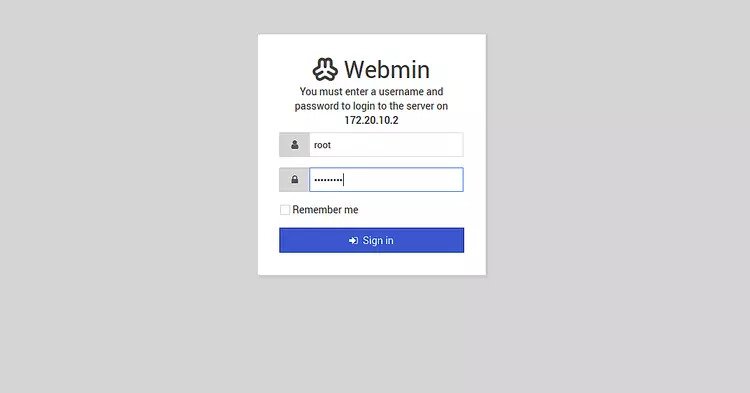
Provide your root user, password and click on the Sign in button. You should see the Webmin dashboard in the following page:
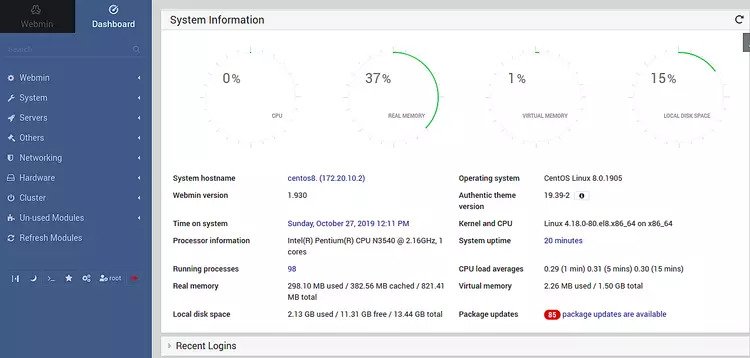
From here, you can configure and manage your CentOS 8 server easily.Advertisements
Conclusion
Congratulations! you have successfully installed Webmin on CentOS 8 server. You can now easily install LAMP/LEMP server, FTP server and hosting your website easily through the Webmin web interface.
How to connect Codeigniter with MSSQL (SQL Server)
$active_group = ‘my_mssql’;
$active_record = TRUE;
$db[‘my_mssql’][‘hostname’] = ‘Driver={SQL Server Native Client 11.0};Server=Host\Instance;Database=queue_sys;’;
$db[‘my_mssql’][‘username’] = ‘wow_queue’;
$db[‘my_mssql’][‘password’] = ‘wow12345’;
$db[‘my_mssql’][‘database’] = ”;
$db[‘my_mssql’][‘dbdriver’] = ‘odbc’;
$db[‘my_mssql’][‘dbprefix’] = ”;
$db[‘my_mssql’][‘pconnect’] = FALSE;
$db[‘my_mssql’][‘db_debug’] = TRUE;
$db[‘my_mssql’][‘cache_on’] = FALSE;
$db[‘my_mssql’][‘cachedir’] = ”;
$db[‘my_mssql’][‘char_set’] = ‘utf8’;
$db[‘my_mssql’][‘dbcollat’] = ‘utf8_general_ci’;
$db[‘my_mssql’][‘swap_pre’] = ”;
$db[‘my_mssql’][‘autoinit’] = TRUE;
$db[‘my_mssql’][‘stricton’] = FALSE;
Note:
SQL Server Native Client 11.0 or SQL Server Native Client 10.0, just play with both settings.
Server=xx.xx.xx.x usually is in the format Server=Host\Instance
Removing index.php from the address bar
RewriteEngine on
RewriteCond $1 !^(index\.php|images|robots\.txt)
RewriteRule ^(.*)$ index.php/$1 [L]
A Simple Template for Post Formats
’;
echo the_title();
echo ‘
’;
echo the_content();
}
elseif ( has_post_format( ‘gallery’ )) {
echo ‘
’;
echo the_title();
echo ‘
’;
echo the_content();
}
elseif ( has_post_format( ‘image’ )) {
echo ‘
’; echo the_title(); echo ‘
’; echo the_post_thumbnail(‘image-format’); echo the_content();}
elseif ( has_post_format( ‘link’ )) {
echo ‘
’; echo the_title(); echo ‘
’; echo the_content();}
elseif ( has_post_format( ‘quote’ )) {
echo the_content();}
elseif ( has_post_format( ‘status’ )) {
echo the_content();}
elseif ( has_post_format( ‘video’ )) {
echo ‘
’; echo the_title(); echo ‘
’; echo the_content();}
elseif ( has_post_format( ‘audio’ )) {
echo ‘
’; echo the_title(); echo ‘
’; echo the_content();}
else {
echo ‘
’; echo the_title(); echo ‘
’; echo the_content();}
?>
.htaccess File
# invoke rewrite engine
RewriteEngine On
RewriteBase /
Options -Indexes
Options -MultiViews
# Redirect to www
RewriteCond %{HTTP_HOST} !^www\.
RewriteRule ^(.*)$ http://www.%{HTTP_HOST}/$1 [R=301,L]
# Prevent scraping from archive for free demo
RewriteCond %{HTTP_USER_AGENT} (ia_archiver) [NC]
RewriteRule . – [F,L]
# redirect all extension to html
RewriteCond %{QUERY_STRING} ^$
RewriteRule ^(.*)\.shtml$ $1.html [L,NC,R=301]
RewriteCond %{QUERY_STRING} ^$
RewriteRule ^(.*)\.phtml$ $1.html [L,NC,R=301]
RewriteCond %{QUERY_STRING} ^$
RewriteRule ^(.*)\.htm$ $1.html [L,NC,R=301]
RewriteCond %{QUERY_STRING} ^$
RewriteRule ^(.*)\.php$ $1.html [L,NC,R=301]
RewriteCond %{QUERY_STRING} ^$
RewriteRule ^(.*)\.aspx$ $1.html [L,NC,R=301]
RewriteCond %{QUERY_STRING} ^$
RewriteRule ^(.*)\.asp$ $1.html [L,NC,R=301]
RewriteCond %{QUERY_STRING} ^$
RewriteRule ^(.*)\.jsp$ $1.html [L,NC,R=301]
# Add a trailing slash (/) to a URL
RewriteCond %{REQUEST_FILENAME} !-f
RewriteCond %{REQUEST_URI} !\.[A-Za-z0-9]*$
RewriteRule .*[^/]$ %{REQUEST_URI}/ [L,R=301]
# Create pretty URLs
RewriteRule ^([^/]+)/$ $1.html
RewriteRule ^([^/]+)/([^/]+)/$ $1/$2.html
RewriteRule ^([^/]+)/([^/]+)/([^/]+)/$ $1/$2/$3.html
RewriteRule ^([^/]+)/([^/]+)/([^/]+)/([^/]+)/$ $1/$2/$3/$4.html
RewriteRule ^([^/]+)/([^/]+)/([^/]+)/([^/]+)/([^/]+)/$ $1/$2/$3/$4/$5.html
RewriteRule ^([^/]+)/([^/]+)/([^/]+)/([^/]+)/([^/]+)/([^/]+)/$ $1/$2/$3/$4/$5/$6.html
RewriteRule ^([^/]+)/([^/]+)/([^/]+)/([^/]+)/([^/]+)/([^/]+)/([^/]+)/$ $1/$2/$3/$4/$5/$6/$7.html
RewriteRule ^index.html$ / [L,R=301]
How to use PHP to connect to SQL Server
php
$myServer = "10.85.80.229";
$myUser = "root";
$myPass = "pass";
$myDB = "testdb";

$dbhandle = mssql_connect($myServer, $myUser, $myPass)
  or die("Couldn't connect to SQL Server on $myServer");
?>
php
$serverName = "ServerName";
$uid = "sqlusername";
$pwd = "sqlpassword";
$databaseName = "DBName";

$connectionInfo = array( "UID"=>$uid,
                         "PWD"=>$pwd,
                         "Database"=>$databaseName);

/* Connect using SQL Server Authentication. */
$conn = sqlsrv_connect( $serverName, $connectionInfo);

$tsql = "SELECT id, FirstName, LastName, Email FROM tblContact";

/* Execute the query. */

$stmt = sqlsrv_query( $conn, $tsql);

if ( $stmt )
{
     echo "Statement executed.
\n";
}
else
{
     echo "Error in statement execution.\n";
     die( print_r( sqlsrv_errors(), true));
}

/* Iterate through the result set printing a row of data upon each iteration.*/

while( $row = sqlsrv_fetch_array( $stmt, SQLSRV_FETCH_NUMERIC))
{
     echo "Col1: ".$row[0]."\n";
     echo "Col2: ".$row[1]."\n";
     echo "Col3: ".$row[2]."
\n";
     echo "-----------------
\n";
}

/* Free statement and connection resources. */
sqlsrv_free_stmt( $stmt);
sqlsrv_close( $conn);
?> WPGlobus language switcher shortcode
?php echo (WPGlobus::Config()->language == ‘en’) ? ‘Language Englisht Text’ : ‘Language Albanian Tekst’; ?>
where albanian is the primary language
How to Activate Windows 10 Pro with CMD
Step 1. Click Start and type cmd, right-click Command Prompt app and choose Run as administrator.
Step 2. Copy and paste the following command line in Command Prompt window and hit Enter. If you find other keys for Windows 10 Pro, you can replace it with the key in the command line after slmgr /ipk.
slmgr /ipk W269N-WFGWX-YVC9B-4J6C9-T83GX
Step 3. Type the following command lines and remember to hit Enter after you type each line.
slmgr /skms kms.xspace.in
slmgr /ato
How to Check If Your Windows 10 Is Activated or Not
If you want to check whether your Windows 10 computer is activated or not, you can press Windows + R keys on the keyboard to open Run box, type slmgr.vbs -xpr in Run box and hit Enter.
