Databases

Install Oracle Database 19c on CentOS 8 in VirtualBox

** Please use the root user to edit the files and execute the commands unless further notice. **

Prerequisite

  1. Install the latest VirtualBox Platform Package and the VirtualBox Extension Pack (Oracle_VM_VirtualBox_Extension_Pack-VERSION.vbox-extpack).
  2. Download the latest VirtualBox Guest Additions (VBoxGuestAdditions_VERSION.iso).
  3. Download the latest CentOS Stream 8.
  4. Create a new virtual machine and install the CentOS to the virtual machine. During the CentOS installation, select Workstation as Base Environment, select Container ManagementDevelopment Tools and Graphical Administration Tools as Additional software for Selected Environment. Use http://mirror.centos.org/centos/8/BaseOS/x86_64/os/ as the installation source.
  5. After installing the CentOS, execute the following commands to get the required libraries to create applications for handling compiled objects.
dnf update
dnf -y install elfutils-libelf-devel
  1. Insert the ISO of VirtualBox Guest Additions to the virtual machine, and then install it.

Download Packages and Software

Hostname and Host File

  1. Open the file /etc/hostname, change the content to update the hostname.
ol8-19.localdomain
  1. Open the file /etc/hosts, add your IP address and hostname.
192.168.122.1 ol8-19.localdomain

Install Required Packages

  1. Perform a dnf update to update every currently installed package.
dnf update
  1. Add execute permission to the downloaded rpm files.
chmod u+x *.rpm
  1. Install the libcapl library for getting and setting POSIX.1e (formerly POSIX 6) draft 15 capabilities.
dnf localinstall -y compat-libcap1-1.10-7.el7.x86_64.rpm
  1. Inatll the libstdc++ package which contains compatibility standard C++ library from GCC 3.3.4.
dnf localinstall -y compat-libstdc++-33-3.2.3-72.el7.x86_64.rpm
  1. Install the below required packages.
dnf install -y bc binutils elfutils-libelf elfutils-libelf-devel fontconfig-devel \
    gcc gcc-c++ glibc glibc-devel ksh ksh libaio libaio-devel libgcc libnsl libnsl.i686 \
    libnsl2 libnsl2.i686 librdmacm-devel libstdc++ libstdc++-devel libX11 libXau libxcb \
    libXi libXrender libXrender-devel libXtst make net-tools nfs-utils smartmontools \
    sysstat targetcli unixODBC;

Install Oracle Installation Prerequisites

  1. Install the Oracle Installation Prerequisites (OIP) package.
dnf localinstall -y oracle-database-preinstall-19c-1.0-1.el7.x86_64.rpm
  1. Open the /etc/group file, update the GID of the below items.
oinstall:x:64890:oracle
dba:x:64891:oracle
oper:x:64892:oracle
backupdba:x:64893:oracle
dgdba:x:64894:oracle
kmdba:x:64895:oracle
racdba:x:64896:oracle
  1. Open the /etc/passwd file, update both the UID and GID of account oracle.
oracle:x:64890:64890::/home/oracle:/bin/bash
  1. Update the password of account oracle.
passwd oracle
  1. Set secure Linux to permissive by editing the /etc/selinux/config file.
SELINUX=permissive
  1. Set the secure Linux change right now.
setenforce Permissive
  1. Disable the firewall.
systemctl stop firewalld
systemctl disable firewalld

Setup Oracle User Profile

  1. Create Oracle directories.
mkdir -p /u01/app/oracle/product/19.3.0/dbhome_1
mkdir -p /u02/oradata
chown -R oracle:oinstall /u01 /u02
chmod -R 775 /u01 /u02
  1. Create a new directory for Oracle user.
mkdir -p /home/oracle/scripts
chown -R oracle:oinstall /home/oracle
  1. Create an environment setting file.
cat > /home/oracle/scripts/setEnv.sh <<EOF
# Oracle Settings
export TMP=/tmp
export TMPDIR=\$TMP

export ORACLE_HOSTNAME=$HOSTNAME
export ORACLE_UNQNAME=cdb1
export ORACLE_BASE=/u01/app/oracle
export ORACLE_HOME=\$ORACLE_BASE/product/19.3.0/dbhome_1
export ORA_INVENTORY=/u01/app/oraInventory
export ORACLE_SID=cdb1
export PDB_NAME=pdb1
export DATA_DIR=/u02/oradata

export PATH=/usr/sbin:/usr/local/bin:\$PATH
export PATH=\$ORACLE_HOME/bin:\$PATH

export LD_LIBRARY_PATH=\$ORACLE_HOME/lib:/lib:/usr/lib
export CLASSPATH=\$ORACLE_HOME/jlib:\$ORACLE_HOME/rdbms/jlib
EOF
  1. Create a startup shell script.
cat > /home/oracle/scripts/start_all.sh <<EOF
#!/bin/bash
. /home/oracle/scripts/setEnv.sh

export ORAENV_ASK=NO
. oraenv
export ORAENV_ASK=YES

dbstart \$ORACLE_HOME
EOF
  1. Create a stop shell script.
cat > /home/oracle/scripts/stop_all.sh <<EOF
#!/bin/bash
. /home/oracle/scripts/setEnv.sh

export ORAENV_ASK=NO
. oraenv
export ORAENV_ASK=YES

dbshut \$ORACLE_HOME
EOF
  1. Update the owner and permission of the shell scripts and its parent directory.
chown -R oracle:oinstall /home/oracle
chmod u+x /home/oracle/scripts/*.sh
  1. Set the environment when the Bash runs whenever it is started interactively.
cat > /home/oracle/.bashrc <<EOF
#.bashrc

# User specific aliases and functions

alias rm='rm -i'
alias cp='cp -i'
alias mv='mv -i'

# Source global definitions
if [ -f /etc/bashrc ]; then
  . /etc/bashrc
fi

. /home/oracle/scripts/setEnv.sh >> /home/oracle/.bashrc
EOF

chown oracle:oinstall /home/oracle/.bashrc

Create and Add New Swap File

  1. Run the following command, with oracle user, to create and apply new swap file.
dd if=/dev/zero of=/tmp/additional-swap bs=1048576 count=4096
chmod 600 /tmp/additional-swap
mkswap /tmp/additional-swap
  1. Apply the swap by executing the following command with root user.
swapon /tmp/additional-swap

Install Oracle Database

  1. Set the DISPLAY variable with oracle user.
DISPLAY=$HOSTNAME:0.0; export DISPLAY
  1. Unzip the archive with oracle user.
cd $ORACLE_HOME
unzip -oq /path/to/software/LINUX.X64_193000_db_home.zip
  1. “Cheat” the installer about the distribution with oracle user.
export CV_ASSUME_DISTID=RHEL7.6
  1. Run the installer, with oracle user, to install Oracle database.
cd $ORACLE_HOME
./runInstaller -ignorePrereq -waitforcompletion -silent                        \
    -responseFile ${ORACLE_HOME}/install/response/db_install.rsp               \
    oracle.install.option=INSTALL_DB_SWONLY                                    \
    ORACLE_HOSTNAME=${ORACLE_HOSTNAME}                                         \
    UNIX_GROUP_NAME=oinstall                                                   \
    INVENTORY_LOCATION=${ORA_INVENTORY}                                        \
    SELECTED_LANGUAGES=en,en_GB                                                \
    ORACLE_HOME=${ORACLE_HOME}                                                 \
    ORACLE_BASE=${ORACLE_BASE}                                                 \
    oracle.install.db.InstallEdition=EE                                        \
    oracle.install.db.OSDBA_GROUP=dba                                          \
    oracle.install.db.OSBACKUPDBA_GROUP=dba                                    \
    oracle.install.db.OSDGDBA_GROUP=dba                                        \
    oracle.install.db.OSKMDBA_GROUP=dba                                        \
    oracle.install.db.OSRACDBA_GROUP=dba                                       \
    SECURITY_UPDATES_VIA_MYORACLESUPPORT=false                                 \
    DECLINE_SECURITY_UPDATES=true
  1. If the setup is success, the following message should be printed on screen.
Successfully Setup Software.
  1. Execute the below scripts, with root user, to update the permission of Oracle directories and set the environment variables.
/u01/app/oraInventory/orainstRoot.sh
/u01/app/oracle/product/19.3.0/dbhome_1/root.sh

Database Creation

  1. Start the listener with oracle user.
lsnrctl start
  1. Create a database with oracle user.
dbca -silent -createDatabase                                                   \
     -templateName General_Purpose.dbc                                         \
     -gdbname ${ORACLE_SID} -sid  ${ORACLE_SID} -responseFile NO_VALUE         \
     -characterSet AL32UTF8                                                    \
     -sysPassword SysPassword1                                                 \
     -systemPassword SysPassword1                                              \
     -createAsContainerDatabase true                                           \
     -numberOfPDBs 1                                                           \
     -pdbName ${PDB_NAME}                                                      \
     -pdbAdminPassword PdbPassword1                                            \
     -databaseType MULTIPURPOSE                                                \
     -automaticMemoryManagement false                                          \
     -totalMemory 1000                                                         \
     -storageType FS                                                           \
     -datafileDestination "${DATA_DIR}"                                        \
     -redoLogFileSize 50                                                       \
     -emConfiguration NONE                                                     \
     -ignorePreReqs

Listener Update

  1. Replace or edit the listener.ora file, with oracle user, to set the correct hostname, port number and SID name.
cat > /u01/app/oracle/product/19.3.0/dbhome_1/network/admin/listener.ora <<EOF
LISTENER =
  (DESCRIPTION_LIST =
    (DESCRIPTION =
      (ADDRESS = (PROTOCOL = TCP)(PORT = 1539))
      (ADDRESS = (PROTOCOL = IPC)(KEY = EXTPROC1521))
    )
  )

SID_LIST_LISTENER =
  (SID_LIST =
    (SID_DESC =
      (SID_NAME = ${ORACLE_SID})
    )
  )

EOF
  1. Reload the Oracle Listener.
lsnrctl reload

Post Installation

  1. Edit the /etc/oratab file, with root user, to update the restart flag from ‘N‘ to ‘Y‘.
orcl:/u01/app/oracle/product/19.3.0/dbhome_1:Y
  1. Configure the Database instance “orcl” with auto startup.
cd $ORACLE_HOME/dbs
ln -s spfilecdb1.ora initorcl.ora
  1. Enable Oracle Managed Files (OMF) and make sure the PDB starts when the instance starts.
sqlplus / as sysdba <<EOF
alter system set db_create_file_dest='${DATA_DIR}';
alter pluggable database ${PDB_NAME} save state;
exit;
EOF
  1. Execute the following commands, with root user, to start the Oracle Listener automatically.
cat > /home/oracle/scripts/cron.sh <<EOF1
#!/bin/bash

. /home/oracle/scripts/setEnv.sh

echo "\`date\`" > /home/oracle/scripts/last.log

lsnrctl start

sleep 3

lsnrctl reload

sleep 3

sqlplus /nolog <
conn / as sysdba
startup
EOF

EOF1

chown oracle:oinstall /home/oracle/scripts/cron.sh
chmod 744 /home/oracle/scripts/cron.sh
  1. Use the following command, with oracle user, to edit the crontab file.
crontab -e
  1. Put the following cron job in the first line of crontab file, then press the keys :wq to save and exit.
@reboot /home/oracle/scripts/cron.sh

Healthcheck

  1. Login as oracle user and then execute the following commands one-by-one.
sqlplus /nolog
conn / as sysdba;
select * from v$version;
show pdbs;

Create New User and Tablespace

  1. Login as Sysdba with SqlPlus.
sqlplus / as sysdba
  1. Update the seesion setting _ORACLE_SCRIPT to true to allow common user comes without c## as prefix.
ALTER SESSION SET "_ORACLE_SCRIPT"=true;
  1. Create a new tablespace with an automatic extensible size 100MB, maximum 10G in size.
-- DROP TABLESPACE my_tablespace INCLUDING CONTENTS AND DATAFILES;
-- Location of the dat file: /u01/app/oracle/product/19.3.0/dbhome_1/dbs/my_tablespace.dat
-- SELECT tablespace_name, block_size, max_size, status FROM DBA_TABLESPACES;
CREATE TABLESPACE my_tablespace
  DATAFILE 'my_tablespace.dat'
    SIZE 100M
    AUTOEXTEND ON
    NEXT 32M MAXSIZE 10G
    EXTENT MANAGEMENT LOCAL
    SEGMENT SPACE MANAGEMENT AUTO
;

SELECT FILE_ID, FILE_NAME, TABLESPACE_NAME, AUTOEXTENSIBLE, INCREMENT_BY 
FROM DBA_DATA_FILES ORDER BY FILE_ID DESC;
  1. [Optional] Update the password life time from 180 days (default) to unlimited.
ALTER PROFILE DEFAULT LIMIT PASSWORD_LIFE_TIME UNLIMITED;
  1. Create a new user.
-- ALTER SESSION SET "_ORACLE_SCRIPT"=true;
-- DROP USER newuser CASCADE;
CREATE USER newuser IDENTIFIED BY "P@ssw0rd" DEFAULT TABLESPACE my_tablespace;
  1. Grant permissions to the new user.
-- REVOKE CREATE SESSION FROM newuser;
-- REVOKE CREATE TABLE FROM newuser;
-- REVOKE CREATE VIEW FROM newuser;
-- REVOKE CREATE ANY TRIGGER FROM newuser;
-- REVOKE CREATE ANY PROCEDURE FROM newuser;
-- REVOKE CREATE SEQUENCE FROM newuser;
-- REVOKE CREATE SYNONYM FROM newuser;
GRANT CREATE SESSION TO newuser;
GRANT CREATE TABLE TO newuser;
GRANT CREATE VIEW TO newuser;
GRANT CREATE ANY TRIGGER TO newuser;
GRANT CREATE ANY PROCEDURE TO newuser;
GRANT CREATE SEQUENCE TO newuser;
GRANT CREATE SYNONYM TO newuser;

ALTER USER newuser QUOTA UNLIMITED ON my_tablespace;
  1. [Optional] Grant DBA to the new user.
-- REVOKE DBA FROM newuser;
GRANT DBA TO newuser;

References

How to Permanently Activate Windows 10 with CMD

Without third-party Windows 10 activation tools, you can activate Windows 10 with CMD for free. Here we’ll introduce how to activate Windows Enterprise edition with CMD.

Step 1. You can press Windows + R key on the keyboard to open Windows Run box. Type cmd, and press Ctrl + Shift + Enter to open and run Windows Command Prompt as administrator.

Step 2. After you enter into Windows 10 Command Prompt, you can copy and paste this command line: slmgr.vbs /upk, in the Command Prompt window. Hit Enter to execute the command.

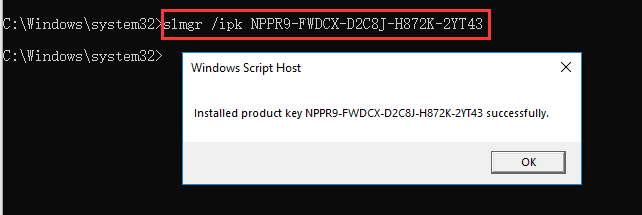
Step 3. Next you can copy and paste this command line and hit Enter to install the Windows 10 product key: slmgr /ipk NPPR9-FWDCX-D2C8J-H872K-2YT43.

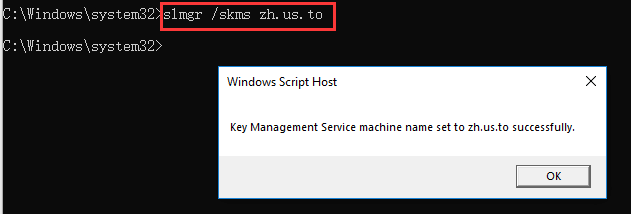
Step 4. Then you can type slmgr /skms zh.us.to command line and hit Enter.

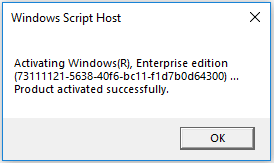
Step 5. At last, copy and paste slmgr /ato and hit Enter to activate Windows 10 for free with CMD.

VMWare Workstation 9 & 10

VMWare Workstation 9 Keys:

HA2VM-220EP-3ZAN8-JR156-8CNHD
1V6JV-60H84-LZXV0-028G2-CA2HD
0V0HD-641E4-FZWK0-UH1EM-CAEP1
NG25P-AW2DN-RZ1V0-K8252-ACY0P
1V22N-4LK8H-TZ1N9-GR9Q2-92GK5

VMWare Workstation 10 Keys:

1Z0G9-67285-FZG78-ZL3Q2-234JG
4C4EK-89KDL-5ZFP9-1LA5P-2A0J0
HY086-4T01N-CZ3U0-CV0QM-13DNU
5U4GA-DQ09H-EZK48-YTAQP-83K79
NU4FQ-DFH40-0ZA01-8A37K-32RKL
HF0DA-FF086-VZ739-AA87H-236M4
HF0A8-FMJ1P-1Z1U1-LK1N2-9AGKJ
5A477-D3284-3ZUF0-2K154-23R0P
MY47Y-2MK1M-6ZQC0-7J05M-8A60D
5V6K2-29243-HZDV0-VVA76-93A2R
NA28T-DR114-AZ9Z8-R1250-93U27
MF4JG-4H3DK-NZ3L0-KHCNM-8AMNP
NA6F3-2HKEM-6ZDF8-Q18N6-33DNN
1Y2FZ-AHJ5H-6ZU09-DKA5M-82RQ7
5U6KQ-6M240-LZMW1-U13N2-AAX7X
HA4FW-8G052-DZ8Q0-U295P-83KLV
5F4PK-42181-9ZXP9-T31Q6-1CVKM
JY468-44L9M-DZ479-3UA72-CAKHR
4F6Z5-80H42-FZ889-L007M-ACJJN
5F6E9-DHL4J-HZ640-KLA70-8C0NN

Serial key of vmware workstation 9.0.1:
4A62F-FU00N-VZM78-ZKCQK-8297E
NA2Y9-2ALE1-3ZNX1-10CQ4-0CK77
HU047-DYKE4-ZZPQ8-L02QH-1AZ4W
JZ422-4AKDN-3ZKV8-G2A5P-827PK
4F2MR-D92EH-GZNV8-YLA7H-13YM9
NF6HV-D435L-XZPD9-J817K-CCN58
4Z6C4-DR1E6-KZ4U0-0K15H-0CFPK
JC0ZU-0H150-3ZTR9-DT15P-02N2K
MA2UX-D614Q-CZ7H1-MACN4-82TQZ
JG6UD-4RH9P-GZP59-9V25K-02TP6
MU0XV-F70D7-3ZW58-FH072-1AP59
1F6VP-AQ20J-GZ4U0-NT17P-8305J

Migration From SQL Server To Oracle Using SQL Developer

Migration is the process of copying the schema objects and data from a non-Oracle database, such as MySQL, Microsoft SQL Server, Sybase Adaptive Server, Microsoft Access, or IBM DB2, to an Oracle database.

To migrate a third-party database to Oracle easily, you can choose the following options using SQL Developer:

– Migrating using the Migration Wizard

– Copying tables to Oracle

Migrating Using the Migration Wizard

The Migration wizard provides a screen to manage all the steps needed for the migration to Oracle database. These steps are as follows:

– Capturing the source database (MySQL, Microsoft SQL Server, Sybase Adaptive Server, Microsoft Access, IBM DB2),

– Converting it to Oracle format,

– Generating DDL,

– Performing the conversion.

After a brief explanation about the process of migration, let’s do a simple migration from SQL Server database to Oracle database.

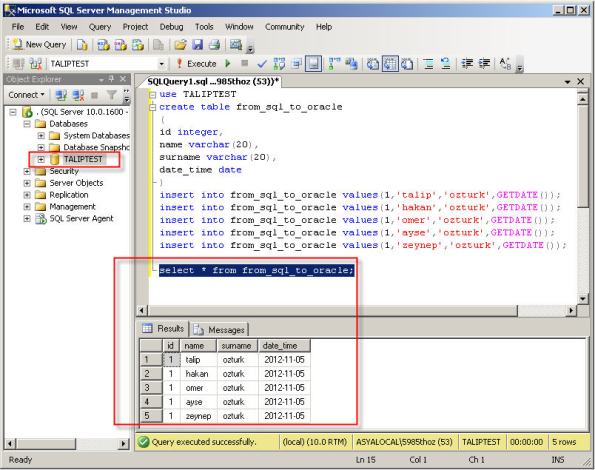
1- I created sample SQL Server database named TALIPTEST.

2- The migration repository is a collection of schema objects that SQL Developer uses to manage metadata for migrations. For a migration repository create a database connection to convenient Oracle database and give following grants.

 CREATE USER MIGRATIONS IDENTIFIED BY “migration”

DEFAULT TABLESPACE USERS

TEMPORARY TABLESPACE TEMP;

grant create session to migrations;

grant resource to migrations;

grant create view to migrations;

For multischema migrations, you must grant the privileges with the ADMIN option as follows.

grant resource to migrations with admin option;

grant create role to migrations with admin option;

grant alter any trigger to migrations with admin option;

grant create user to migrations with admin option;

3- Download SQL Developer from http://www.oracle.com/technetwork/developer-tools/sql-developer/downloads/index.html

4- Unzip the file named sqldeveloper-3.2.20.09.87.zip and extract it. Open  sqldeveloper.exe file to open SQL Developer.

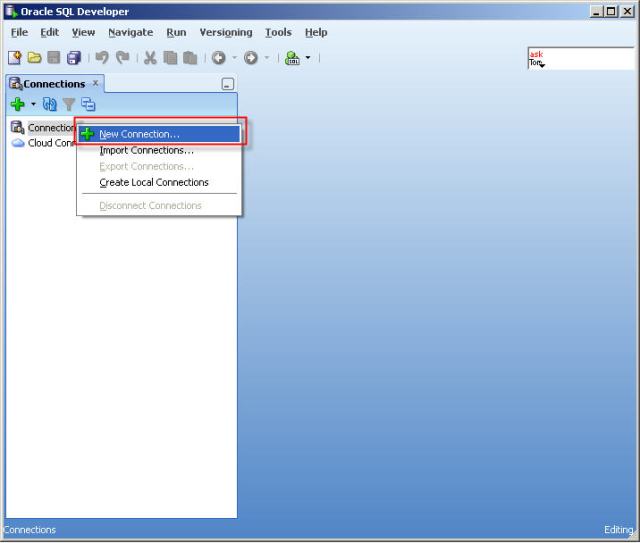
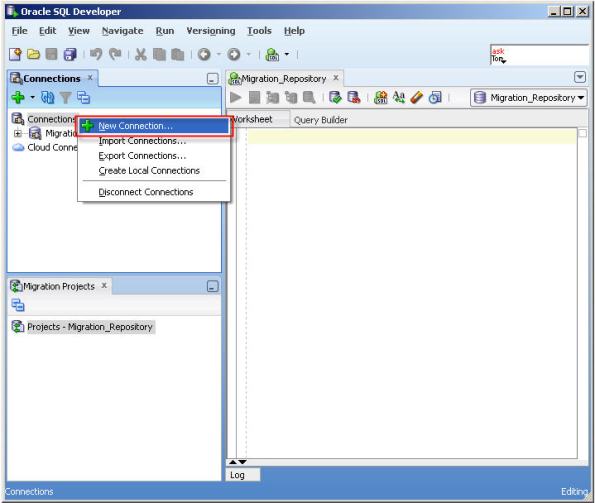
5- Right click to the “Connections” and click the “New Connections”

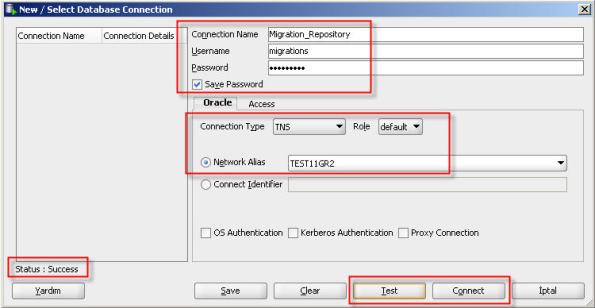
6-  Create a database connection named Migration_Repository that connects to the MIGRATIONS user.

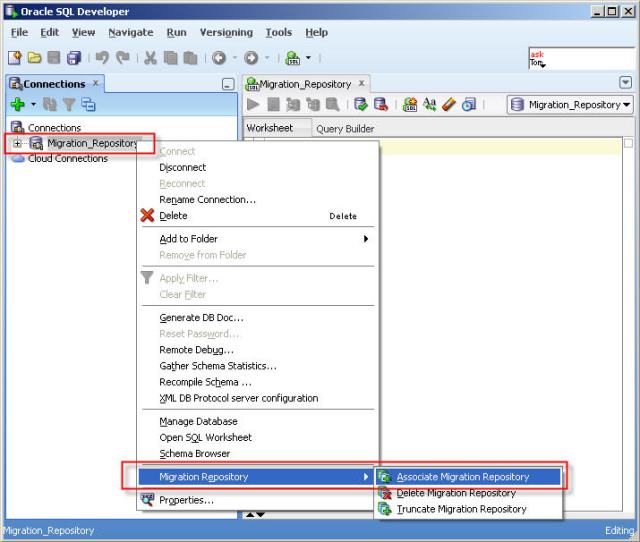
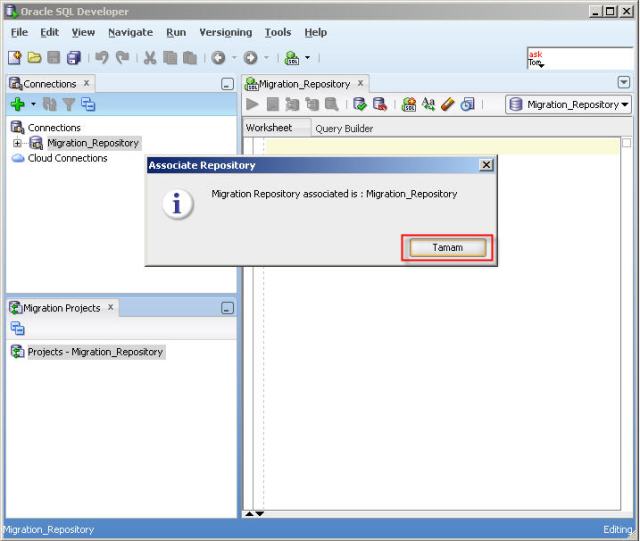
7- Right-click the Migration_Repository connection, and select “Migration Repository” menu , then “Associate Migration Repository” to create the repository.

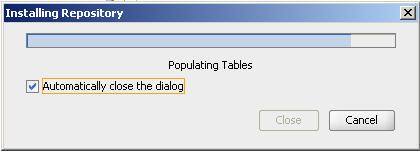
8- Schema objects needed for migration will be created in MIGRATIONS schema.

9- To connect to third-party database (MySQL, Microsoft SQL Server, Sybase Adaptive Server,  Microsoft Access, IBM DB2) using SQL Developer, we need jTDS driver. You can download needed jTDS driver from following link. http://sourceforge.net/projects/jtds/files/jtds/1.2/jtds-1.2-dist.zip/download  . Extract the dowloaded zip file named jtds-1.2-dist.zip

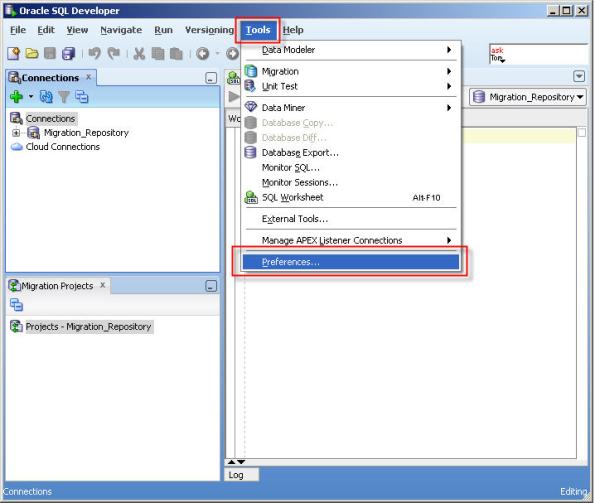
10- Click “Tools” and then “Prefenrences”.

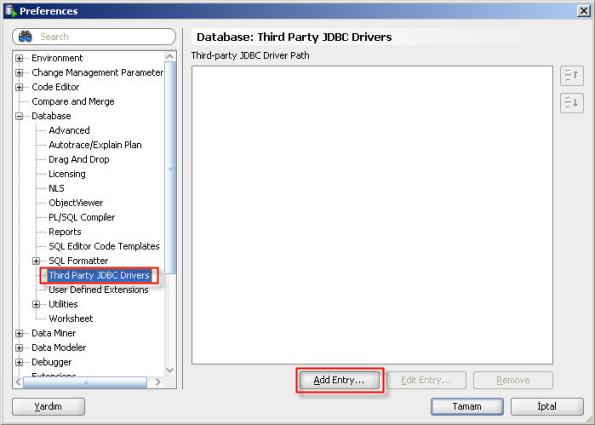
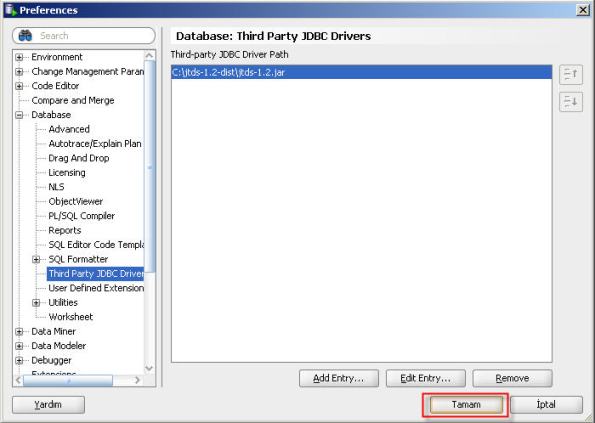
11- Select “Third Party JDBC Drivers” and click “Add Entry” button to add jTDS driver for SQL Server.

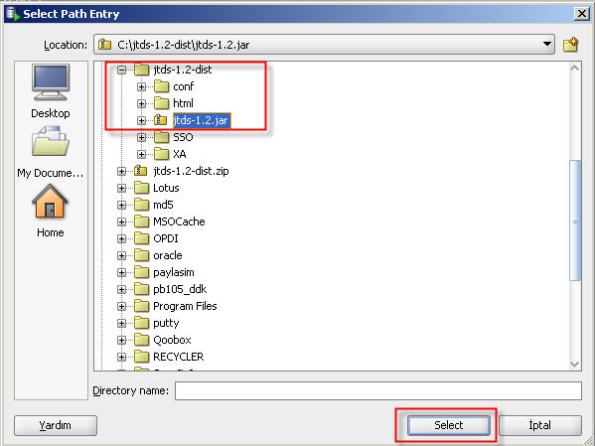
12- Select jar file located in jTDS driver folder.

13- Click “OK” button.

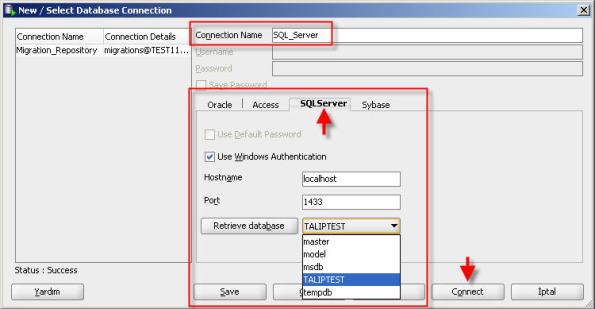
14- Now you can connect to SQL Server or Sybase database using SQL Developer. Connect to the SQL Server database as follows.

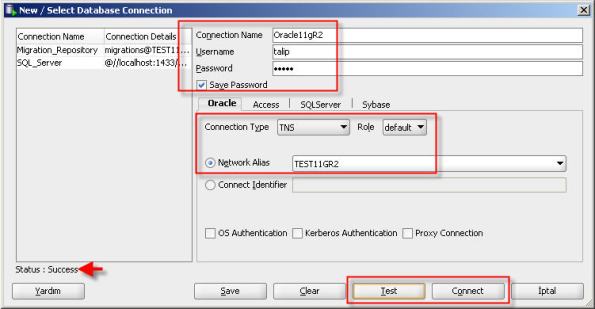
15- And finally, let us create the database connection which we will migrate to.

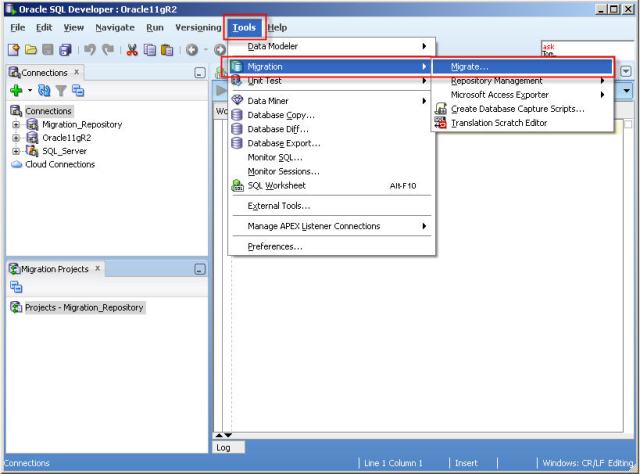
16- The migration wizard is invoked in a variety of contexts. You can right-click a third-party database connection and select “Migrate to Oracle”  or you can click “Tools>Migration>Migrate…”.

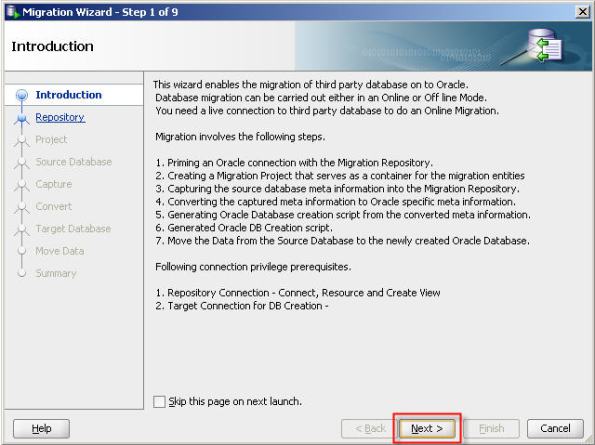
17- Click “Next” button.

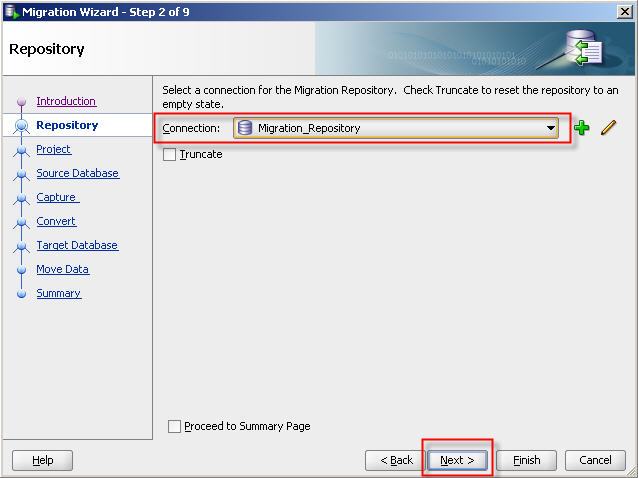
18- Select migration repository database connection.

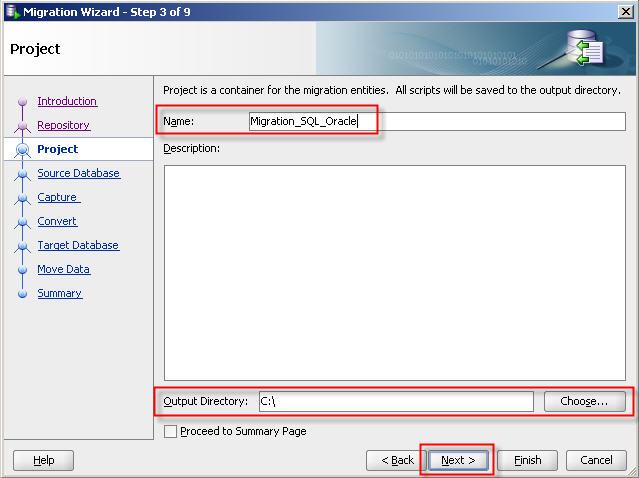
19- Give a name for migration project and select a directory to write output.

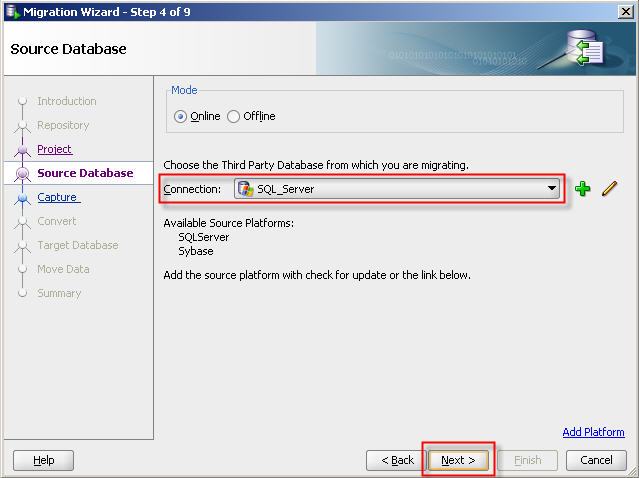
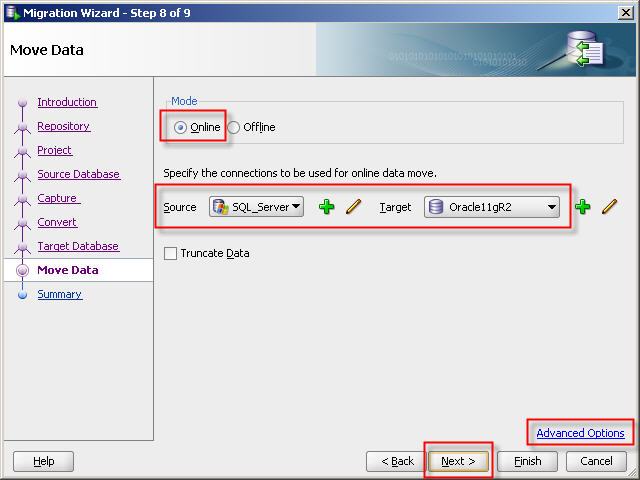
20– Select third party database connection. You can migrate database on online or offline mode. If you choose online migration then Migration Wizard will perform all needed operations. If you choose offline migration then Migration Wizard will generate all needed DDL scripts.

21- Select SQL Server database which we want to migrate to Oracle.

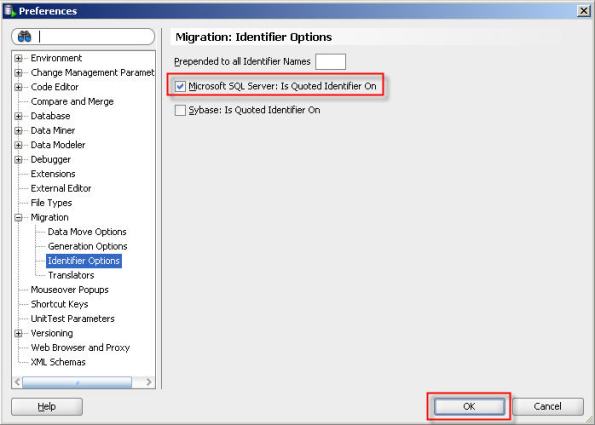
22- Specify the conversion options. And click “Advanced Options” link to ensure “Microsoft SQL Server : Is quoted identifier on” option is selected.

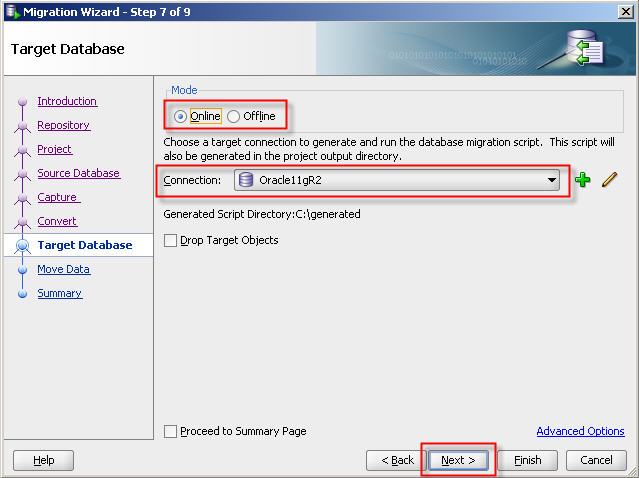
23- Select target database connection.

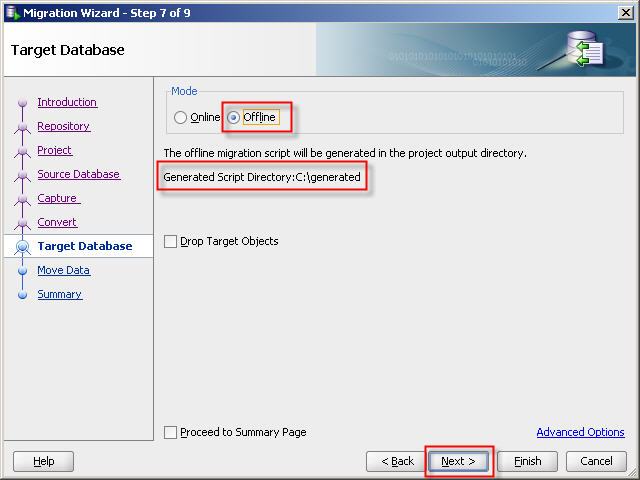
24- If you select offline migration then offline migration script will be generated in the project output directory.

25- Select the connections to be used for online data move.

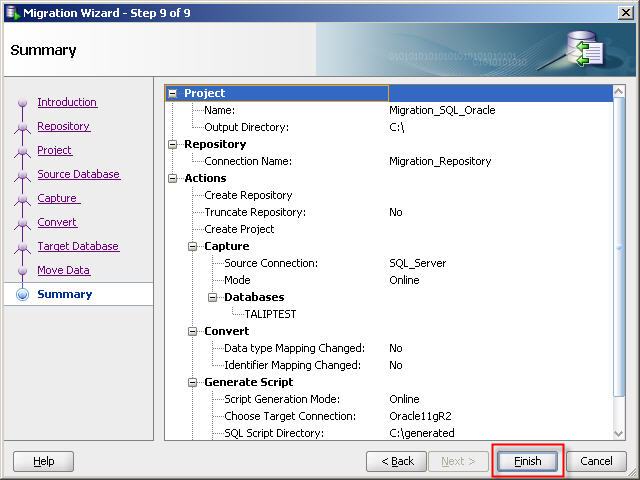
26- Click “Finish” button so start migration.

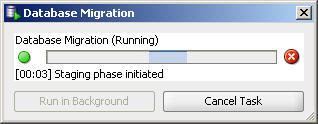
27- Migration and conversion process will be perfomed as follows.

Now, Our SQL Server database in Oracle 🙂

Copying tables to Oracle

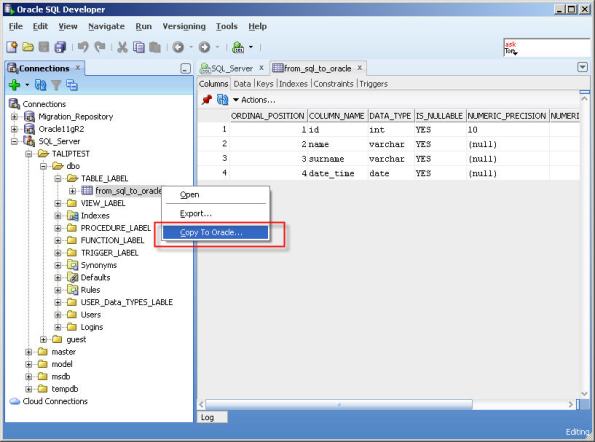
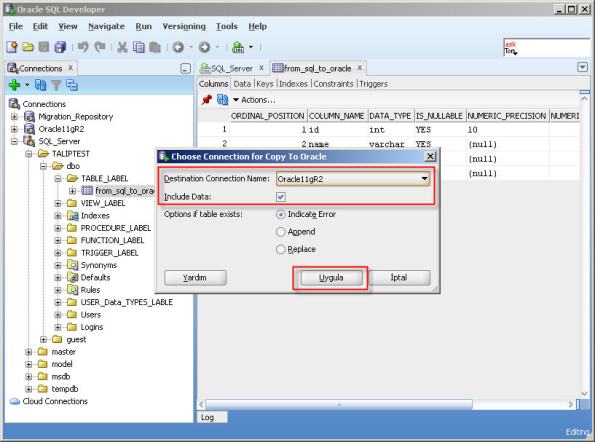
Right click the table located in third party database and click “Copy To Oracle”

Select destination (Oracle) database connection and click “Apply” button. If you choose “Include Data” check box it will create table structure and move data.

Copy to Oracle database is finished.

Note: This method doesn’t move indexes, triggers, etc. It only moves table structure and data.

Data Type Conversion

Data Type Conversion

The gateway converts Microsoft SQL Server data types to Oracle data types as follows:

Table A-1 Data Type Conversions

Microsoft SQL Server Oracle Comment
BIGINT NUMBER(19)
BINARY RAW
BIT NUMBER(3)
CHAR CHAR
DATETIME DATE Fractional parts of a second are truncated
DECIMAL NUMBER(p[,s])
FLOAT FLOAT(49)
IMAGE LONG RAW
INTEGER NUMBER(10) NUMBER range is -2,147,483,647 to 2,147,483,647
MONEY NUMBER(19,4)
NCHAR NCHAR
NTEXT LONG
NVARCHAR NCHAR
NUMERIC NUMBER(p[,s])
REAL FLOAT(23)
SMALL DATETIME DATE The value for seconds is returned as 0
SMALL MONEY NUMBER(10,4)
SMALLINT NUMBER(5) NUMBER range is -32,767 to 32,767
TEXT LONG
TIMESTAMP RAW
TINYINT NUMBER(3)
UNIQUEIDENTIFIER CHAR(36)
VARBINARY RAW
VARCHAR VARCHAR2

Bitrix 24 – Corporate Portal 18.5.180

1C-Bitrix Corporate Portal 18.5.180.tar.gz
Rename and unpack the distribution archive in the ssh command line or using the hosting control panel with the command:
tar xzvf bitrix24_source.tar.gz
2. In the browser, run http: //name-your-site.ru/index.php
3. Follow the instructions of the installer;
4. On the encoding selection screen, ALWAYS select the UTF-8 encoding;
5. When you get to the license entry field – enter PTR-ML-BXPR18XXXXXXXXXX – instead of “X”, any numbers or capital Latin letters.
6. Follow the instructions of the installer.
7. Profit !!

query in the database

INSERT INTO `b_option` (` MODULE_ID`, `NAME`,` VALUE`, `DESCRIPTION`,` SITE_ID`) VALUES
(‘main’, ‘PARAM_MAX_SITES’, ‘ 2 ‘, ”, NULL),
(‘main’ , ‘PARAM_MAX_USERS’, ‘ 100500 ‘, ”, NULL);

Using PCC to load balance across multiple non bonded links.

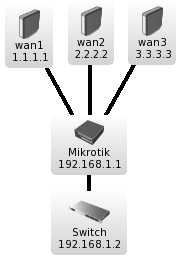
This is my ongoing work at using multiple ADSL services and the Mikrotik PCC rules along with some inbound mangling to allow a single router to load balance traffic across as many non bonded links as required.

Updated: 7th Jan 2010 – notes: added static routing marks for inbound traffic as inbound should never fall over to backup routes, while outbound should go over whatever is available. Also cleaned up routing order so it’s easier to read.

Note that none of this config requires the use of IP addresses at all, as it simply uses the pppoe-client interfaces and your lan interface to mark traffic. In my example wan1-pppoe,wan2-pppoe,wan3-pppoe are used and lan

/ip route
add check-gateway=arp comment="WAN 3  - Distance 1" disabled=no distance=1 dst-address=0.0.0.0/0 gateway=wan3-pppoe routing-mark=wan3
add check-gateway=arp comment="WAN 2  - Distance 1" disabled=no distance=1 dst-address=0.0.0.0/0 gateway=wan2-pppoe routing-mark=wan2
add check-gateway=arp comment="WAN 1  - Distance 1" disabled=no distance=1 dst-address=0.0.0.0/0 gateway=wan1-pppoe routing-mark=wan1
add check-gateway=arp comment="WAN 1  - Distance 2" disabled=no distance=2 dst-address=0.0.0.0/0 gateway=wan2-pppoe routing-mark=wan1
add check-gateway=arp comment="WAN 2  - Distance 2" disabled=no distance=2 dst-address=0.0.0.0/0 gateway=wan3-pppoe routing-mark=wan2
add check-gateway=arp comment="WAN 3  - Distance 2" disabled=no distance=2 dst-address=0.0.0.0/0 gateway=wan1-pppoe routing-mark=wan3
add check-gateway=arp comment="WAN 1  - Distance 3" disabled=no distance=3 dst-address=0.0.0.0/0 gateway=wan3-pppoe routing-mark=wan1
add check-gateway=arp comment="WAN 2  - Distance 3" disabled=no distance=3 dst-address=0.0.0.0/0 gateway=wan1-pppoe routing-mark=wan2
add check-gateway=arp comment="WAN 3  - Distance 3" disabled=no distance=3 dst-address=0.0.0.0/0 gateway=wan2-pppoe routing-mark=wan3
add check-gateway=arp comment="Default Route - Distance 1" disabled=no distance=1 dst-address=0.0.0.0/0 gateway=wan1-pppoe
add check-gateway=arp comment="Default Route - Distance 2" disabled=no distance=3 dst-address=0.0.0.0/0 gateway=wan3-pppoe
add check-gateway=arp comment="Default Route - Distance 3" disabled=no distance=2 dst-address=0.0.0.0/0 gateway=wan2-pppoe
add check-gateway=arp comment="Static Route - WAN1" disabled=no distance=1 dst-address=0.0.0.0/0 gateway=wan1-pppoe routing-mark=static-wan1
add check-gateway=arp comment="Static Route - WAN2" disabled=no distance=2 dst-address=0.0.0.0/0 gateway=wan2-pppoe routing-mark=static-wan2
add check-gateway=arp comment="Static Route - WAN3" disabled=no distance=3 dst-address=0.0.0.0/0 gateway=wan3-pppoe routing-mark=static-wan3
/ip firewall mangle
add action=mark-connection chain=input comment="Mark new inbound connection wan1" connection-state=new disabled=no in-interface=wan1-pppoe new-connection-mark=wan1 \
passthrough=yes
add action=mark-connection chain=input comment="Mark new inbound connection wan2" connection-state=new disabled=no in-interface=wan2-pppoe new-connection-mark=wan2 \
passthrough=yes
add action=mark-connection chain=input comment="Mark new inbound connection wan3" connection-state=new disabled=no in-interface=wan3-pppoe new-connection-mark=wan3 \
passthrough=yes
add action=mark-connection chain=prerouting comment="Mark established inbound connection wan1" connection-state=established disabled=no in-interface=wan1-pppoe \
new-connection-mark=wan1 passthrough=yes
add action=mark-connection chain=prerouting comment="Mark established inbound connection wan2" connection-state=established disabled=no in-interface=wan2-pppoe \
new-connection-mark=wan2 passthrough=yes
add action=mark-connection chain=prerouting comment="Mark established inbound connection wan3" connection-state=established disabled=no in-interface=wan3-pppoe \
new-connection-mark=wan3 passthrough=yes
add action=mark-connection chain=prerouting comment="Mark related inbound connection wan1" connection-state=related disabled=no in-interface=wan1-pppoe \
new-connection-mark=wan1 passthrough=yes
add action=mark-connection chain=prerouting comment="Mark related inbound connection wan2" connection-state=related disabled=no in-interface=wan2-pppoe \
new-connection-mark=wan2 passthrough=yes
add action=mark-connection chain=prerouting comment="Mark related inbound connection wan3" connection-state=related disabled=no in-interface=wan3-pppoe \
new-connection-mark=wan3 passthrough=yes
add action=mark-routing chain=output comment="Mark new inbound route wan1" connection-mark=wan1 disabled=no new-routing-mark=static-wan1 passthrough=no
add action=mark-routing chain=output comment="Mark new inbound route wan2" connection-mark=wan2 disabled=no new-routing-mark=static-wan2 passthrough=no
add action=mark-routing chain=output comment="Mark new inbound route wan3" connection-mark=wan3 disabled=no new-routing-mark=static-wan3 passthrough=no
add action=mark-connection chain=prerouting comment="Mark traffic that isn't local with PCC mark rand (3 possibilities) - option 1" connection-state=new disabled=no \
dst-address-type=!local in-interface=lan new-connection-mark=wan1_pcc_conn passthrough=yes per-connection-classifier=both-addresses:3/0
add action=mark-connection chain=prerouting comment="Mark traffic that isn't local with PCC mark rand (3 possibilities) - option 2" connection-state=new disabled=no \
dst-address-type=!local in-interface=lan new-connection-mark=wan2_pcc_conn passthrough=yes per-connection-classifier=both-addresses:3/1
add action=mark-connection chain=prerouting comment="Mark traffic that isn't local with PCC mark rand (3 possibilities) - option 3" connection-state=new disabled=no \
dst-address-type=!local in-interface=lan new-connection-mark=wan3_pcc_conn passthrough=yes per-connection-classifier=both-addresses:3/2
add action=mark-connection chain=prerouting comment="Mark established traffic that isn't local with PCC mark rand (3 possibilities) - option 1" connection-state=\
established disabled=no dst-address-type=!local in-interface=lan new-connection-mark=wan1_pcc_conn passthrough=yes per-connection-classifier=\
both-addresses:3/0
add action=mark-connection chain=prerouting comment="Mark established traffic that isn't local with PCC mark rand (3 possibilities) - option 2" connection-state=\
established disabled=no dst-address-type=!local in-interface=lan new-connection-mark=wan2_pcc_conn passthrough=yes per-connection-classifier=\
both-addresses:3/1
add action=mark-connection chain=prerouting comment="Mark established traffic that isn't local with PCC mark rand (3 possibilities) - option 3" connection-state=\
established disabled=no dst-address-type=!local in-interface=lan new-connection-mark=wan3_pcc_conn passthrough=yes per-connection-classifier=\
both-addresses:3/2
add action=mark-connection chain=prerouting comment="Mark related traffic that isn't local with PCC mark rand (3 possibilities) - option 1" connection-state=related \
disabled=no dst-address-type=!local in-interface=lan new-connection-mark=wan1_pcc_conn passthrough=yes per-connection-classifier=both-addresses:3/0
add action=mark-connection chain=prerouting comment="Mark related traffic that isn't local with PCC mark rand (3 possibilities) - option 2" connection-state=related \
disabled=no dst-address-type=!local in-interface=lan new-connection-mark=wan2_pcc_conn passthrough=yes per-connection-classifier=both-addresses:3/1
add action=mark-connection chain=prerouting comment="Mark related traffic that isn't local with PCC mark rand (3 possibilities) - option 3" connection-state=related \
disabled=no dst-address-type=!local in-interface=lan new-connection-mark=wan3_pcc_conn passthrough=yes per-connection-classifier=both-addresses:3/2
add action=mark-routing chain=prerouting comment="Mark routing for  PCC mark - option 1" connection-mark=wan1_pcc_conn disabled=no new-routing-mark=wan1 passthrough=\
yes
add action=mark-routing chain=prerouting comment="Mark routing for  PCC mark - option 2" connection-mark=wan2_pcc_conn disabled=no new-routing-mark=wan2 passthrough=\
yes
add action=mark-routing chain=prerouting comment="Mark routing for  PCC mark - option 3" connection-mark=wan3_pcc_conn disabled=no new-routing-mark=wan3 passthrough=\
yes

Convert FAT to NTFS by using Convert.exe – CMD (Command Prompt)

Users who are familiar with computer management can also try to use Convert.exe – CMD to change the FAT partition or storage device to NTFS.

To find out more information about Convert.exe, please follow these steps:

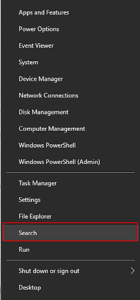
Step 1: Right-click on the “Windows” icon and select “Search”.

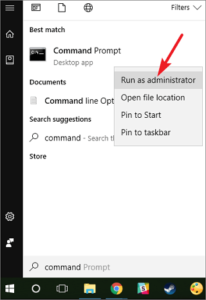
Step 2: Type: Command Prompt in the Search box and right-click on “Command Prompt”, then select “Run as Administrator”.

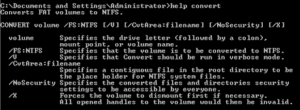
Step 3: In the command window, type help convert and then press “Enter”. (Information about converting FAT volumes to NTFS is made available as shown below.)

To continue changing a FAT volume or device to NTFS from the command prompt, follow these tips:

Step 4: In the command prompt window, type: convert D: /fs:ntfs and hit “Enter”. (Replace D: with the drive letter of your partition or storage device.)

Step 5: All you need is to wait for the converting process to complete and then exit the Command Prompt.

The file system will be changed into NTFS and you can use it to save data again.

Free Web Hosting