With Red Hat officially ending support for CentOS 8, users are forced to migrate to a different operating system. While CentOS 7 remains supported till end of 2024, the life cycle of the newer CentOS 8 was cut short by Red Hat for the end of 2021. Red Hat’s decision to end the CentOS 8 support remains highly controversial in the Linux community and it has stirred a lot of criticism. While the EOL of CentoOS 8 is a fact, we’re going to focus on recommending reasonable alternatives that can swiftly replace no longer supported CentOS 8.
Alternatives to CentOS 8
If your server runs CentOS, then the natural solution seems to migrate to other distribution based on Red Hat Enterprise Linux (RHEL) code. Migrating to one of the recommended RHEL derivatives will ensure a seamless experience and uninterrupted performance regardless of what you run on the server. We describe 4 RHEL derivatives in this article:
• AlmaLinux
• Rocky Linux
• Oracle Linux
• CentOS Stream
All of them aim to be 100% binary compatible with the original CentOS, meaning your current projects running on CentOS should run on each of them in the same way. From a technical perspective and from user’s experience, there is not much of a difference between the original CentOS 8 and the above-mentioned distributions.
The decision on which distribution to migrate is less about the functionality of the operating system and more about how it’s developed and maintained. Some of the alternatives are free community projects, while others are backed by large-scale commercial businesses.
AlmaLinux
First distribution we will cover is AlmaLinux, an increasingly popular semi-commercial project.
AlmaLinux is developed as a direct successor for CentOS. It is the binary equivalent to CentOS 8. But unlike Rocky Linux, the development is run by a private company. CloudLinux is a company that founded and funded the AlmaLinux OS foundation. CloudLinux invested approximately $1 million to develop AlmaLinux, after Red Hat announced discontinued support for CentOS 8. The combination of private funding and a strong community makes this distribution very promising.
When Red Hat announced the end of support for CentOS 8, one of the co-founders of the original CentOS operating system stepped in. Henry Kurtzer founded CentOS together with his colleague Rocky McGaugh in 2004. When Kurtzer decided to start working on a new substitute for CentOS, he named the new operating system after the late Rocky McGaugh. As all other alternatives mentioned in this article, the Rocky Linux distribution is based on the RHEL code, which means there are only marginal differences in code in comparison to CentOS.
Rocky Linux is an independent project with a free community support. The stable release 8.4 was released in June 2021 under the codename “Green Obsidian”. From all mentioned distributions, this is the youngest distribution, and one that is still under construction.
Since mid-2021, Henry Kurtzer has been offering paid support plans via his CIQ company, trying to offer “enterprise-grade” services . Still, the Rocky Linux distribution is at heart a community project preserving the original open-source spirit.
Key features:
Active community
Lead by CentOS founder
Slower release cycle
Young project
Plesk / cPanel support is missing
CentOS Stream
CentOS Stream is an alternative to CentOS 8 that comes directly from Red Hat. The main difference is that it has a different release cycle than other CentOS8 alternatives. It’s a rolling release of the RHEL, meaning that there are almost constant updates with all the newest developments in the code of the core, libraries and applications:
On one hand this means access to the newest software very quickly, on the other hand there is a higher risk of compatibility issues. It is a great idea for a development sandbox, but not necessarily for a production system.
Key features:
Backed by a renowned company
Constantly Updated
Oracle Linux
One of the less mentioned alternatives is using Linux from Oracle. Like all other alternatives, Oracle’s Linux is 100 percent binary compatible with the original Red Hat distribution. And that makes it also very close to the CentOS distribution – Oracle ensures that their Linux is fully compatible with existing CentOS 8 apps.
The biggest advantage of Oracle Linux is obvious – the support of one of the most prominent IT companies. The customer support isn’t free, but everything else is. Some users also consider as an advantage the possibility to perform updates via the yum server.
On the other hand, many users are now discouraged from using Linux distributions developed by corporations. They argue that after Red Hat discontinued support of CentOS, Oracle Linux can end up doing the same. But at least for now, the Oracle Linux remains a perfectly viable alternative, especially if you can afford their support.
Key Features:
Backed by a renowned company
Contabo Recommendation
All distributions mentioned above are very close to the original CentOS 8. Developers of all mentioned distributions also made it easy to migrate using just a few commands.
Your decision which alternative to use should be based on who stands behind each project. Do you trust an open community like Rocky Linux or are you more keen on projects backed by big corporations like Oracle?
If we were to recommend just one distribution, it would undoubtedly be AlmaLinux. It has the stability thanks to the backing of CloudLinux and the energy coming from the community. That’s why we recommend AlmaLinux as a safe bet for CentOS 8 users.
How to Migrate from CentOS 8
Video Guide
Below, you will find a brief description of the migration process for AlmaLinux, Rocky Linux, CentOS Stream and Oracle Linux.
Don’t forget to back up your data before performing the migration. If you don’t care about the data on the instance, you can simply reinstall the virtual machine without performing a migration. Contabo customers can do this in Contabo Customer Panel and choose AlmaLinux, Rocky Linux or CentOS Stream.
First, log in to your instance using SSH. Also, please make sure you have sufficient admin rights first. The easiest way how to avoid admin rights issues is to enter the command sudo -i at the beginning of each session: sudo -i
How to migrate from CentOS 8 to AlmaLinux
Before migrating, update your current distribution by running this command: dnf update
Download the distribution from GitHub using curl -O https://raw.githubusercontent.com/AlmaLinux/almalinux-deploy/master/almalinux-deploy.sh
Assign all necessary permissions to the script: chmod +x almalinux-deploy.sh
Now run the script by typing ./almalinux-deploy.sh
And finally reboot
How to migrate from CentOS 8 to Rocky Linux
Before migrating, update your current distribution by running this command: dnf update
Rocky Linux developers have created a script called migrate2rocky. To obtain the distribution, just download it using this command: curl -O https://raw.githubusercontent.com/rocky-linux/rocky-tools/main/migrate2rocky/migrate2rocky.sh
When the file has been finished downloading, give the script all necessary permissions by chmod u+x migrate2rocky.sh
Now execute the script itself: ./migrate2rocky.sh -r
And finally reboot
How to migrate from CentOS 8 to CentOS Stream
Before migrating, update your current distribution by running this command: dnf update
Start the installation by typing: dnf install centos-release-stream
After the installation is done, you have to change the repository for CentOS Stream: dnf swap centos-linux-repos centos-stream-repos
And at last, let’s sync all your existing packages with the new distribution: dnf distro-sync
and finally reboot
How to Migrate From CentOS 8 to Oracle Linux
Before migrating, update your current distribution by running this command: dnf update
Download the distribution from GitHub: curl -O https://raw.githubusercontent.com/oracle/centos2ol/main/centos2ol.sh
Now run this command to replace your CentOS 8 with the Oracle: ./centos2ol.sh
Create a MySQL database for Laravel application; so execute the following command on command line to create database for laravel app:
$ sudo mysql
MariaDB [(none)]> CREATE DATABASE laraveldb;
MariaDB [(none)]> GRANT ALL ON laraveldb.* to 'webmaster'@'localhost' IDENTIFIED BY 'tecmint';
MariaDB [(none)]> FLUSH PRIVILEGES;
MariaDB [(none)]> quit
Step 3 – Install Composer in Ubuntu 22.04
Then use the following command to install composer (a dependency manager for PHP) on ubuntu 22.04 system:
Also, set the fastcgi_pass directive should point to the medium PHP-FPM is listening on for requests (for example fastcgi_pass unix:/run/php/php7.4-fpm.sock):
Save the file and then enable the Laravel site configuration by creating a link from /etc/nginx/sites-available/example.com.conf to the /etc/nginx/sites-enabled/ directory. Besides, remove the default server block configuration.
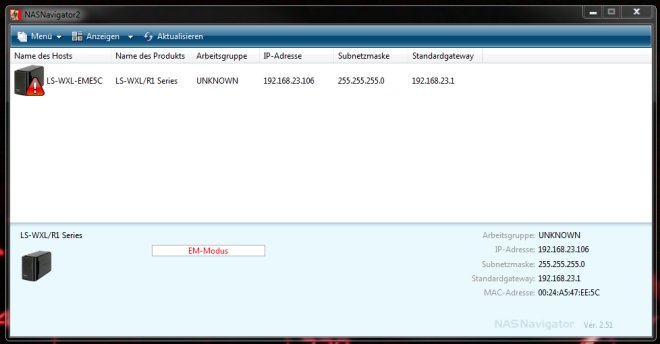
Recently I picked up a Buffalo Linkstation 220 to play around with at home as I felt that I could use a bit of additional storage to play around with. Note that this previous statement is pretty much a lie. I have tons of storage, and was really just looking for an new toy to play around with. Basically I just had a few disks laying around that I wanted to put to use.
However, much to my dismay the I was unable to configure the device once I shoved in the disks, powered it up, and connected to it with the Buffalo Smart Phone Navigator. I figured that this was not a big deal however, so I tried the installable Windows App from my Windows 7 Vm. The Buffalo NAS Navigator was also able to connect to the device, however the device showed that it was currently booted in what was called “Emergency Mode”. Not sensing a real emergency, I did not panic.
Fortunately the site that I borrowed the above image from (here) and this site (here) give advice on how to fix the issue. First step is to download the Buffalo Linkstation Firmware Updater that you can get here. Both pages advise you to modify the LSUpdater.ini file. However their instructions did not work for me. The exact changes, and the LSUpdater.ini in its entirety are below.
[code language=”css”]
[Application]
Title = BUFFALO LinkStation Series Updater Ver.1.62
WaitReboot = 1200
WaitFormat = 600
WaitFileSend = 600
WaitDiscover = 120
At this point you launch the updater again, and select “Update“. This fully partitions the drives and then updates the firmware. This process takes a while, so be patient. Now you can launch the NAS Navigator and configure the device.
For an introduction to Git and how to install, please refer to the introduction tutorial.
This article will teach you how to use Git when you want to deploy your application. While there are many ways to use Git to deploy our application, this tutorial will focus on the one that is most straightforward. I assume you already know how to create and use a repository on your local machine. If not, please refer to this tutorial.
When you use Git, the workflow generally is toward version control only. You have a local repository where you work and a remote repository where you keep everything in sync and can work with a team and different machines. But you can also use Git to move your application to production.
Server Setup
Our fictitious workspace:
Your server live directory: /var/www/html
Your server repository: /var/www/site.git
What should we do if we want to push to site.git and at the same time make all the content available at /var/www/html?
To create our repository:
On /var/www/site.git we execute sudo git config –global init.defaultBranch main and right after sudo git init –bare
You will see a few files and folders, including the ‘hooks’ folder. So let’s go to ‘hooks’ folder:
Docker is an application that simplifies the process of managing application processes in containers. Containers let you run your applications in resource-isolated processes. They’re similar to virtual machines, but containers are more portable, more resource-friendly, and more dependent on the host operating system.
In this tutorial, you’ll install and use Docker Community Edition (CE) on Ubuntu 22.04. You’ll install Docker itself, work with containers and images, and push an image to a Docker Repository.
Prerequisites
To follow this tutorial, you will need the following:
An account on Docker Hub if you wish to create your own images and push them to Docker Hub, as shown in Steps 7 and 8.
Step 1 — Installing Docker
The Docker installation package available in the official Ubuntu repository may not be the latest version. To ensure we get the latest version, we’ll install Docker from the official Docker repository. To do that, we’ll add a new package source, add the GPG key from Docker to ensure the downloads are valid, and then install the package.
First, update your existing list of packages:
sudoapt update
Next, install a few prerequisite packages which let apt use packages over HTTPS:
Installing Docker now gives you not just the Docker service (daemon) but also the docker command line utility, or the Docker client. We’ll explore how to use the docker command later in this tutorial.
Step 2 — Executing the Docker Command Without Sudo (Optional)
By default, the docker command can only be run the root user or by a user in the docker group, which is automatically created during Docker’s installation process. If you attempt to run the docker command without prefixing it with sudo or without being in the docker group, you’ll get an output like this:
Output
docker: Cannot connect to the Docker daemon. Is the docker daemon running on this host?.
See 'docker run --help'.
If you want to avoid typing sudo whenever you run the docker command, add your username to the docker group:
sudousermod-aGdocker${USER}
To apply the new group membership, log out of the server and back in, or type the following:
su – ${USER}
You will be prompted to enter your user’s password to continue.
Confirm that your user is now added to the docker group by typing:
groups
Output
sammy sudo docker
If you need to add a user to the docker group that you’re not logged in as, declare that username explicitly using:
sudousermod-aGdocker username
The rest of this article assumes you are running the docker command as a user in the docker group. If you choose not to, please prepend the commands with sudo.
Let’s explore the docker command next.
Step 3 — Using the Docker Command
Using docker consists of passing it a chain of options and commands followed by arguments. The syntax takes this form:
docker[option][command][arguments]
To view all available subcommands, type:
docker
As of Docker version 20.10.14, the complete list of available subcommands includes:
Output
  attach      Attach local standard input, output, and error streams to a running container
  build       Build an image from a Dockerfile
  commit      Create a new image from a container's changes
  cp          Copy files/folders between a container and the local filesystem
  create      Create a new container
  diff        Inspect changes to files or directories on a container's filesystem
  events      Get real time events from the server
  exec        Run a command in a running container
  export      Export a container's filesystem as a tar archive
  history     Show the history of an image
  images      List images
  import      Import the contents from a tarball to create a filesystem image
  info        Display system-wide information
  inspect     Return low-level information on Docker objects
  kill        Kill one or more running containers
  load        Load an image from a tar archive or STDIN
  login       Log in to a Docker registry
  logout      Log out from a Docker registry
  logs        Fetch the logs of a container
  pause       Pause all processes within one or more containers
  port        List port mappings or a specific mapping for the container
  ps          List containers
  pull        Pull an image or a repository from a registry
  push        Push an image or a repository to a registry
  rename      Rename a container
  restart     Restart one or more containers
  rm          Remove one or more containers
  rmi         Remove one or more images
  run         Run a command in a new container
  save        Save one or more images to a tar archive (streamed to STDOUT by default)
  search      Search the Docker Hub for images
  start       Start one or more stopped containers
  stats       Display a live stream of container(s) resource usage statistics
  stop        Stop one or more running containers
  tag         Create a tag TARGET_IMAGE that refers to SOURCE_IMAGE
  top         Display the running processes of a container
  unpause     Unpause all processes within one or more containers
  update      Update configuration of one or more containers
  version     Show the Docker version information
  wait        Block until one or more containers stop, then print their exit codes
To view the options available to a specific command, type:
docker docker-subcommand –help
To view system-wide information about Docker, use:
docker info
Let’s explore some of these commands. We’ll start by working with images.
Step 4 — Working with Docker Images
Docker containers are built from Docker images. By default, Docker pulls these images from Docker Hub, a Docker registry managed by Docker, the company behind the Docker project. Anyone can host their Docker images on Docker Hub, so most applications and Linux distributions you’ll need will have images hosted there.
To check whether you can access and download images from Docker Hub, type:
docker run hello-world
The output will indicate that Docker in working correctly:
Output
Unable to find image 'hello-world:latest' locally
latest: Pulling from library/hello-world
2db29710123e: Pull complete
Digest: sha256:bfea6278a0a267fad2634554f4f0c6f31981eea41c553fdf5a83e95a41d40c38
Status: Downloaded newer image for hello-world:latest

Hello from Docker!
This message shows that your installation appears to be working correctly.

...
Docker was initially unable to find the hello-world image locally, so it downloaded the image from Docker Hub, which is the default repository. Once the image downloaded, Docker created a container from the image and the application within the container executed, displaying the message.
You can search for images available on Docker Hub by using the docker command with the search subcommand. For example, to search for the Ubuntu image, type:
docker search ubuntu
The script will crawl Docker Hub and return a listing of all images whose name matches the search string. In this case, the output will be similar to this:
Output
NAME                             DESCRIPTION                                     STARS     OFFICIAL   AUTOMATED
ubuntu                           Ubuntu is a Debian-based Linux operating sys…   14048     [OK]
websphere-liberty                WebSphere Liberty multi-architecture images …   283       [OK]
ubuntu-upstart                   DEPRECATED, as is Upstart (find other proces…   112       [OK]
neurodebian                      NeuroDebian provides neuroscience research s…   88        [OK]
open-liberty                     Open Liberty multi-architecture images based…   51        [OK]
...
In the OFFICIAL column, OK indicates an image built and supported by the company behind the project. Once you’ve identified the image that you would like to use, you can download it to your computer using the pull subcommand.
Execute the following command to download the official ubuntu image to your computer:
docker pull ubuntu
You’ll see the following output:
Output
Using default tag: latest
latest: Pulling from library/ubuntu
e0b25ef51634: Pull complete
Digest: sha256:9101220a875cee98b016668342c489ff0674f247f6ca20dfc91b91c0f28581ae
Status: Downloaded newer image for ubuntu:latest
docker.io/library/ubuntu:latest
After an image has been downloaded, you can then run a container using the downloaded image with the run subcommand. As you saw with the hello-world example, if an image has not been downloaded when docker is executed with the run subcommand, the Docker client will first download the image, then run a container using it.
To see the images that have been downloaded to your computer, type:
docker images
The output will look similar to the following:
Output
REPOSITORY          TAG                 IMAGE ID            CREATED             SIZE
ubuntu              latest              1d622ef86b13        3 weeks ago         73.9MB
hello-world         latest              bf756fb1ae65        4 months ago        13.3kB
As you’ll see later in this tutorial, images that you use to run containers can be modified and used to generate new images, which may then be uploaded (pushed is the technical term) to Docker Hub or other Docker registries.
Let’s look at how to run containers in more detail.
Step 5 — Running a Docker Container
The hello-world container you ran in the previous step is an example of a container that runs and exits after emitting a test message. Containers can be much more useful than that, and they can be interactive. After all, they are similar to virtual machines, only more resource-friendly.
As an example, let’s run a container using the latest image of Ubuntu. The combination of the -i and -t switches gives you interactive shell access into the container:
docker run -it ubuntu
Your command prompt should change to reflect the fact that you’re now working inside the container and should take this form:
Output
root@d9b100f2f636:/#
Note the container id in the command prompt. In this example, it is d9b100f2f636. You’ll need that container ID later to identify the container when you want to remove it.
Now you can run any command inside the container. For example, let’s update the package database inside the container. You don’t need to prefix any command with sudo, because you’re operating inside the container as the root user:
apt update
Then install any application in it. Let’s install Node.js:
aptinstall nodejs
This installs Node.js in the container from the official Ubuntu repository. When the installation finishes, verify that Node.js is installed:
node-v
You’ll see the version number displayed in your terminal:
Output
v12.22.9
Any changes you make inside the container only apply to that container.
To exit the container, type exit at the prompt.
Let’s look at managing the containers on our system next.
Step 6 — Managing Docker Containers
After using Docker for a while, you’ll have many active (running) and inactive containers on your computer. To view the active ones, use:
dockerps
You will see output similar to the following:
Output
CONTAINER ID IMAGE COMMAND CREATED
In this tutorial, you started two containers; one from the hello-world image and another from the ubuntu image. Both containers are no longer running, but they still exist on your system.
To view all containers — active and inactive, run docker ps with the -a switch:
dockerps-a
You’ll see output similar to this:
Output
CONTAINER ID   IMAGE         COMMAND   CREATED         STATUS                     PORTS     NAMES
1c08a7a0d0e4   ubuntu        "bash"     About a minute ago   Exited (0) 7 seconds ago             dazzling_taussig
587000e49d53   hello-world   "/hello"   5 minutes ago        Exited (0) 5 minutes ago             adoring_kowalevski
To view the latest container you created, pass it the -l switch:
dockerps-l
Output
CONTAINER ID   IMAGE     COMMAND   CREATED         STATUS                     PORTS     NAMES
1c08a7a0d0e4   ubuntu    "bash"    3 minutes ago   Exited (0) 2 minutes ago             dazzling_taussig
To start a stopped container, use docker start, followed by the container ID or the container’s name. Let’s start the Ubuntu-based container with the ID of 1c08a7a0d0e4:
docker start 1c08a7a0d0e4
The container will start, and you can use docker ps to see its status:
Output
CONTAINER ID   IMAGE     COMMAND   CREATED         STATUS         PORTS     NAMES
1c08a7a0d0e4   ubuntu    "bash"    6 minutes ago   Up 8 seconds             dazzling_taussig
To stop a running container, use docker stop, followed by the container ID or name. This time, we’ll use the name that Docker assigned the container, which is dazzling_taussig:
docker stop dazzling_taussig
Once you’ve decided you no longer need a container anymore, remove it with the docker rm command, again using either the container ID or the name. Use the docker ps -a command to find the container ID or name for the container associated with the hello-world image and remove it.
dockerrm adoring_kowalevski
You can start a new container and give it a name using the --name switch. You can also use the --rm switch to create a container that removes itself when it’s stopped. See the docker run help command for more information on these options and others.
Containers can be turned into images which you can use to build new containers. Let’s look at how that works.
Step 7 — Committing Changes in a Container to a Docker Image
When you start up a Docker image, you can create, modify, and delete files just like you can with a virtual machine. The changes that you make will only apply to that container. You can start and stop it, but once you destroy it with the docker rm command, the changes will be lost for good.
This section shows you how to save the state of a container as a new Docker image.
After installing Node.js inside the Ubuntu container, you now have a container running off an image, but the container is different from the image you used to create it. But you might want to reuse this Node.js container as the basis for new images later.
Then commit the changes to a new Docker image instance using the following command.
docker commit -m“What you did to the image”-a“Author Name” container_id repository/new_image_name
The -m switch is for the commit message that helps you and others know what changes you made, while -a is used to specify the author. The container_id is the one you noted earlier in the tutorial when you started the interactive Docker session. Unless you created additional repositories on Docker Hub, the repository is usually your Docker Hub username.
For example, for the user sammy, with the container ID of d9b100f2f636, the command would be:
When you commit an image, the new image is saved locally on your computer. Later in this tutorial, you’ll learn how to push an image to a Docker registry like Docker Hub so others can access it.
Listing the Docker images again will show the new image, as well as the old one that it was derived from:
docker images
You’ll see output like this:
Output
REPOSITORY TAG IMAGE ID CREATED SIZE
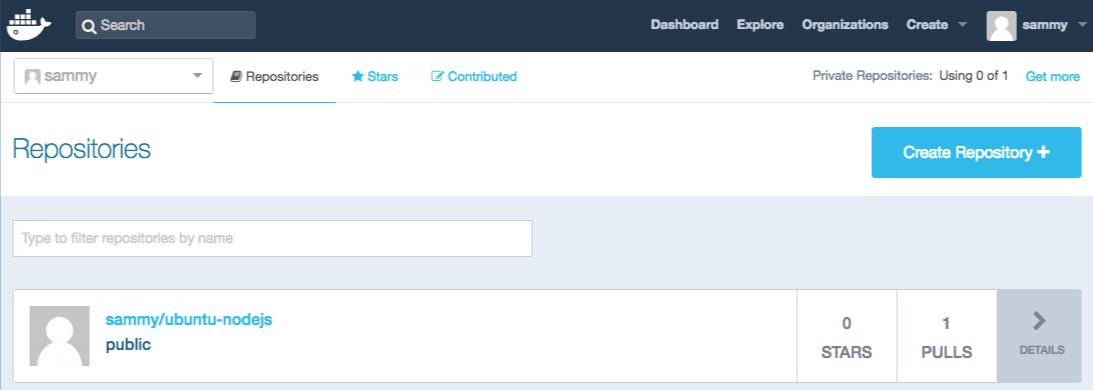
sammy/ubuntu-nodejs latest 7c1f35226ca6 7 seconds ago 179MB
...
In this example, ubuntu-nodejs is the new image, which was derived from the existing ubuntu image from Docker Hub. The size difference reflects the changes that were made. And in this example, the change was that NodeJS was installed. So next time you need to run a container using Ubuntu with NodeJS pre-installed, you can just use the new image.
You can also build Images from a Dockerfile, which lets you automate the installation of software in a new image. However, that’s outside the scope of this tutorial.
Now let’s share the new image with others so they can create containers from it.
Step 8 — Pushing Docker Images to a Docker Repository
The next logical step after creating a new image from an existing image is to share it with a select few of your friends, the whole world on Docker Hub, or other Docker registry that you have access to. To push an image to Docker Hub or any other Docker registry, you must have an account there.
To push your image, first log into Docker Hub.
docker login -u docker-registry-username
You’ll be prompted to authenticate using your Docker Hub password. If you specified the correct password, authentication should succeed.
Note: If your Docker registry username is different from the local username you used to create the image, you will have to tag your image with your registry username. For the example given in the last step, you would type:
docker tag sammy/ubuntu-nodejs docker-registry-username/ubuntu-nodejs
Portainer is a popular Docker UI that helps you visualise your containers, images, volumes and networks. Portainer helps you take control of the Docker resources on your machine, avoiding lengthy terminal commands.
Portainer recently reached version 2.0 which added support for Kubernetes clusters. The tool also supports Docker Swarm and Azure ACI environments. In this tutorial, we’ll be keeping it simple and using Portainer to manage a local Docker installation.
Two editions of the software are available, the free and open-source CE and commercial Business. The extra capabilities of Business are mostly focused on enhanced access, quota management, and administrator controls.
Install Portainer
Make sure you’ve got Docker installed and running before proceeding any further. Docker 19.01 is required for all Portainer features to be fully supported.
First of all, you’ll need to create a new Docker volume. Portainer will use this to store its persistent data. Ours is going to be called portainer_data.
docker volume create portainer_data
Next, use Docker to start a new Portainer container:
This command will pull the portainer/portainer-ce image and start a new container from it. The container will be detached and executing in the background (-d).
The volume created earlier is mounted to /data within the container, where Portainer stores all its application data. The host’s Docker socket is also mounted into the container, so that Portainer has access to your machine’s Docker instance. Finally, port 9000 on the host is bound to port 9000 within the container. This is the port Portainer exposes its web UI on.
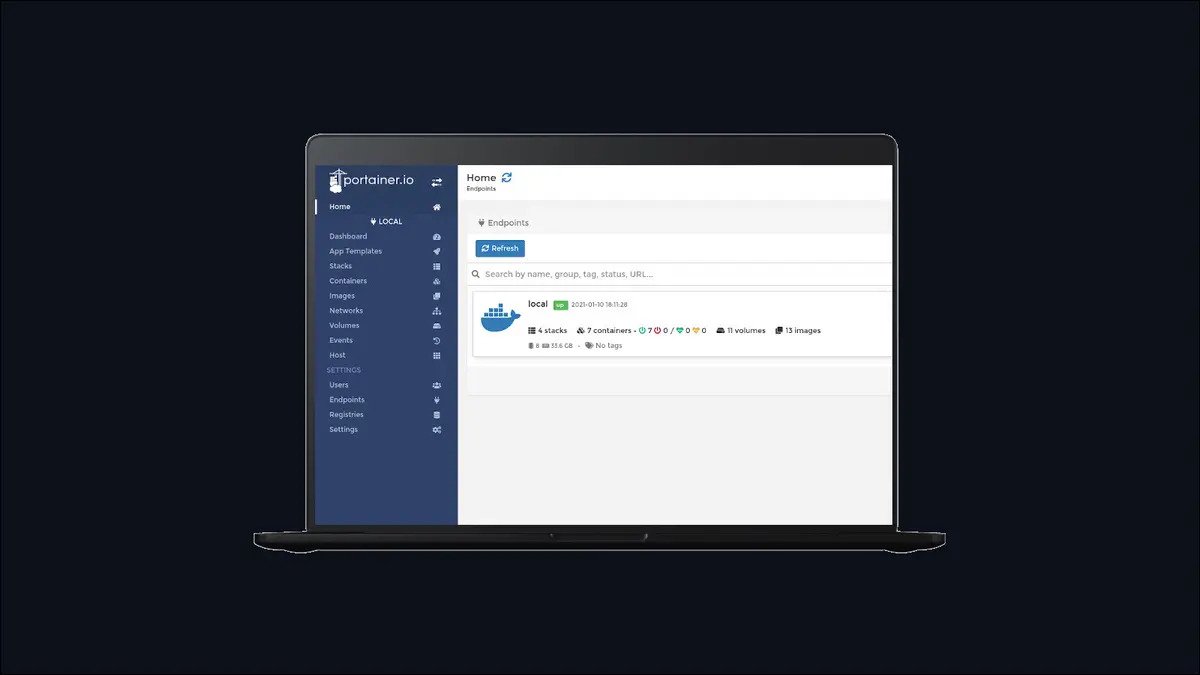
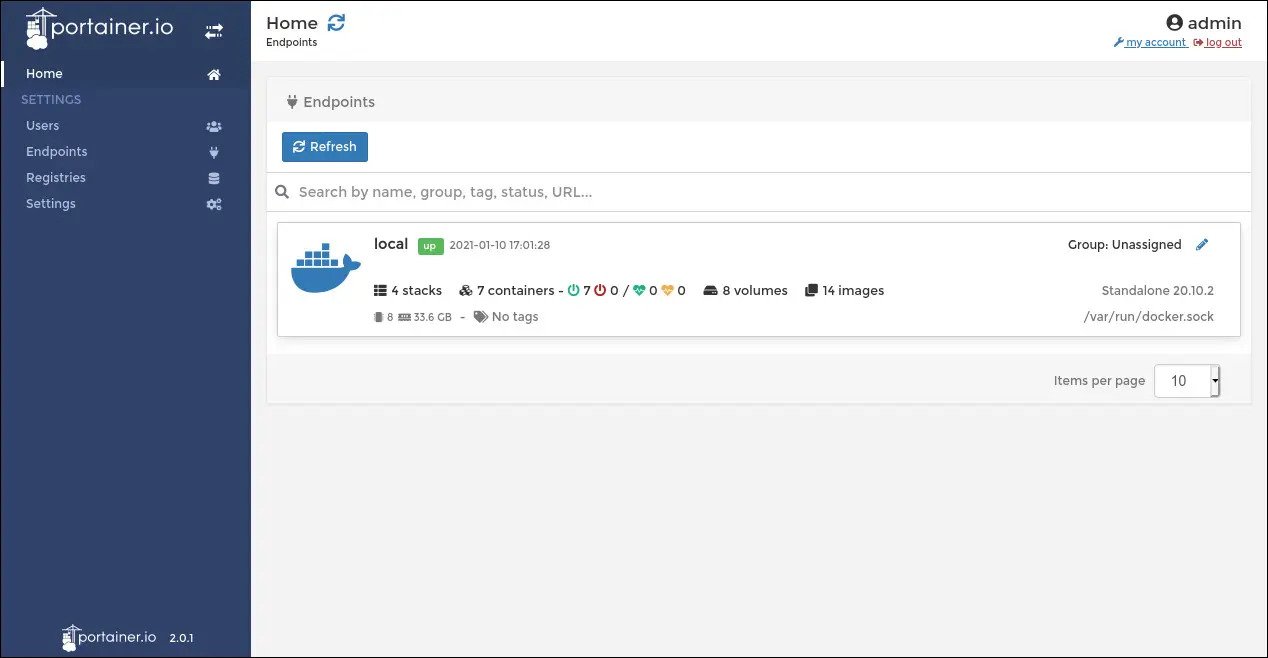
First Run
You can now login to Portainer by visiting http://localhost:9000 in your browser. You’ll need to set a password for the admin user upon first use. You’ll then land on the Home screen.
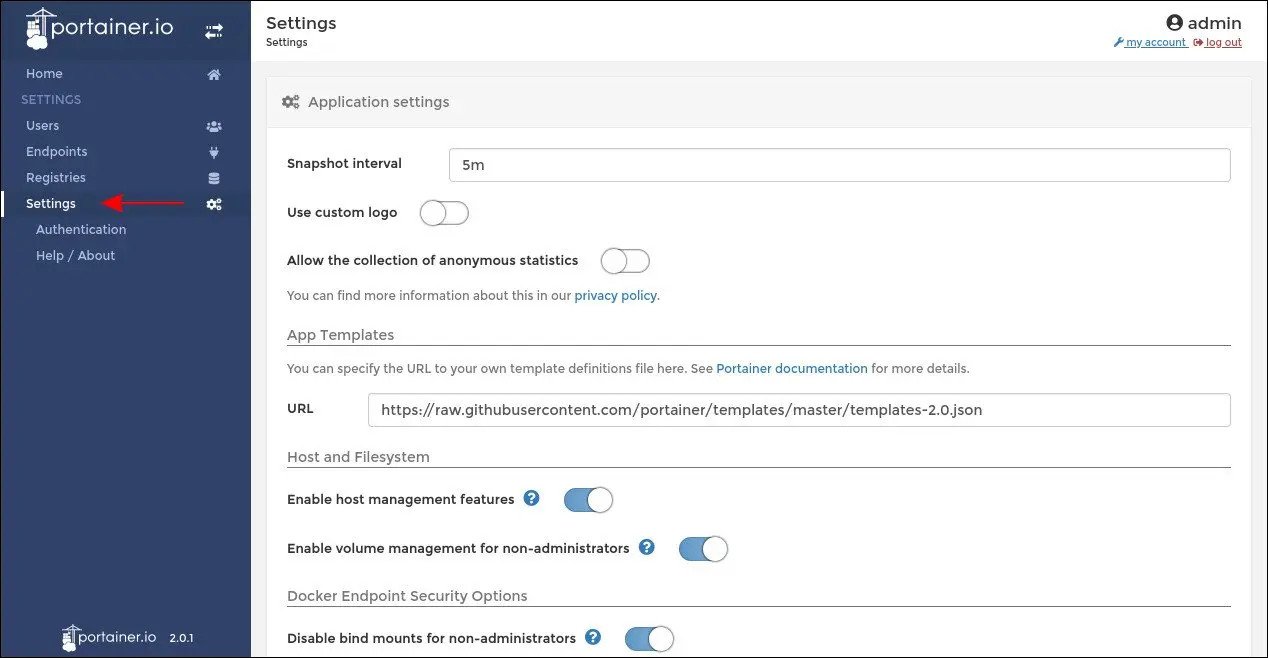
Before beginning to use Portainer, it’s worth looking at the app’s own configuration options. Click the “Settings” link in the left navigation menu. Here, you can change Portainer security settings, set a custom application logo and opt out of anonymous usage statistics collection. Most of the settings should be fairly self-explanatory, with the majority focused on limiting the power afforded to non-administrator users.
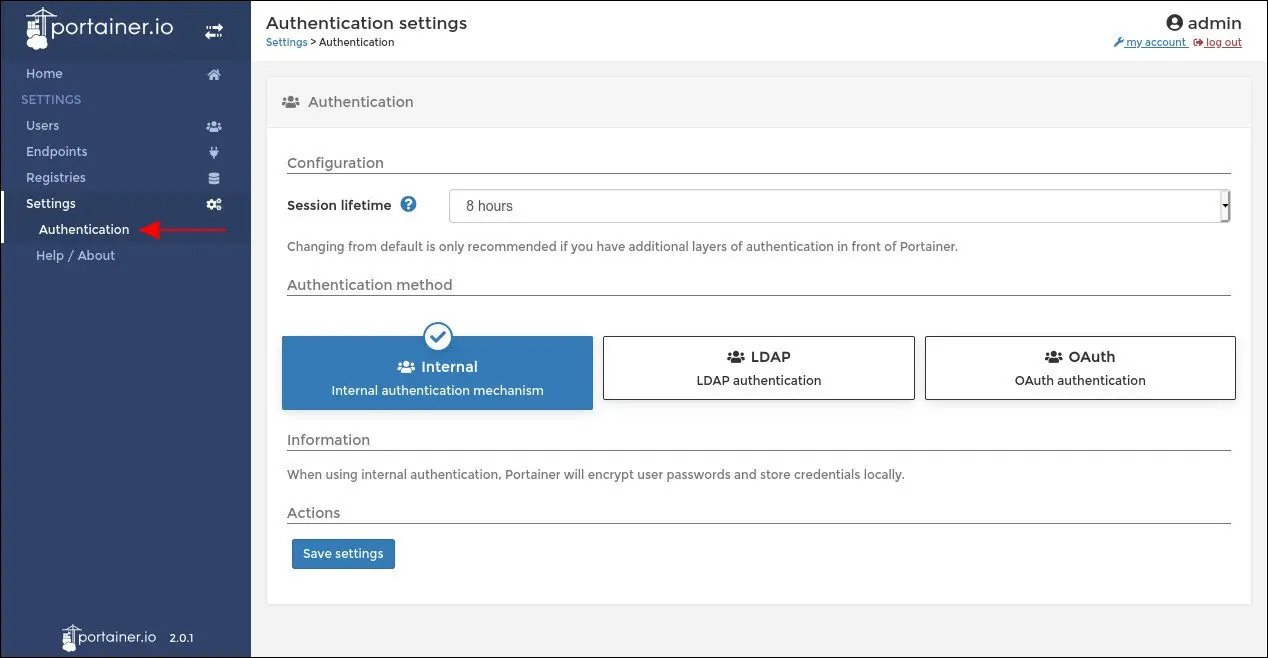
The “Authentication” submenu in the navigation bar lets you configure how users login to Portainer. Portainer uses its own internal user management system by default but you can choose to use an existing LDAP server or OAuth provider. Select the method to use and then fill out the form fields to setup your preferred authentication system. When using the built-in users database, you can use the “Users” link in the sidemenu to create additional users and sort them into teams.
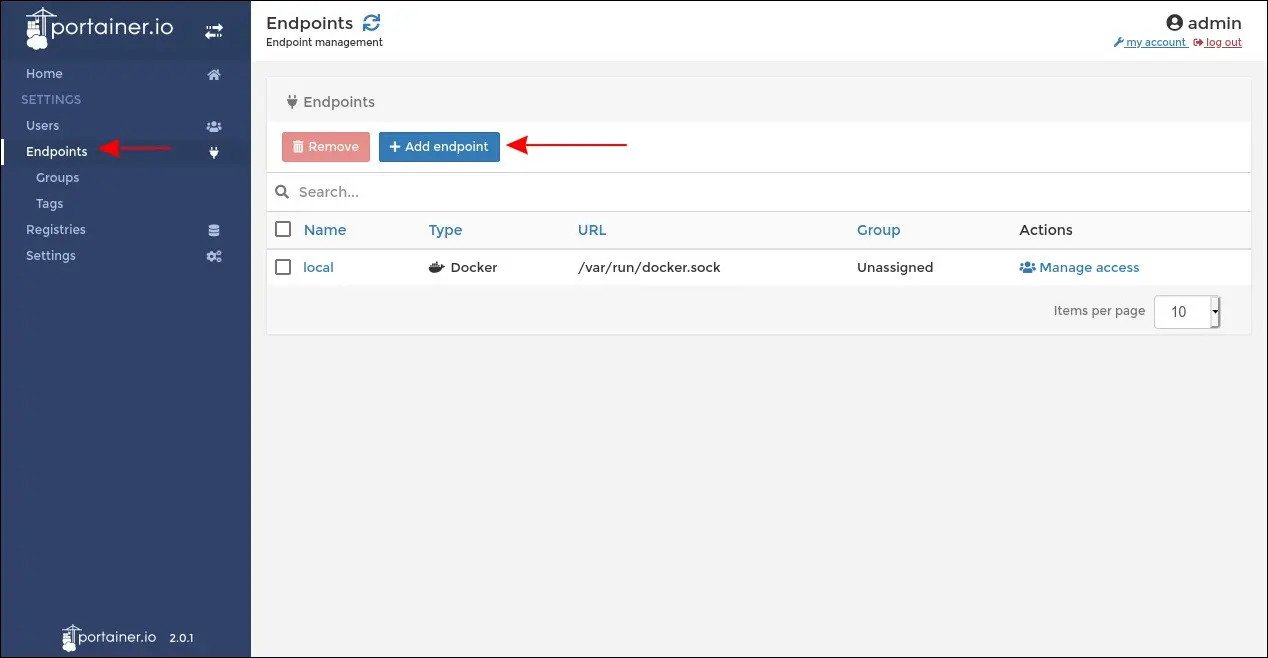
Endpoints
Portainer lets you manage multiple Docker endpoints. To begin with, you’ll see a single “local” endpoint, representing the Docker Engine running on your own machine.
To add an additional endpoint, click the “Endpoints” link in the sidebar. Next, click the blue “Add endpoint” button. Choose the type of endpoint you’ll be using and supply your connection details.
All being well, you’ll be able to add your endpoint. It’ll show up as a new selectable tile on the Portainer homescreen. Detailed guidance on adding additional endpoints is outside the scope of this introductory guide as success will require correct configuration of the host you’re connecting to.
Managing Containers
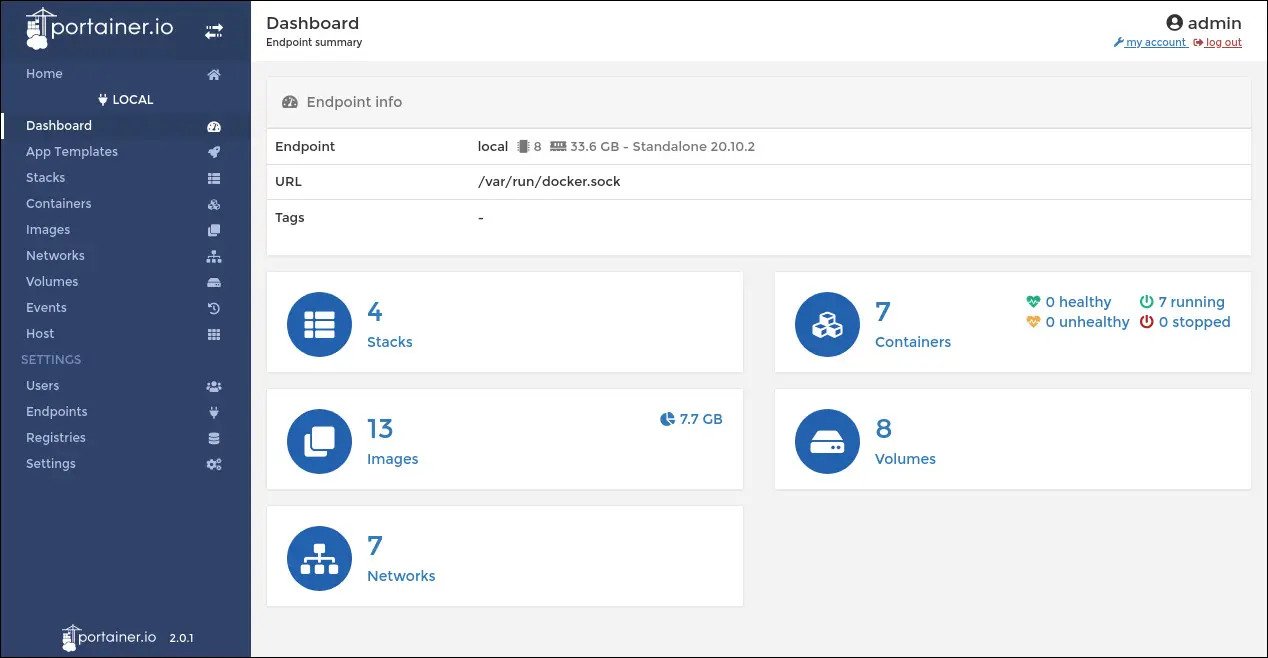
You’re now ready to begin using Portainer to interact with Docker. From the homescreen, click your “local” endpoint. It will become selected within Portainer, giving you access to the full management UI. You’ll arrive at a simple dashboard giving you an overview of your containers, images and volumes.
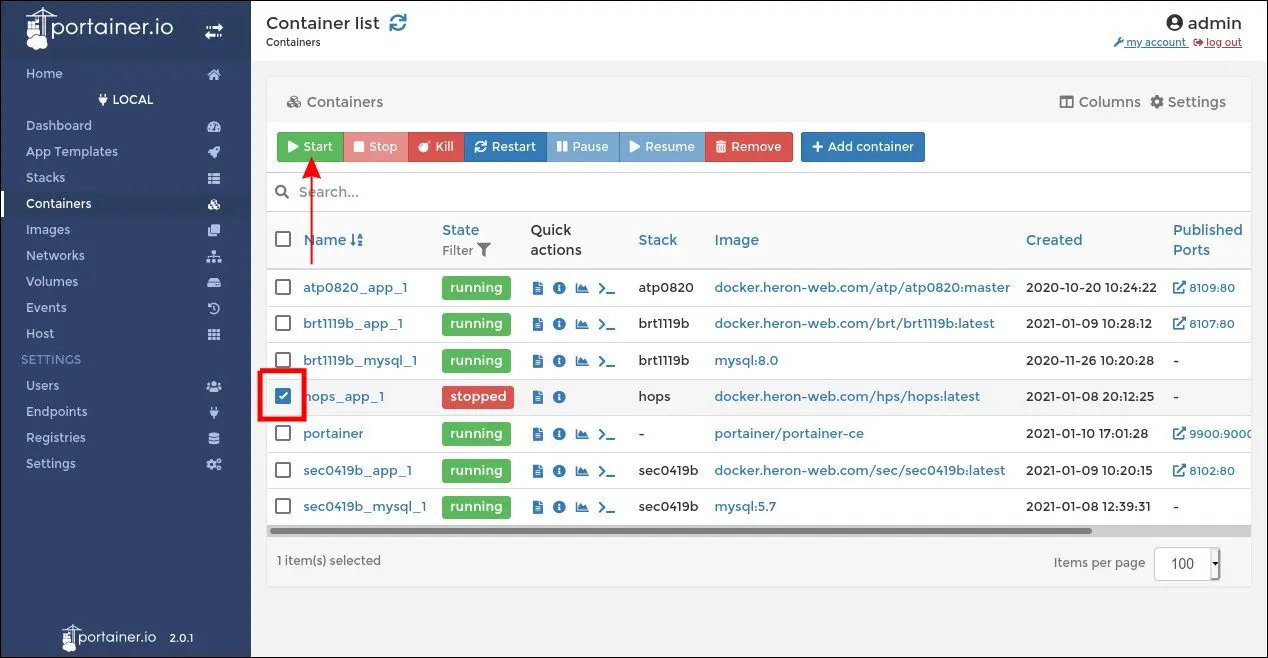
Click “Containers” on the dashboard or in the sidebar to open the container management screen. You’ll see a table displaying all your Docker containers.
To take an action against a container, click the checkbox next to its name. You can now use the button row at the top of the screen to start, stop, restart or remove the container. Containers which are currently running will show a green “running” state while stopped ones get a red “stopped”.
If you’re using a fresh Docker installation, your only container might be Portainer itself. Take care not to stop this container, as it’s serving the Portainer web UI you’re using!
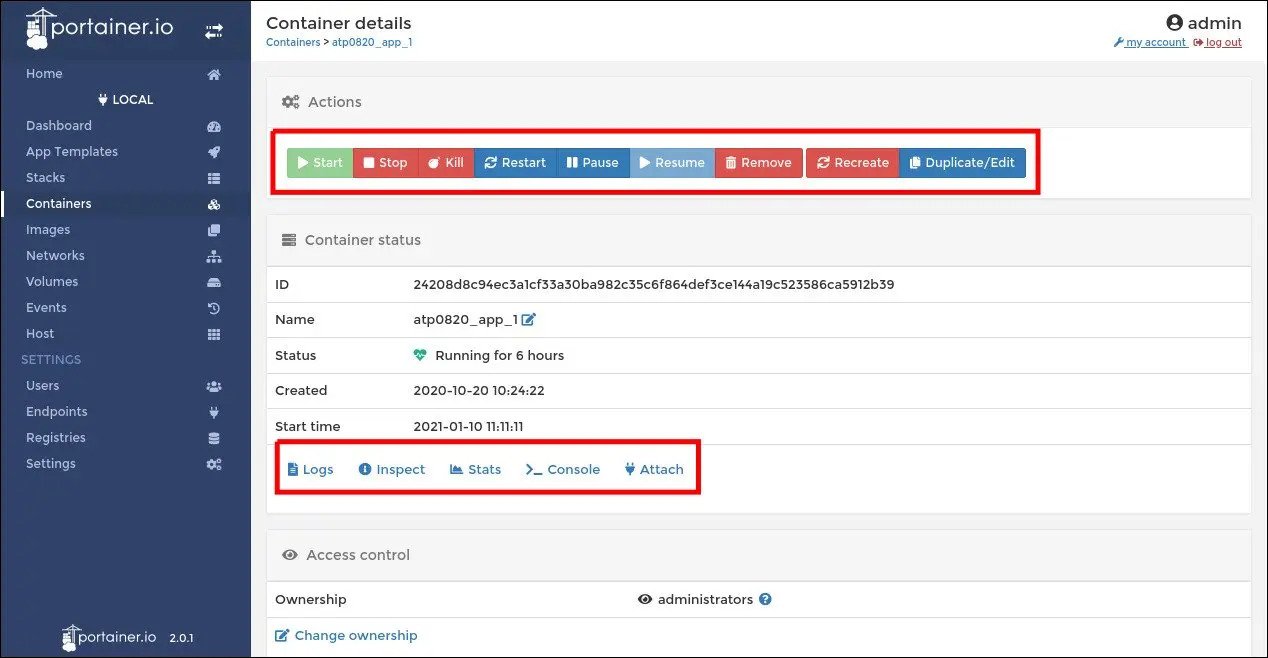
Click the name of a container to view and change its details. This screen allows you to inspect the container’s properties, create a new Docker image from its current state and manage its network connections.
At the top of the screen, you’ll find five buttons under “Container status” that allow you to view the container’s logs (“Logs”), inspect its Docker manifest (“Inspect”), view resource usage statistics (“Stats”), access an interactive console (“Console”) or attach a console to the foreground process in the container (“Attach”).
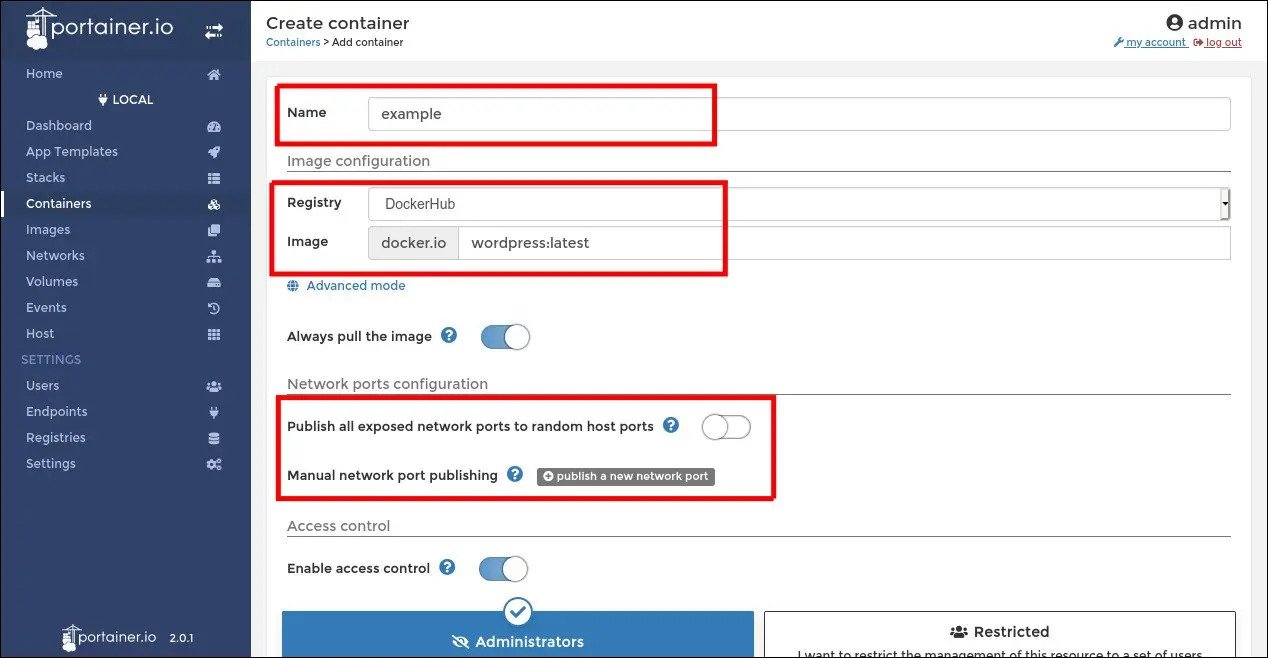
Create a Container
To create a new container, return to the Containers screen and click the blue “Add container” button. You may also edit an existing container – effectively destroying it and replacing it with a new one with modified properties – by using the “Duplicate/Edit” button on the container details screen. Both operations display the same interface.
First, type a name for your new container. Next, specify the Docker image to use. For public images on Docker Hub, such as wordpress:latest, you can type an image name without providing any additional configuration.
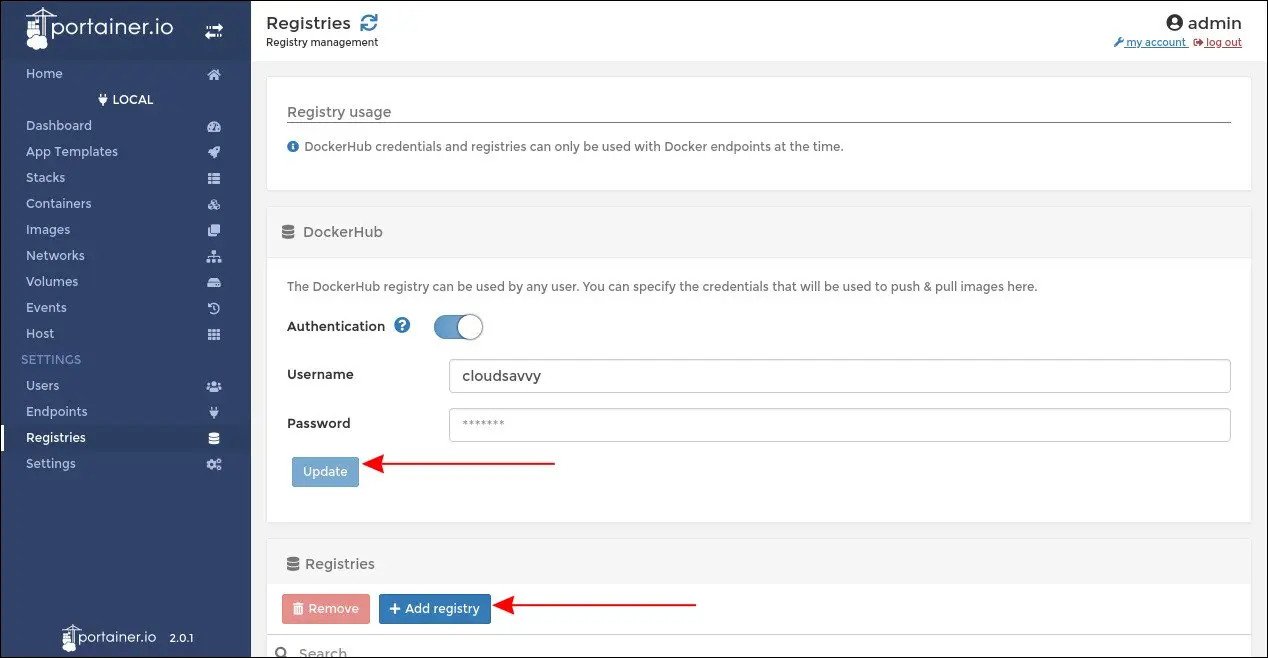
To use images stored within a private registry, you’ll first need to add the registry’s details to Portainer. Click the “Registries” link under the Settings heading in the left sidebar. Press the blue “Add registry” button and define the URL, username and password of your registry. You’ll then be able to select it in the “Registry” dropdown on the container creation screen. You may also use the Registries screen to set credentials for Docker Hub connections, allowing you to pull private images and avoid the rate limits applied to unauthenticated users.
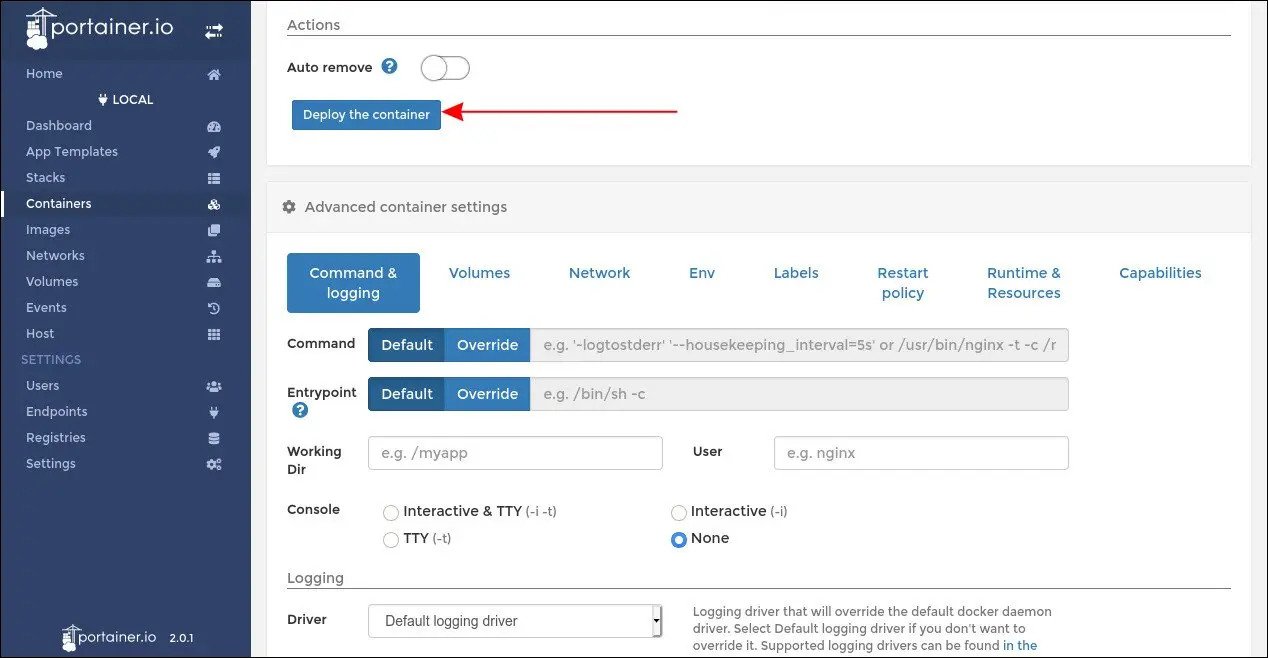
You’re now ready to deploy your container by pressing the “Deploy the container” button at the bottom of the form. Before proceeding, review the additional settings which are displayed above the button. You can configure port binding, force Portainer to pull the image before deploying and choose to remove the container automatically when it exits.
At the bottom of the screen, you’ll find an advanced settings UI that offers even more options – too many to cover exhaustively here. These replicate the entire functionality of the docker run CLI command, enabling you to set up the container’s command, entrypoint, volumes, network interfaces and environment variables. Much of this UI should feel intuitive if you’re already familiar with Docker’s capabilities.
Using Container Stacks
The container creation screen only permits you to spin up one container at a time. Portainer has built-in support for “stacks” which allow you to deploy linked containers. This functionality is based on docker-compose version 2.
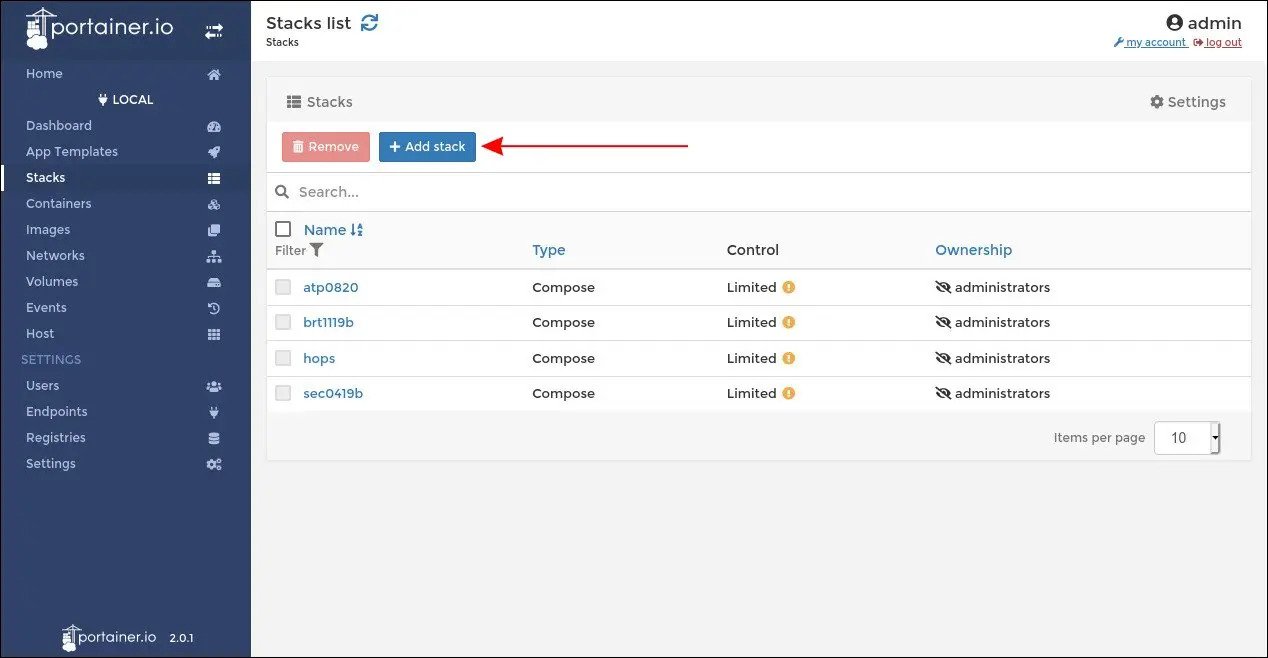
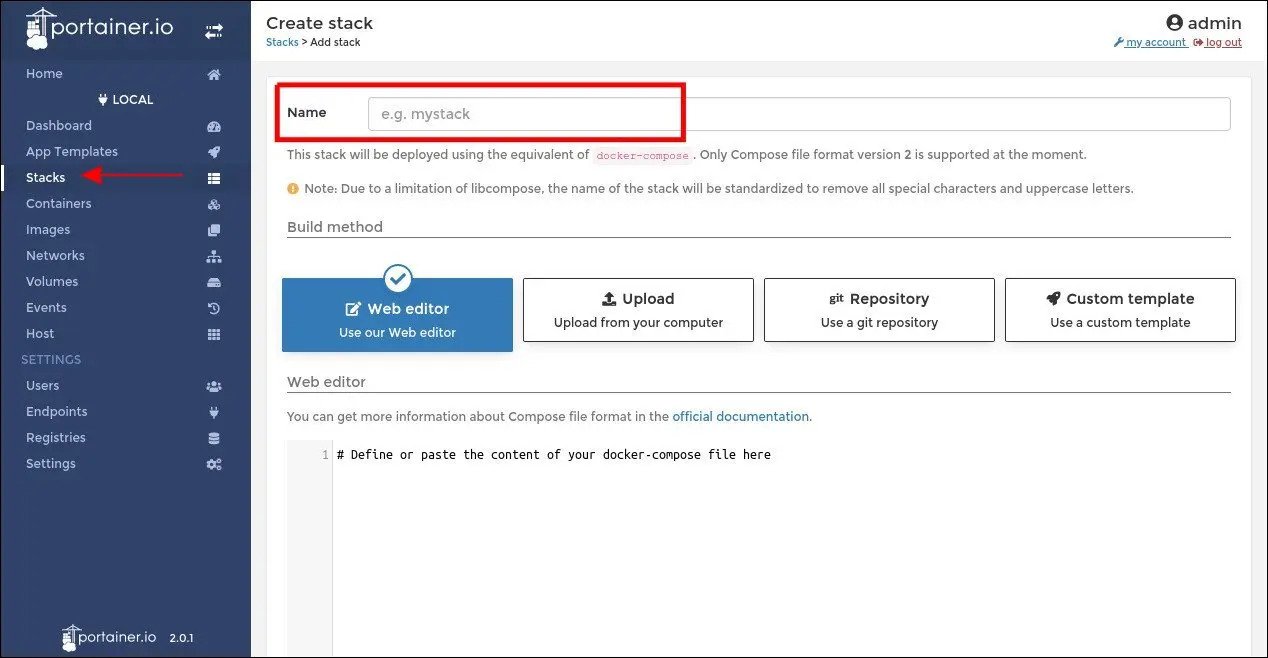
Click the “Stacks” item in the navigation bar, then press the “Add stack” button. There’s no support for creating stacks graphically – you have to paste or upload a docker-compose.yml file. You may also choose to connect to a Git repository and use its docker-compose.yml directly.
Before deploying the stack, you’re able to set environment variables that will be made available to the containers. Choose which level of Portainer access control to apply and then click “Deploy the stack”. Portainer will pull all the images and create all the containers specified by the Compose file.
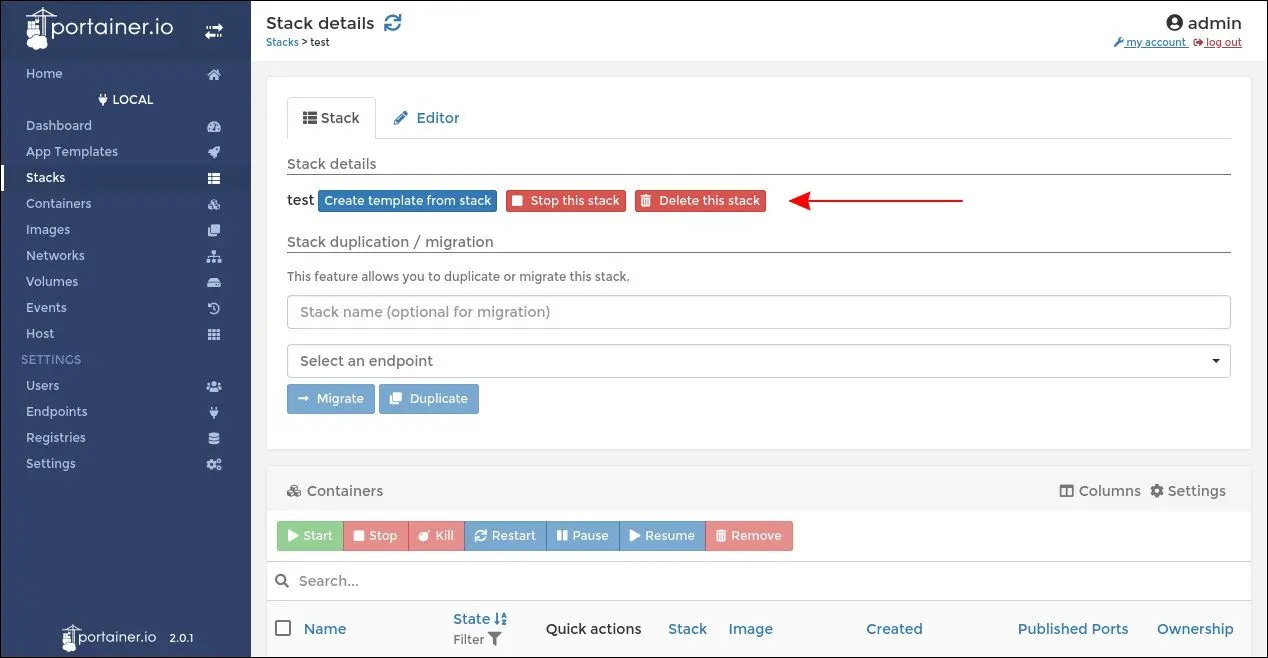
Select your stack from the Stacks screen to manage its containers collectively. You can stop all the containers in the stack, or delete the stack entirely, using the buttons at the top of the screen. There’s also controls to duplicate the stack or create a reusable template from its current state.
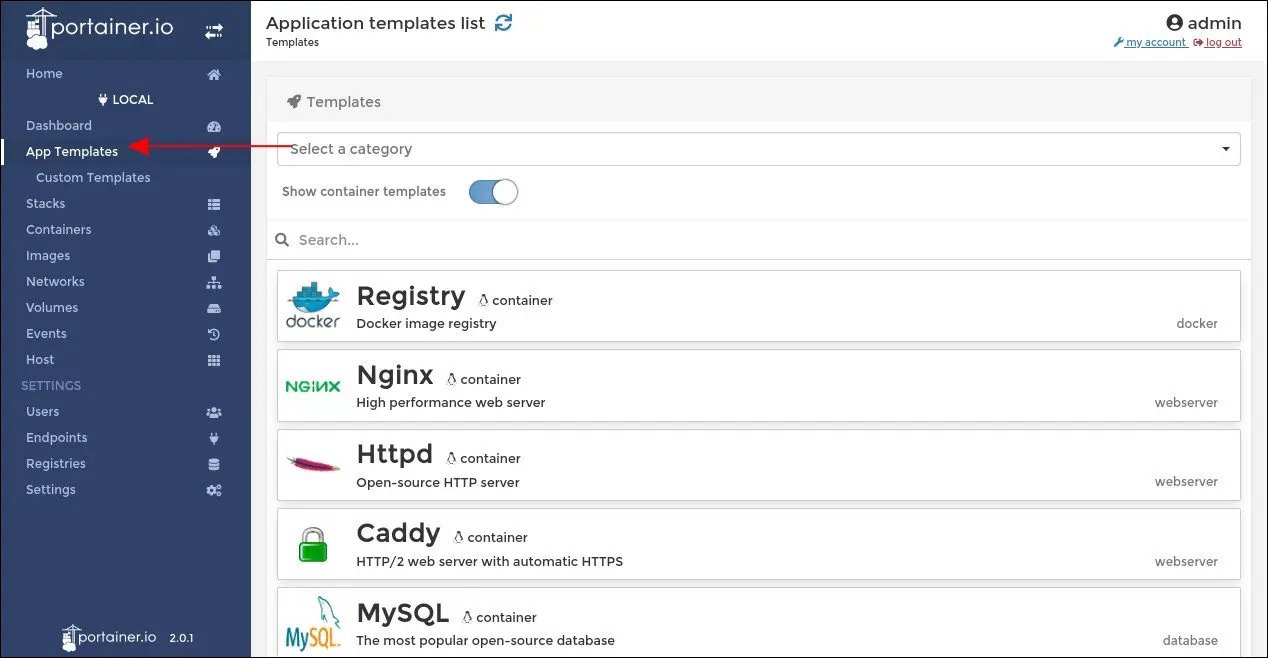
Templates can be accessed from the stack creation screen and allow you to quickly spin up new instances of frequently used services. Portainer also ships with a number of built-in templates, accessible from the “App Templates” link in the navigation bar.
Portainer helps you quickly create, manage and monitor Docker containers. It provides a graphical interface to Docker CLI commands that can sometimes become long and unwieldy. It also makes Docker accessible to users who may be unfamiliar with command-line interfaces.
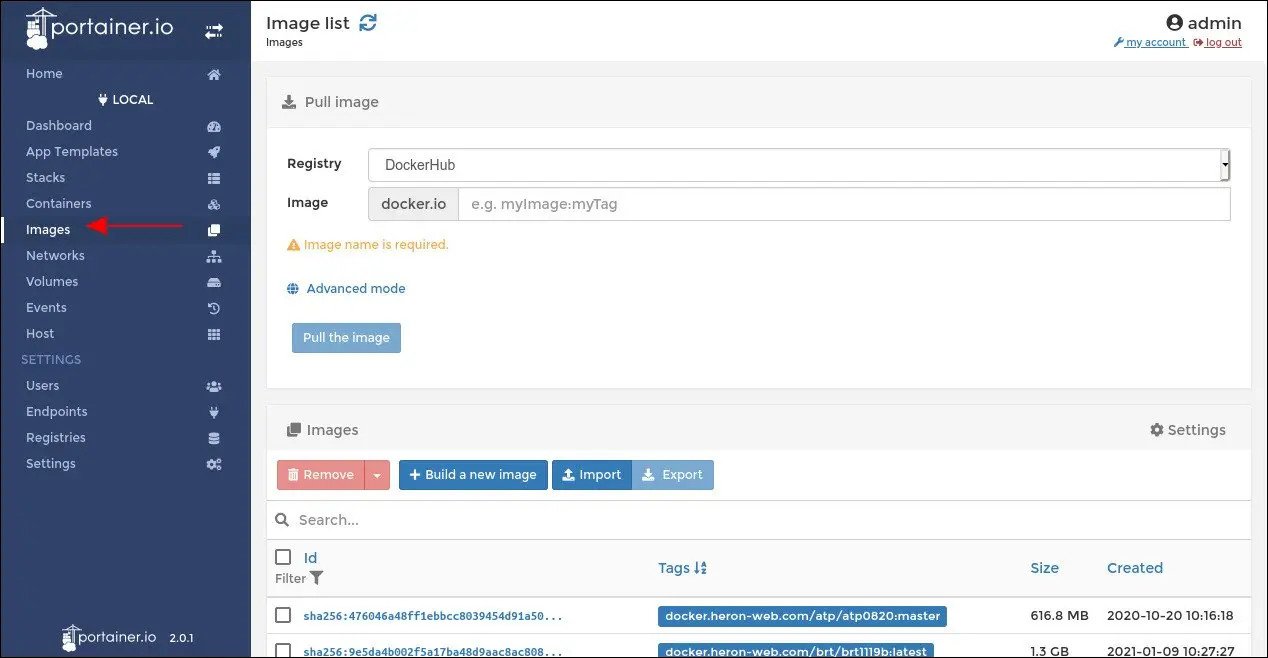
Besides its container management capabilities, Portainer also provides visibility into the other fundamental Docker resources. The Images screen allows you to view, pull, import, export and delete the images available on your endpoint. The Networks and Volumes screens act similarly, enumerating and providing control over their respective resources. Finally, the Events table offers a comprehensive listing of all the actions taken by the Docker engine. This can be useful when reviewing past actions and identifying when certain containers were created or destroyed.
– Shtohet opsioni i likujdimit te faturave te Shitjes / Blerjes nga ambjenti dokumenteve te Arkes / Bankes
– Shtohet opsioni i ri “Recepturat e artikullit per Fleten e Prodhimit” me ate te se cilit perdoruesi mund te perzgjedhe recepturat e prodhimit direkt te Moduli i Artikullit
– Shtohet opsion per te kopjuar te gjitha dhenat e Fatures se Shitjes (Koka + Trupi i Dokumentit), qe te mund te behen paste ne nje ndermarrje tjeter
– Aplikohen ndryshimet e kerkuara ligjore (Prill 2022) per llogaritjen e TAP (Tatimet mbi te ardhurat personale) sipas ligjit Nr.113/2021
– Shtohet logjika e Tatimit ne Burim per legjislacionin Kosove, rasti i qiradhenies (tatimi ne burim (9% e vleres pa tvsh) eshte paguar nga klienti dhe duhet t’i zbritet shitjes)
– Ne Fature Blerje Importi me artikuj te thjeshte (mallra) kontabilizohen disa llogari analitike te 375, jo vetem nje
– Ne modulin e “Importit te te dhenave” shtohen opsionet:
a.”Importo Artikuj”
b.”Importo Kliente”
c.”Importo Furnitore”
d. Importo Artikujt e Perbere
e. Importo Asete
– Ne modulin “Historiku i Ndryshimeve te Entiteve”, shtohet opsioni “Historiku i ndryshimeve te Furnitorit”
– Shtohet opsion per kontrollin e Arkes qe mos te kaloje me gjendje negative
– Ne Bilanc Mobile shtohet opsion i ri per te zgjedhur disa artikujt ne grup gjate rejistrimit te Porosi Shitje ose Fature Shitje
Raportet
– Ndryshim i “Pasqyra e te Ardhura – Shpenzime – PASH” sipas kerkesave te reja ligjore Kosove
– Ndryshim i “Pasqyra e pozites financiare- Bilanc” sipas kerkesave te reja ligjore Kosove
– Shtohet raport i ri “Marzhi sipas klienteve”
– Shtohet opsioni/butoni “Shfaq Kartelen”, te raporti kontabilitetit: Gjendja e llogarive sipas monedhave
If you have a huge site, chances are you also do a lot of data processing – imports, exports, calculations etc.
These kind of batch processing jobs that max out the CPU and disk are the mortal enemy of real-time transactions. Your web visitors demand real-time interaction and fast response from your site, so if you are running imports and maxing out your CPU and disk on the same server hosting your web traffic then your users are regularly going to encounter slowness. This leads to loss of interest from your visitors, loss of sales and loss of SEO rank.
Ultimately, to solve this, once you have exhausted scaling up, you need to architect a better solution.
Scaling Up WordPress – check before building your cluster!
If you are considering building a cluster, it means you think you can’t get more speed from a single server. If you have not yet used our Super Speedy Pack yet then you should definitely try that before building a cluster. We built our Super Speedy Pack to solve search, filtering and underlying scalability issues exhibited in WordPress and WooCommerce.
It is not uncommon for customers with large sites to get 10x or more speed boost from our Super Speedy Plugin pack so prior to building your cluster, check out our Super Speedy Plugin pack.
Scaling Out with a WordPress Cluster
You need to separate the batch processing from the realtime stuff. That means you need a minimum of 2 servers. 1 server processes all the data imports, exports, calculations, category counts, etc – the data is replicated to the 2nd server and that server serves your web traffic.
If you’re going to the bother of getting 2 servers, you’re better off going further and getting 3 servers. It’s very little extra hassle and then gives you the ability to have 3 servers online at once with no batch processing, or 1 or 2 of the servers handling batch processing and the remaining ones serving web traffic.
Using this model, you can also easily switch servers offline to upgrade them without interrupting visitors to your website. That means you can be online 100% of the time!
Note that this setup technically uses 4 servers – the 4th server being a load balancer. Instead of this server, you could use the Digital Ocean load balancer feature/server instead but I provide details below for installing this easily.
If you’re looking at building a cluster for more speed, you may find our plugin pack will help give you the speed boost you need.
Step by step guide to building your cluster
This is the guide I use to install these clusters, so hopefully it helps some of you out there who wish to go huge with your WordPress sites.
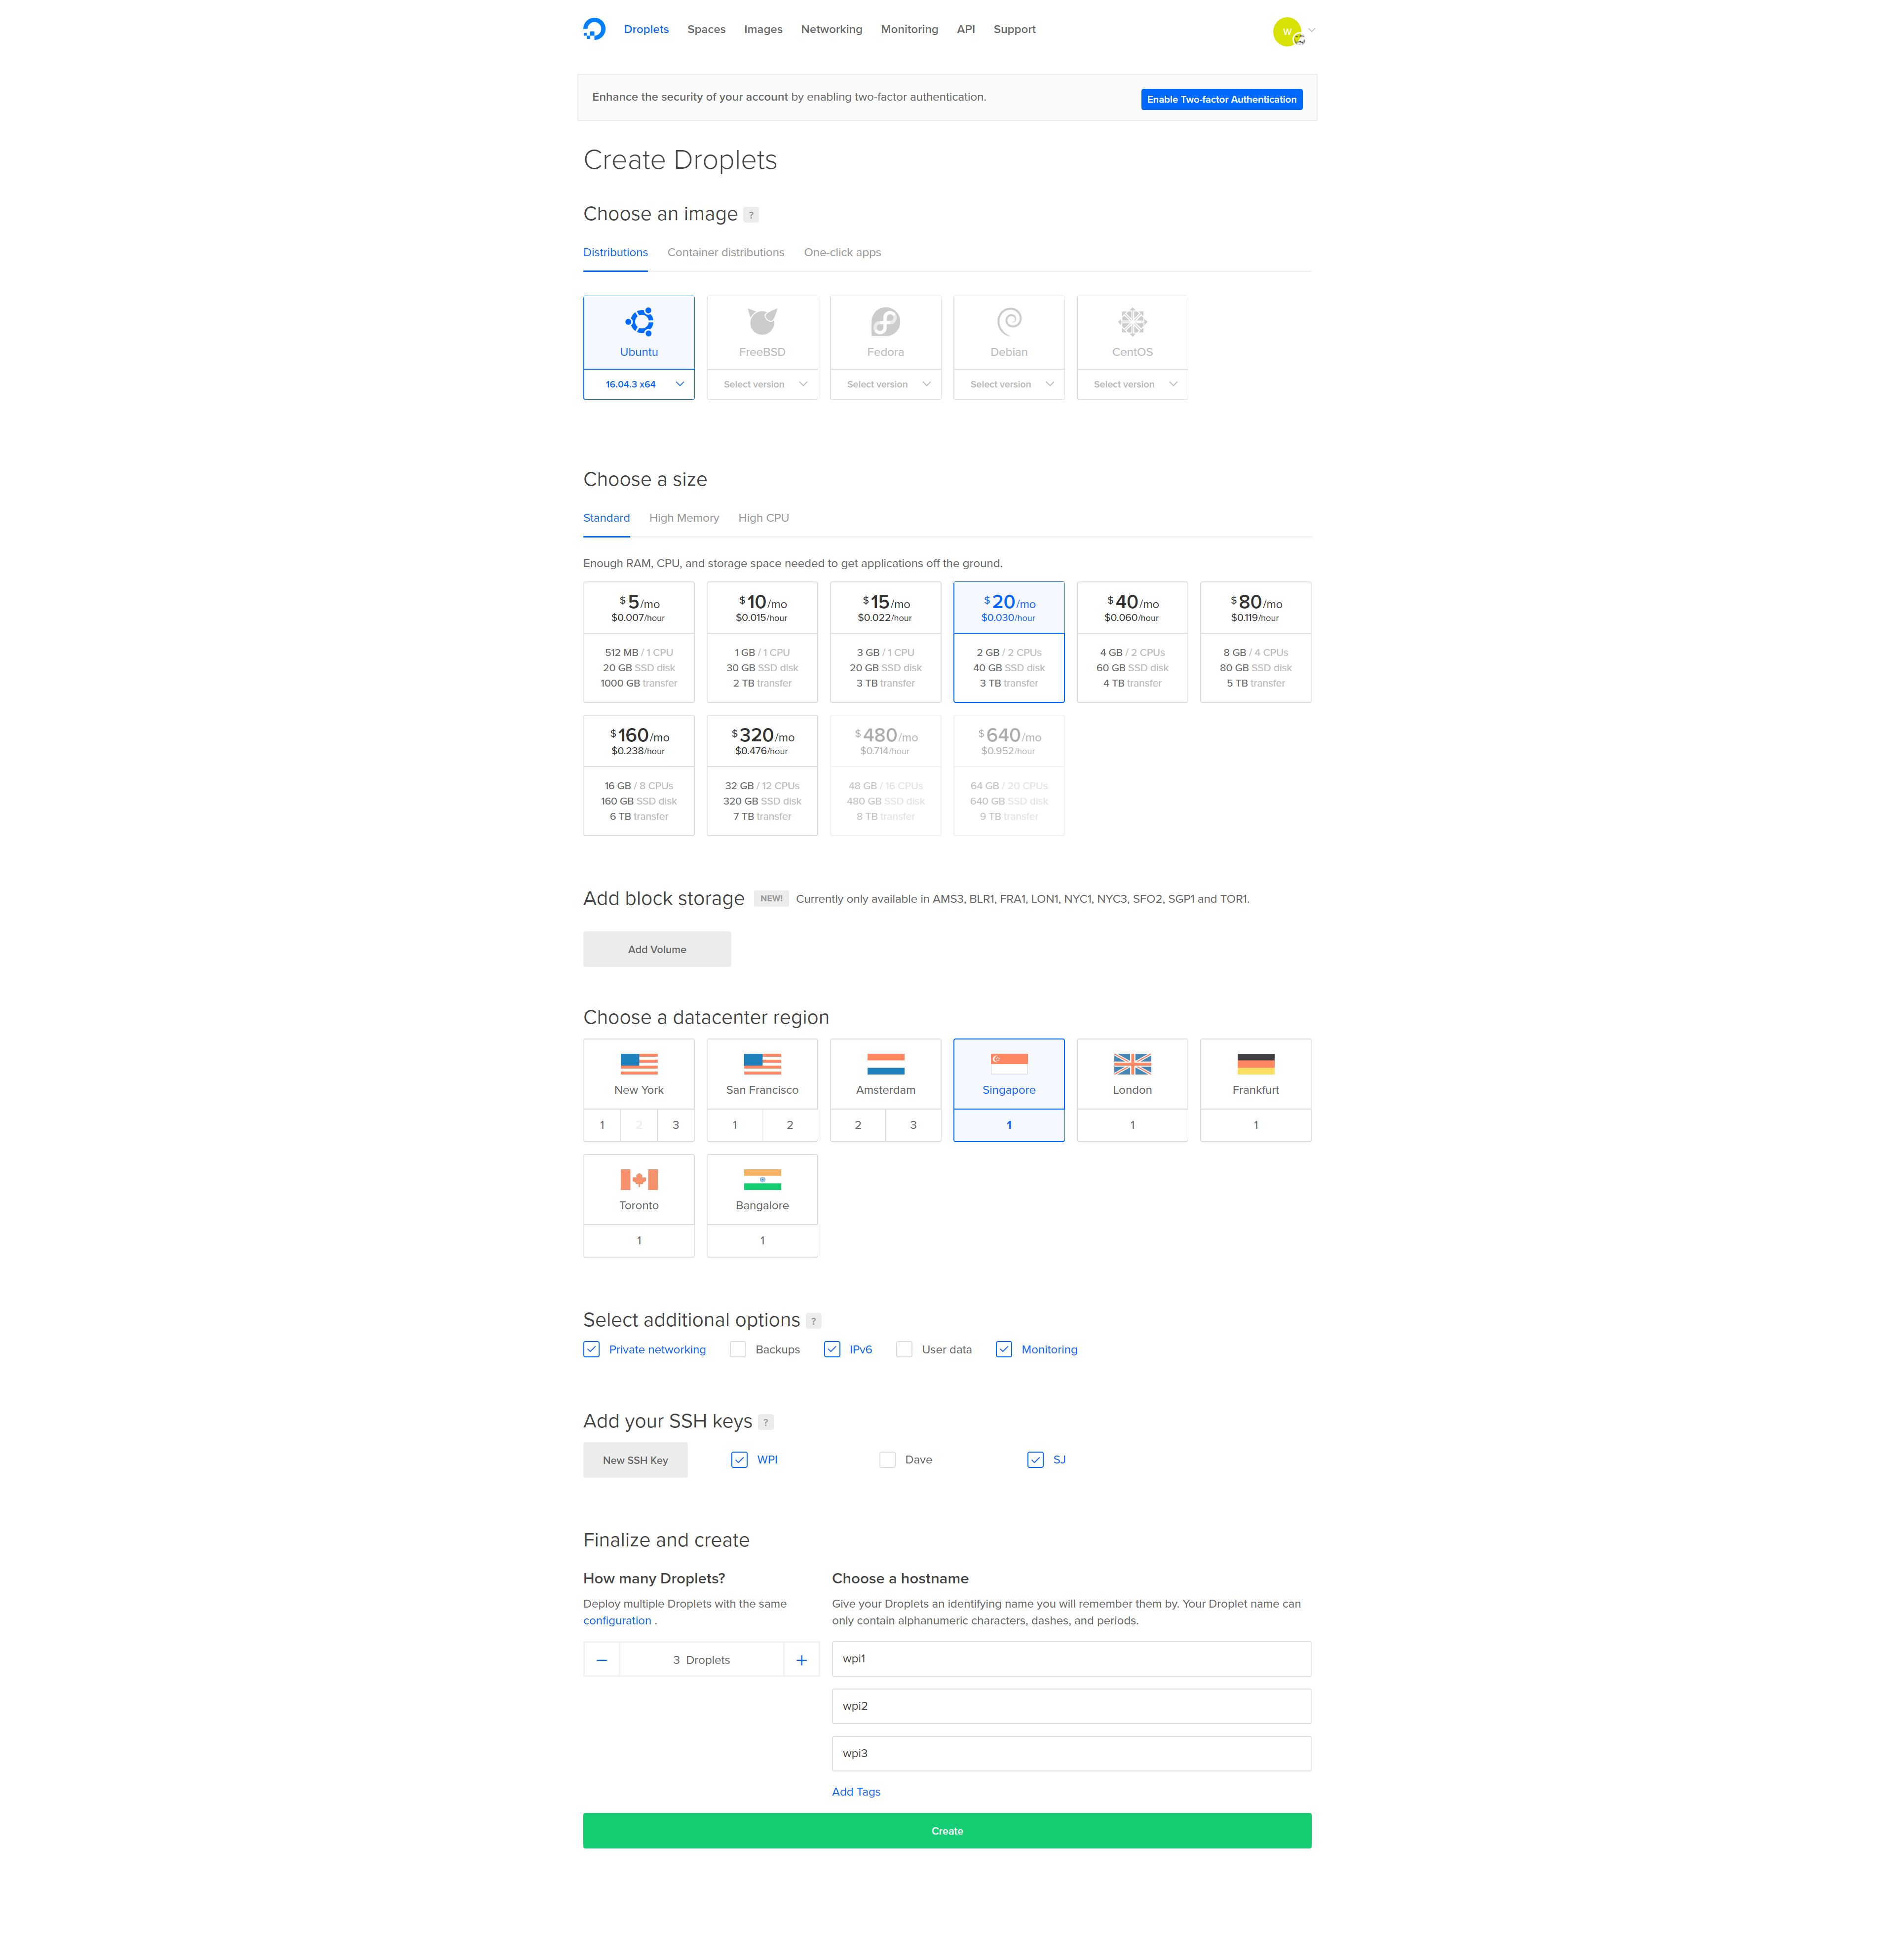
Create 3 Ubuntu 16.04 servers
I like Digital Ocean, so this guide is using their hosting, but you can use any host provided they offer private networking and Ubuntu 16.04.
Create 3 Ubuntu 16.04 (or 3 servers on any platform) – they make it easy to make multiple at once – make sure to enable private networking and add your ssh key.
Install PerconaDB XtraDB Cluster on your cluster-nodes
Log into your 3 droplets and run the following commands on each node:
Note: You will be asked to enter a new root password for the cluster. To make life easier, use the same password for each PerconaDB node, or leave the root password blank and it will infer security if you log in as root and connect.
Configure private networking
We want the nodes to share data over the private network, rather than out and in from your hosting company. This prevents crazy bandwidth costs, speeds things up and improves security.
Even though private networking is already enabled, we need to be able to reliably use eth1 (rather than eth0) as the private network device.
On each node edit the grub networking file. I prefer vi to edit files, but you can use nano or even edit the files with Filezilla.
vi /etc/default/grub.d/50-cloudimg-settings.cfg
Find the line that begins GRUB_CMDLINE_LINUX_DEFAULT and alter it as follows (add net.ifnames=0):
Save the file then run the update grub command and reboot (only time I know of where you need to reboot a linux box!).
update-grub
shutdown -r now
Repeat the above for all your nodes. Then you can check config with this:
ifconfig -a
You should see the public IP address against eth0 and the private address against eth1.
You can also view each ethernet devices configuration here:
cat /etc/network/interfaces.d/50-cloud-init.cfg
The file above will already be configured if you selected private networking when you created the droplet.
Take a note of the private IP address for each of your 3 nodes. This information is also available from your Digital Ocean interface when you click through to each droplet.
You can test private networking is working by pinging the private IP address of another node from one of the nodes:
ping 10.130.45.161
Configure replication
Firstly, we need a replication user. Create this user on all 3 nodes.
Log into mysql:
mysql
or if you chose a password for your mysql server earlier, use this:
mysql -u root -p
Enter the root DB password you chose earlier then create a new user for replication purposes (choose a strong password and note it down so we can add it to the configuration files):
CREATE USER 'sstuser'@'localhost' IDENTIFIED BY 'password';
GRANT RELOAD, LOCK TABLES, PROCESS, REPLICATION CLIENT ON *.* TO 'sstuser'@'localhost';
FLUSH PRIVILEGES;
Next exit MySQL by typing ‘exit’ then hitting enter, then stop MySQL on all 3 nodes using:
service mysql stop
On node1, customise the configuration file below according to your private IP addresses and replication user password enter it into this file:
vi /etc/mysql/percona-xtradb-cluster.conf.d/wsrep.cnf
Enter the 3 private IP addresses for wsrep_cluster_address, separated by commas.
Enter node 1 private IP address for wsrep_node_address.
Enter the sst password for wsrep_sst_auth.
Change the name of the node on the line wsrep_node_name
Your file will end up looking something like this (lines in bold are the lines you need to alter from the default config):
[mysqld]
# Path to Galera library
wsrep_provider=/usr/lib/galera3/libgalera_smm.so

# Cluster connection URL contains IPs of nodes
#If no IP is found, this implies that a new cluster needs to be created,
#in order to do that you need to bootstrap this node
wsrep_cluster_address=gcomm://10.130.45.161,10.130.47.4,10.130.47.11

# In order for Galera to work correctly binlog format should be ROW
binlog_format=ROW

# MyISAM storage engine has only experimental support
default_storage_engine=InnoDB

# Slave thread to use
wsrep_slave_threads= 8

wsrep_log_conflicts
# This changes how InnoDB autoincrement locks are managed and is a requirement for Galera
innodb_autoinc_lock_mode=2

# Node IP address
wsrep_node_address=10.130.45.161
# Cluster name
wsrep_cluster_name=pxc-cluster

#If wsrep_node_name is not specified, then system hostname will be used
wsrep_node_name=pxc-cluster-node-1

#pxc_strict_mode allowed values: DISABLED,PERMISSIVE,ENFORCING,MASTER
pxc_strict_mode=ENFORCING

# SST method
wsrep_sst_method=xtrabackup-v2

#Authentication for SST method
wsrep_sst_auth="sstuser:password"
Note: You will also need to remove the # comment from the beginning of the lines with the wsrep_node_address and the wsrep_sst_auth.
Copy the contents of the file and then save it. Configure node 2 and node 3 by editing the same file on those nodes and altering 2 rows from the file above:
Change wsrep_node_address to be the private IP address of node 2 (or node 3 for that node)
Change wsrep_node_name to pxc-cluster-node-2 or pxc-cluster-node-3
Once you’ve done this, you’re ready to bootstrap your cluster.
Bootstrap your cluster
On node 1, run the following command:
/etc/init.d/mysql bootstrap-pxc
Check it’s running by logging into mysql and running this command:
showstatuslike'wsrep%';
Note: The above command can be useful in future to check for replication status – you can see things like how many items are queued to be replicated amongst other details.
On node 2 and 3, run the following:
/etc/init.d/mysql start
You now have a Percona cluster with 3 nodes replicating data to each other.
Install Nginx and PHP 7 on all 3 nodes
On each node, install Nginx and PHP 7 using the following sequence of commands:
After much testing, GlusterFS is not well-suited to WordPress file-replication. GlusterFS slows down a LOT when there are a lot of files in each directory. The guide has been updated to use Unison instead. This Unison setup uses a star schema for file replication, with node 1 at the centre of the star.
That means a file edit on node 3 will replicate to node 1 and then to node 2. A file edit on node 1 will replicate out directly to node 2 and 3. Because of this, it makes sense to make node 1 our wp-admin server where we upload plugin files. Because of this star schema for file replication, node 1 is your most important node. If it goes down, or you switch it off, file replication will be paused until you bring it back online.
On each node, install unison:
apt-get -y install unison openssh-server
This will allow us to run the replication commands later once we have installed the WordPress files.
Configure SSH so nodes can connect to each other
SSH access is required for Unison to be able to replicate files. Run the following on all 3 nodes:
ssh-keygen
Hit enter 3 times to accept 3 defaults inc 2 blank passwords for the keyfile so it works non-interactively
Now, grab a copy of the id_rsa.pub files for each node and paste them into the other 2 nodes authorized_keys file. Find the public keys of each node by running this command:
cat /root/.ssh/id_rsa.pub
Then paste those public keys into the authorized_keys file of the other 2 nodes:
vi /root/.ssh/authorized_keys
Authenticate each node
On node 1, run:
ssh ipofnode2
ssh ipofnode3
You will be asked if you wish to trust the other node. Answer yes.
Repeat this on node 2 and node 3, connecting to the other 2 nodes.
Replicate the web folder files using Unison
Now that we have ssh authentication, we can set up Unison to replicate the website files to node 2 and 3. Run the following commands on node 1 of your cluster:
Change IP addresses and folder locations. Use internal IP addresses so traffic goes over the faster internal network card.
Install WordPress files onto Node 1 only
Because we are using file replication and we already have database replication in our cluster, we only need to install WordPress onto node 1. On node 1, run the following:
Note: Instead of /var/www/wpicluster you could use /var/www/yourdomain.com but if you do, ensure you alter the nginx config files in the next section.
Configure Nginx to load your WordPress site on each node
I’ve created some configuration files to make this part quicker and easier. The configuration files set Nginx up to work over port 80 – later, we will add SSL to our load balancer. This reduces load on our servers since they won’t have to decrypt SSL traffic.
The configuration files here also configure the Nginx fastcgi-cache, so you don’t need to install Varnish. They’re also domain-name independent, so no configuration required.
Digital Ocean provide a load balancer, but with that approach you have to manually renew your SSL certificates. Plus you get less control – we want control so we can send wp-admin traffic to node 1. So follow the instructions below to set up your own load balancer.
First, create a droplet with Ubuntu 16.04 again, private networking and your SSH keys.
Then log onto your load balancer droplet and run the following commands:
Then create a new file at /etc/nginx/conf.d/loadbalancer.conf.
vi /etc/nginx/conf.d/loadbalancer.conf
This will automatically be loaded when you restart nginx. Enter the following in the file, adjusted for your private IP addresses.
upstream clusterwpadmin {
     server 10.130.45.161;
}
upstream clusternodes {
     ip_hash;
 server 10.130.47.4 max_fails=3;
 server 10.130.47.11 max_fails=3;
}
server {
     listen 80;
# this block is for letsencrypt
 root /var/www/html;
 location ~ /.well-known {
      allow all;
  try_files $uri $uri/ =404;
 }
 server_name _;
 #return 301 https://$host$request_uri;
 location ~ /wp-(admin/|login\.php\b|cron\.php) {
     proxy_pass http://clusterwpadmin;
 proxy_set_header X-Forwarded-Host $host;
 proxy_set_header X-Forwarded-Server $host;
 proxy_set_header X-Forwarded-For $proxy_add_x_forwarded_for;
 proxy_set_header X-Forwarded-Proto $scheme;
 proxy_set_header X-Real-IP $remote_addr;
 proxy_set_header Host $host;
 }
location / {
     proxy_pass http://clusternodes;
 proxy_set_header X-Forwarded-Host $host;
 proxy_set_header X-Forwarded-Server $host;
 proxy_set_header X-Forwarded-For $proxy_add_x_forwarded_for;
 proxy_set_header X-Forwarded-Proto $scheme;
 proxy_set_header X-Real-IP $remote_addr;
 proxy_set_header Host $host;
 }
}
server {
     listen 443 ssl;
 #ssl_certificate /etc/letsencrypt/live/yourdomain.com/cert.pem;
 #ssl_certificate_key /etc/letsencrypt/live/yourdomain.com/privkey.pem;
location ~ /wp-(admin/|login\.php\b|cron\.php) {
     proxy_pass http://clusterwpadmin;
 proxy_set_header X-Forwarded-Host $host;
 proxy_set_header X-Forwarded-Server $host;
 proxy_set_header X-Forwarded-For $proxy_add_x_forwarded_for;
 proxy_set_header X-Forwarded-Proto $scheme;
 proxy_set_header X-Real-IP $remote_addr;
 proxy_set_header Host $host;
 }
location / {
     proxy_pass http://clusternodes;
 proxy_set_header X-Forwarded-Host $host;
 proxy_set_header X-Forwarded-Server $host;
 proxy_set_header X-Forwarded-For $proxy_add_x_forwarded_for;
 proxy_set_header X-Forwarded-Proto $scheme;
 proxy_set_header X-Real-IP $remote_addr;
 proxy_set_header Host $host;
 }
}
#if a user connects to yourdomain.com:9443 they will be directed to node 1. This is where admins should connect to add plugins etc.
server {
     listen 9443 ssl;
 server_name _;
 #ssl_certificate /etc/letsencrypt/live/yourdomain.com/cert.pem;
 #ssl_certificate_key /etc/letsencrypt/live/yourdomain.com/privkey.pem;
location / {
     proxy_pass http://clusterwpadmin;
 proxy_set_header X-Forwarded-Host $host;
 proxy_set_header X-Forwarded-Server $host;
 proxy_set_header X-Forwarded-For $proxy_add_x_forwarded_for;
 proxy_set_header X-Forwarded-Proto $scheme;
 proxy_set_header X-Real-IP $remote_addr;
 proxy_set_header Host $host;
 }
}

Save that file then you can restart nginx using:
service nginx restart
SaveNow, log into your DNS provider and point your new domain name at the public IP address of your loadbalancer node.
Configure WordPress
Now that we have database and file replication set up, and a load balancer, we can go about starting the 5-minute install of WordPress.
On node 1, connect to mysql using:
mysql -p (or just mysql if no root password)
Note: you’ll be asked for your password, so paste it in – right-click in putty is paste, and it’ll look like nothing happened because it’s a password field, but it does paste.
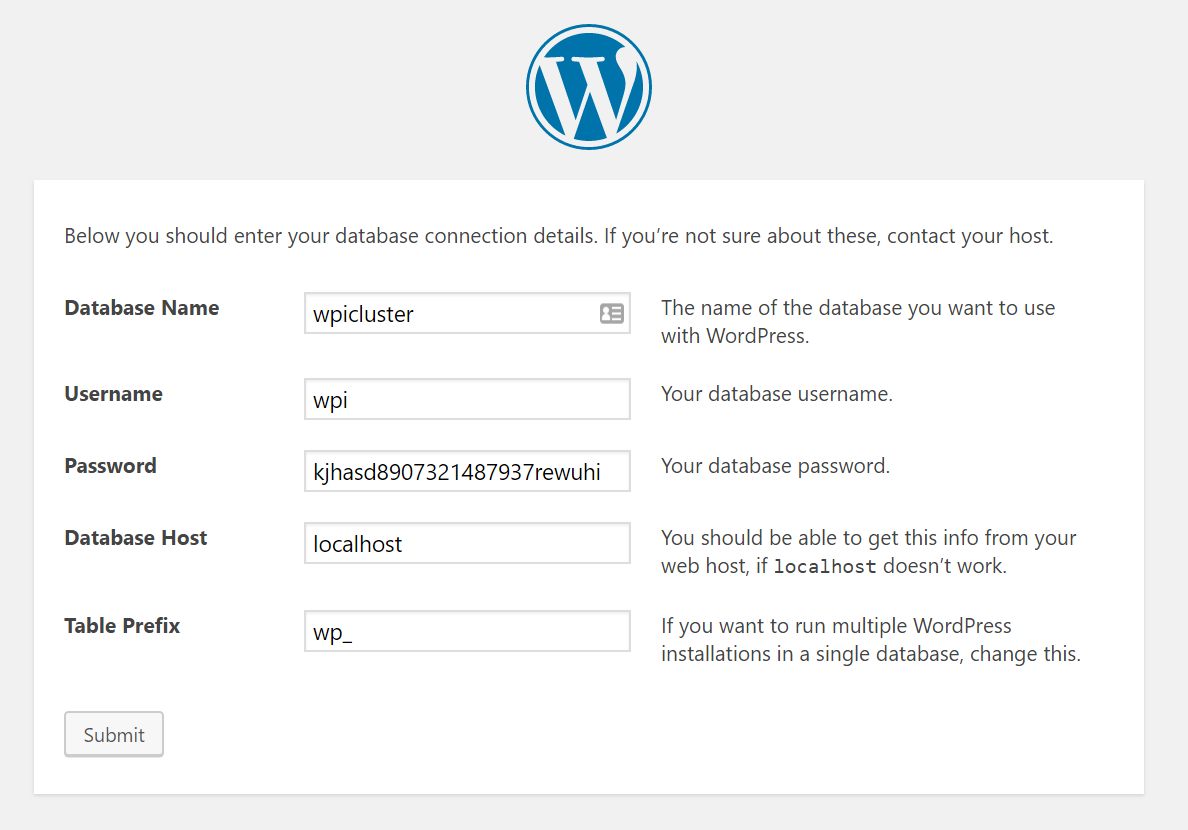
create database wpicluster;
grant all privileges on wpicluster.* to wpi@localhost identified by 'CHOOSEASTRONGPASSWORD';
Visit the URL you chose earlier for your loadbalancer, e.g. http://www.yourdomain.com.
Choose your language, then enter the database name: wpicluster, the username: wpi and the password you chose in the GRANT command above.
Set up WordPress Cron on only node 1
WP Cron is awful. It relies on users visiting your site in order to run scheduled tasks. In this case, we don’t even want scheduled jobs running on node 2 or 3, so we’ll disable wp cron across all nodes and then implement a real cron job on node 1.
On node 1, edit /var/www/wpicluster/wp-config.php. This file edit will replicate to your other nodes.
vi /var/www/wpicluster/wp-config.php
and insert the following lines somewhere:
define('WP_DISABLE_CRON', true);
if (strpos($_SERVER['HTTP_X_FORWARDED_PROTO'], 'https') !== false) {
 $_SERVER['HTTPS']='on';
}
Note: Only the first line is to disable WP_CRON. The rest is for later when we forward traffic from our load balancer and we want to ensure WordPress knows to server up static files over HTTPS if that was what the user requested.
If you’re struggling to figure out where to put this code, you can stick it after the define(‘DB_NAME’, ….); line.
This wp-config.php update will replicate out to the other nodes using GlusterFS, so you don’t need to modify this on the other nodes.
You should get a note telling you CONGRATULATIONS. It will also tell you the location the key files were saved to. Now edit the loadbalancer.conf file from earlier to set up SSL. (WordPress installation does not work well over SSL which is why we add SSL after installation)
vi /etc/nginx/conf.d/loadbalancer.conf
Uncomment the ssl_certificate (x2) and ssl_certificate_key (x2) lines and replace the path with the paths provided by the output from LetsEncrypt.
Also uncomment the line “return 301 https://$host$request_uri;”
service nginx restart
Once you have edited the loadbalancer.conf file and restarted nginx, you will have a working SSL certificate on your load balancer.
Note: At this point, if you access your website with https, some CSS will appear broken. There is one final stage we have to complete in order to fix this, which is almost the final step in the entire process.
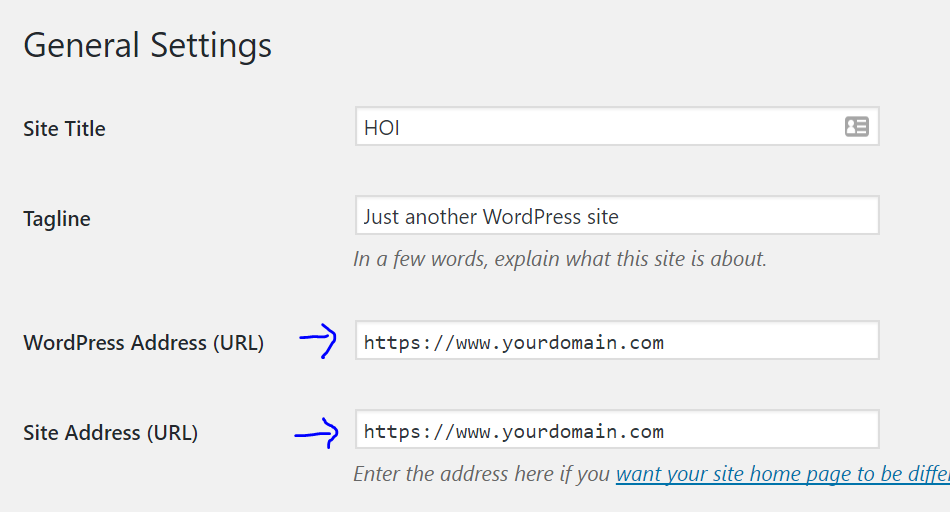
Update your Site URL in WordPress
Log into node1.yourdomain.com. Visit the WordPress dashboard, then Settings->General.
You will see 2 domain entries, both of which are probably currently tied to your node 1 subdomain, and both of which will be http instead of https.
Replace both of these entries with https://www.yourdomain.com.
Note: Here you enter the domain name you chose for your load balancer, normally www.yourdomain.com or similar.
If you didn’t already, edit your wp-config.php file on Node 1 and just below where you disabled WP_CRON, add the following lines:
if (strpos($_SERVER['HTTP_X_FORWARDED_PROTO'], 'https') !== false) {
  $_SERVER['HTTPS']='on';
}
The traffic is being served over https to your users, but because it’s plain http on each node (between your load balancer and your nodes), you need to make sure WordPress knows it’s HTTPS so any static files are correctly loaded over HTTPS.
Go forth and conquer!
That’s it, a mammoth task complete.
You can visit wp-admin from any server, but you can also force traffic to node 1 for your own admin purposes by visiting https://www.yourdomain.com:9443/wp-admin/. With the configuration above, node 1 is never serving traffic to front-end users, so you can run all kinds of admin jobs on there without impacting slowing down user traffic.
ISD ofron suport IT me staf të kualifikuar të gatshëm 24×7. Suporti ynë është i disponueshëm online, offline, remote, offsite dhe përmes manualeve të përdorimit dhe të administrimit. Suporti i ISD ofrohet në forma të ndryshme: të herëpashershëm, me kontratë të thjeshtë dhe me kontratë profesionale.